介绍
对于MyBatis中一些简单的单表操作,编写SQL语句是简单且重复的事情,非常繁琐的事情。
所以MyBatis-Plus出现了,提供对单表操作的支持,不再需要为单表操作编写Sql语句。
MyBatis-Plus是MyBatis的增强工具,只对Mybatis做增强,不做改变
特性
- 无侵入:只做增强、不做改变,引入MyBatis-Plus不会对现有的工程产生影响
- 强大的CRUD操作:内置通用 Mapper、通用 Service,仅仅通过少量配置即可实现单表大部分 CRUD 操作,更有强大的条件构造器,满足各类使用需求
- 支持多种主键自动生成策略
- 支持自定义全局通用操作
- 内置代码生成器:快速生成mapper、service、controller
- 内置分页插件
- 支持多种数据库
框架结构
MyBatisPlus的框架结构

MyBatisPlus会先扫描实体类,通过这个实体类就能找到数据库中的表,然后分析表字段,生成基本的单表的CRUD的Mapper
MP初体验
建表,注意id字段的类型是bigint,因为MP在插入时,会使用雪花算法来生成id值,所以表字段的类型应该是bigint。
- 建表并插入数据的sql语句
CREATE DATABASE `mybatis_plus`;
USE `mybatis_plus`;
CREATE TABLE `user` (
`id` BIGINT(20) NOT NULL COMMENT '主键ID',
`name` VARCHAR(30) DEFAULT NULL COMMENT '姓名',
`age` INT(11) DEFAULT NULL COMMENT '年龄',
`email` VARCHAR(50) DEFAULT NULL COMMENT '邮箱',
PRIMARY KEY (`id`)
) ENGINE=INNODB DEFAULT CHARSET=utf8;

INSERT INTO USER (id, NAME, age, email) VALUES
(1, 'Jone', 18, 'test1@baomidou.com'),
(2, 'Jack', 20, 'test2@baomidou.com'),
(3, 'Tom', 28, 'test3@baomidou.com'),
(4, 'Sandy', 21, 'test4@baomidou.com'),
(5, 'Billie', 24, 'test5@baomidou.com');- 创建SpringBoot项目


- 引入基础依赖:
- Lombok 为了简化实体类开发
- MySQL驱动
- MyBatisPlus的starter依赖
<dependency>
            <groupId>org.springframework.boot</groupId>
            <artifactId>spring-boot-starter</artifactId>
        </dependency>

        <dependency>
            <groupId>org.springframework.boot</groupId>
            <artifactId>spring-boot-starter-test</artifactId>
            <scope>test</scope>
        </dependency>

        <dependency>
            <groupId>com.mysql</groupId>
            <artifactId>mysql-connector-j</artifactId>
        </dependency>

        <dependency>
            <groupId>org.projectlombok</groupId>
            <artifactId>lombok</artifactId>
            <optional>true</optional>
        </dependency>

        <dependency>
            <groupId>com.baomidou</groupId>
            <artifactId>mybatis-plus-boot-starter</artifactId>
            <version>3.5.3.1</version>
        </dependency>


        <dependency>
            <groupId>com.alibaba</groupId>
            <artifactId>druid-spring-boot-starter</artifactId>
            <version>1.2.18</version>
</dependency>- 编写SpringBoot配置文件
spring:
  datasource:
    driver-class-name: com.mysql.cj.jdbc.Driver
    username: root
    password: root
    url: jdbc:mysql://localhost:3306/mybatis_plus
type: com.alibaba.druid.pool.DruidDataSource- User类:表中是bigint,所以实体类就要用Long
@Data
@AllArgsConstructor
public class User {

    private Long id;

    private String name;

    private Integer age;

    private String email;

}- 自定义Mapper,只需要继承MyBatisPlus中提供的BaseMapper,并指定操作的泛型
package com.liumingkai.mapper;

import com.baomidou.mybatisplus.core.mapper.BaseMapper;
import com.liumingkai.domain.User;

public interface UserMapper extends BaseMapper<User> {
}- 在SpringBoot的启动类上添加MapperScan注解
@SpringBootApplication
@MapperScan("com.liumingkai.mapper")
public class MyBaitsPlusTestApplication {

    public static void main(String[] args) {
        SpringApplication.run(MyBaitsPlusTestApplication.class, args);
    }

}- 测试
package com.liumingkai;

import com.liumingkai.domain.User;
import com.liumingkai.mapper.UserMapper;
import org.junit.jupiter.api.Test;
import org.springframework.beans.factory.annotation.Autowired;
import org.springframework.boot.test.context.SpringBootTest;

import java.util.List;
import java.util.function.Consumer;

@SpringBootTest
class MyBaitsPlusTestApplicationTests {

    @Autowired
    private UserMapper userMapper;


    @Test
    public void testSelectList(){
        // 通过条件构造器查询一个List集合
        // 若没有条件,则可以设置null
        List<User> users = userMapper.selectList(null);
        users.forEach(System.out::println);
    }

}
至此,MyBatisPlus的基本功能就体验完了
补充
如果想要看到MybatisPlus生成的SQL语句,只需要配置一下MP的日志即可,打开MP的日志
mybatis-plus:
  configuration:
    log-impl: org.apache.ibatis.logging.stdout.StdOutImpl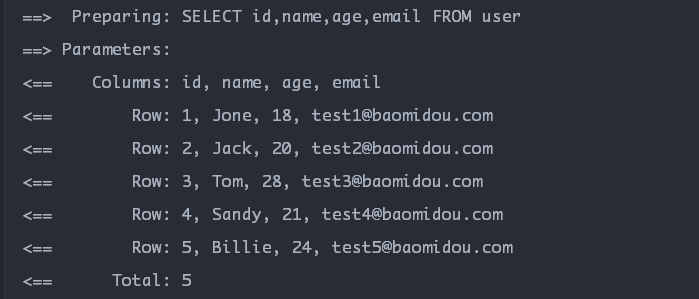
基础使用
我们自定义的Mapper接口继承了BaseMapper接口,因此可以使用BaseMapper中提供的方法。
来看一下BaseMapper中提供的方法有哪些
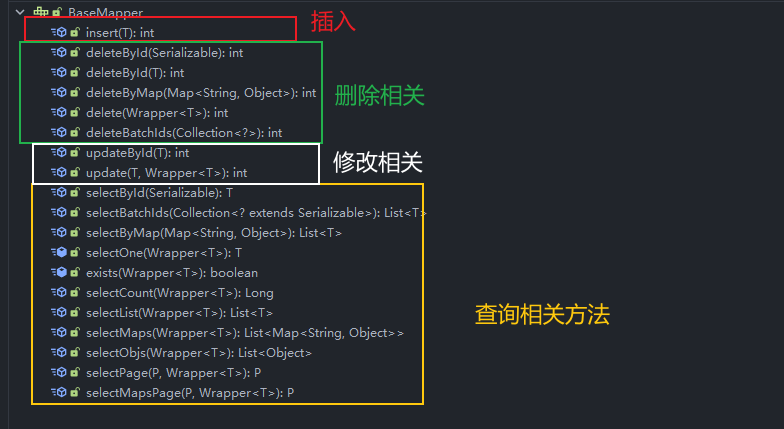
先来看关于基本的CRUD的使用,关于条件构造器Wrapper的使用,后面单独说
下面这些基本使用,都不是关于Wrapper的,
插入insert
先来看插入方法,在BaseMapper中,只有一个插入相关的方法insert(),该方法的参数是一个泛型的实体类对象
@Test
public void testInsert(){
    User user = new User();
    user.setAge(21);
    user.setName("KK");
    user.setEmail("182@gmail.com");
    userMapper.insert(user);
}

insert()方法会有一个返回值,代表数据库表受影响的行数
通过这个实体类的对象,就可以拿到自动生成的id了
MP默认会通过雪花算法来自动生成id值,这个id值是一个无规律的long类型的,所以要保证数据库id字段的类型是bigint,实体类的类型是Long
@Test
    public void testInsert(){
        User user = new User();
        user.setAge(18);
        user.setName("zhangsan");
        user.setEmail("182@gmail.com");
        int lines = userMapper.insert(user);
        System.out.println(lines);
//        1
        // 获取生成的id
        System.out.println(user.getId());
//        1659451611275132930
    }
删除delete
在BaseMapper中,提供了5个与删除相关的方法
// 根据id删除
int deleteById(Serializable id);

// 根据实体类实例删除
int deleteById(T entity);

// 根据map条件删除
int deleteByMap(@Param("cm") Map<String, Object> columnMap);

// 根据wrapper条件构造器删除
int delete(@Param("ew") Wrapper<T> queryWrapper);

// 批量删除,给出id的集合
int deleteBatchIds(@Param("coll") Collection<?> idList);- 测试一下最普通的通过id来生成
@Test
public void testDeleteById() {
    int lines = userMapper.deleteById(1659451611275132930L);
    System.out.println("受影响的记录数是" + lines);
}
- 测试通过map来删除
@Test
    public void testDeleteByMap(){
        HashMap<String, Object> map = new HashMap<>();
        // 删除name是Jack
        // 且 age是20 的 记录
        map.put("name","Jack");
        map.put("age",20);
        int lines = userMapper.deleteByMap(map);
        System.out.println("受影响的行数是" + lines);
    }
- 测试批量删除
@Test
    public void testDeleteBatch(){
        int lines = userMapper.deleteBatchIds(Arrays.asList(1, 2, 3));
        System.out.println("受影响的行数是" + lines);
    }
修改update
BaseMapper中与update相关的方法只有两个
int updateById(@Param("et") T entity);

int update(@Param("et") T entity, @Param("ew") Wrapper<T> updateWrapper);
测试按照实体类来修改
@Test
    public void testUpdate(){
        User user = new User();
        user.setId(1659459173198348290L);
        user.setAge(25);
        user.setEmail("mybatis@gmail.com");
        int lines = userMapper.updateById(user);
    }
MP中的修改,只会对指定的字段修改,没有给出的字段值,是不会修改的
查询Query
BaseMapper中关于查询的方法是最多的
// 根据id查询
T selectById(Serializable id);
// 根据id批量查询
List<T> selectBatchIds(@Param("coll") Collection<? extends Serializable> idList);
// 根据map条件查询
List<T> selectByMap(@Param("cm") Map<String, Object> columnMap);
// 查询一条记录
default T selectOne(@Param("ew") Wrapper<T> queryWrapper) ;
// 查询记录条数
Long selectCount(@Param("ew") Wrapper<T> queryWrapper);

// 根据条件构造器查询List集合
List<T> selectList(@Param("ew") Wrapper<T> queryWrapper);

// 根据条件构造器查询Map
List<Map<String, Object>> selectMaps(@Param("ew") Wrapper<T> queryWrapper);

List<Object> selectObjs(@Param("ew") Wrapper<T> queryWrapper);

<P extends IPage<T>> P selectPage(P page, @Param("ew") Wrapper<T> queryWrapper);

<P extends IPage<Map<String, Object>>> P selectMapsPage(P page, @Param("ew") Wrapper<T> queryWrapper);
测试最基础的根据id查询
@Test
    public void testQuery(){
        User user = userMapper.selectById(5L);
        System.out.println(user);
    }
批量查询
@Test
    public void selectByIdBatch(){
        List<User> users = userMapper.selectBatchIds(Arrays.asList(4, 5));
        users.forEach(System.out::println);
    }
Map条件查询
@Test
    public void testSelectByMap(){
        HashMap<String, Object> map = new HashMap<>();
        // 查询姓名为KK, age为21的人
        map.put("name","KK");
        map.put("age",21);
        List<User> users = userMapper.selectByMap(map);
        users.forEach(System.out::println);
    }
自定义功能
MP只提供了单表操作,实际开发中肯定是不能满足需求的。
因为很多业务需要做到多表联查。
前面说过,MP只做增强,不做修改,所以我们在普通的MyBatis中怎么用的,现在还是怎么用就可以
如果说我们需要在mapper.xml中写sql,那么就需要在配置文件中给出mapper.xml文件所在的地址。
但是MyBatisPlus中默认有这个地址

MP默认的这个mapper.xml的地址就是classpath:/mapper/**/*.xml
所以我们可以在resources目录下创建一个mapper目录来存饭mapper.xml文件,当然也可以修改mapper.xml文件的位置
比如说,我们需要查询并返回一个Map,我们自己写的话,只需要
- 在Mapper接口中给出方法
public interface UserMapper extends BaseMapper<User> {

    Map<String,Object> selectMapById(@Param("id") Long id);

}- 在
UserMapper.xml中给出sql语句
<?xml version="1.0" encoding="UTF-8" ?>
<!DOCTYPE mapper
        PUBLIC "-//mybatis.org//DTD Mapper 3.0//EN"
        "https://mybatis.org/dtd/mybatis-3-mapper.dtd">
<mapper namespace="com.liumingkai.mapper.UserMapper">
<!--
    Map<String,Object> selectMapById(@Param("id") Long id);
-->
    <select id="selectMapById" resultType="map">
        select name, age, email from user where id = #{id}
    </select>

</mapper>- 测试一下
@Test
    public void testCustomeFunction(){
        Map<String, Object> userMap = userMapper.selectMapById(4L);
        System.out.println(userMap);
    }
通用Service接口
介绍
MyBatisPlus不仅提供了通用的DAO层的Mapper,还提供了Service的通用的Service
我们可以通过继承BaseMapper来调用通过Mapper中的方法
同样,我们也可以通过继承其提供的Service接口,来调用通用Service中的方法
官网中这样说的

MP将Service层的CRUD封装到了IService接口,为了与Mapper层的方法名作区分,通用Service中的方法命名是以
get查询单条remve删除list查询集合page分页
来作为方法前缀的
MP中,IService一个Service层的顶级接口,MP中也给出了默认的实现类ServiceImpl


分析
因为Service层的是更注重业务逻辑的,所以显然MP中默认提供的这个IService接口的实现类ServiceImpl是无法满足我们的需求的
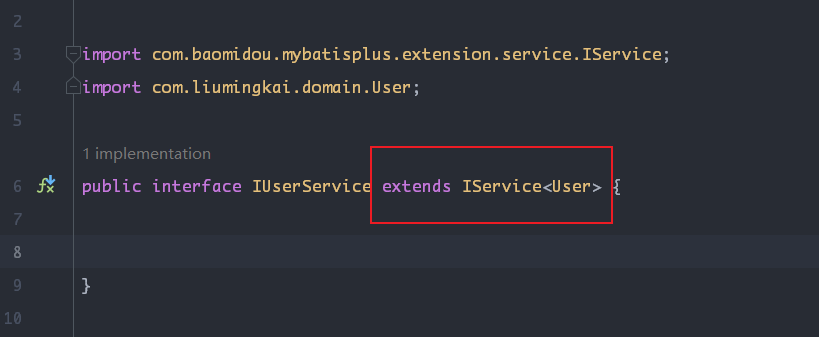
因此,我们的Service层接口可以继承IService接口来实现我们自己的Service
但是如果我们自定义接口的实现类需要实现自定义接口,那么同样就需要重写IService接口中的方法,因此,我们可以让Service的实现类去继承MP中提供的ServiceImpl,然后可以在此基础上自定义功能、方法
关于IService的泛型:就是我们实体类的泛型
关于ServiceImpl的泛型:
- 第一个是BaseMapper的泛型
- 第二个是实体类的泛型
- 自定义Service层接口
package com.liumingkai.service;

import com.baomidou.mybatisplus.extension.service.IService;
import com.liumingkai.domain.User;

public interface IUserService extends IService<User> {


}
- 实现类
package com.liumingkai.service.impl;

import com.baomidou.mybatisplus.extension.service.impl.ServiceImpl;
import com.liumingkai.domain.User;
import com.liumingkai.mapper.UserMapper;
import com.liumingkai.service.IUserService;
import org.springframework.stereotype.Service;

@Service
public class UserServiceImpl extends ServiceImpl<UserMapper, User> implements IUserService {
}
这样,我们既可以使用通用Service的功能,也可以使用自定义的功能
我们前面了解了通用Mapper中的方法,现在这个通用Servcie中的方法,也可以通过方法名来直接知道其作用
只不过为了区分Mapper中的方法,修改了方法前缀:
get查询单条remve删除list查询集合page分页save新增或修改
来演示两个通用Service中的方法
- 查询记录数
package com.liumingkai;

import com.liumingkai.service.IUserService;
import org.junit.jupiter.api.Test;
import org.springframework.beans.factory.annotation.Autowired;
import org.springframework.boot.test.context.SpringBootTest;

@SpringBootTest
public class MPServiceTest {

    @Autowired
    IUserService userService;

    @Test
    public void testGetCount(){
        long counts = userService.count();
        System.out.println(counts);
    }

}
- 批量添加
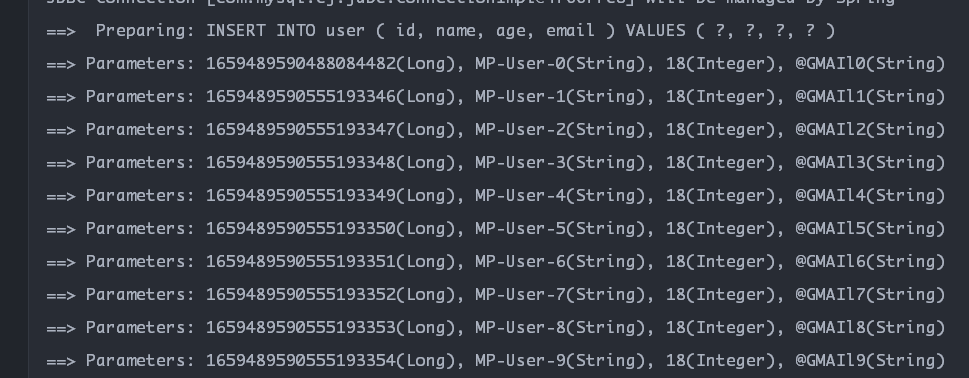
我们在刚才的BaseMapper中发现,BaseMapper中关于新增的方法只有一个insert(),是无法实现批量插入的。
MP将批量添加的方法放在了通用Service层,为了避免在Mapper层编写大量的sql语句,同时能在数据插入前做一些前置处理。
@Test
    public void testInsertBatch(){
        System.out.println(userService.getClass());
        List<User> list = new ArrayList<>();
        for(int i = 0;i < 10; i ++){
            User user = new User();
            user.setAge(18);
            user.setEmail("@GMAIl" + i );
            user.setName("MP-User-" +i);
            list.add(user);
        }

        System.out.println(userService.saveBatch(list));
    }
MP常用注解
表名与实体类名称不一致的问题
在MP中,具体Mapper操作的表是由对应的实体类来决定的。
上面的案例中,我们的实体类是User,表格名是user,实体类与表格能对应上,所以能够通过实体类来找到表
在数据库规范中,我们的表名称一般都是t_或tb_开头,显然与Java中实体类是对应不上的
如果数据库的表与实体类的名称不一致,可以有两种方式来解决
- 在实体类上使用@TableName来标注表格的名称
@Data
@TableName("tb_user")
public class User {

    private Long id;

    private String name;

    private Integer age;

    private String email;

}- 全局配置,如果项目中的实体类非常多,而且对应的表格也非常多,这些表格的前缀都是统一的,则此时可以使用全局配置来统一配置所有实体类对应表格的前缀
mybatis-plus:
  configuration:
    log-impl: org.apache.ibatis.logging.stdout.StdOutImpl
  global-config:
    db-config:
      table-prefix: "tb_"
实体类中不需要@TableName注解了
@Data
public class User {

    private Long id;

    private String name;

    private Integer age;

    private String email;

}
@TableId
MP在插入时,默认使用名称为id的字段名作为表的主键。
再说一遍,MP是根据实体类去找数据库中的表,扫描实体类的属性名,对应找到同名的字段名。
默认将实体类中的属性名叫
id的属性作为主键,去表中找有没有叫id的字段。
如果类的属性名不是叫做id,此时MP就找不到实体类的主键名称,因此也无法找到表的id字段名称。
例如,实体类的对应的主键字段的属性名是uid,表的主键字段的名称也叫uid
此时可以使用@TableId来标识实体类中的主键
public class User {

    @TableId
    private Long uid;

    private String name;

    private Integer age;

    private String email;

}
如果实体类主键的属性名与表的逐渐名称不一致,可以指定@TableId的value属性为表主键名称
比如,实体类主键属性名为id,表字段主键名称是uid,
public class User {

    @TableId("uid")
    private Long id;

    private String name;

    private Integer age;

    private String email;

}
前面说过,在插入时,如果不指定主键值,那么MP默认通过雪花算法来生成主键值,但是我们也可以改变MP的主键值生成策略
通过@TableId的type属性
@Test
    public void testInsert() {
        User user = new User();
        // 给出了主键值,则不会通过雪花算法来生成id值
        user.setId(123L);
        user.setAge(18);
        user.setName("Marry");
        user.setEmail("182@gmail.com");
        int lines = userMapper.insert(user);
        System.out.println(lines);
        System.out.println(user.getId());
    }
@TableId的type属性值是一个枚举类型,可以查看此枚举类中的值
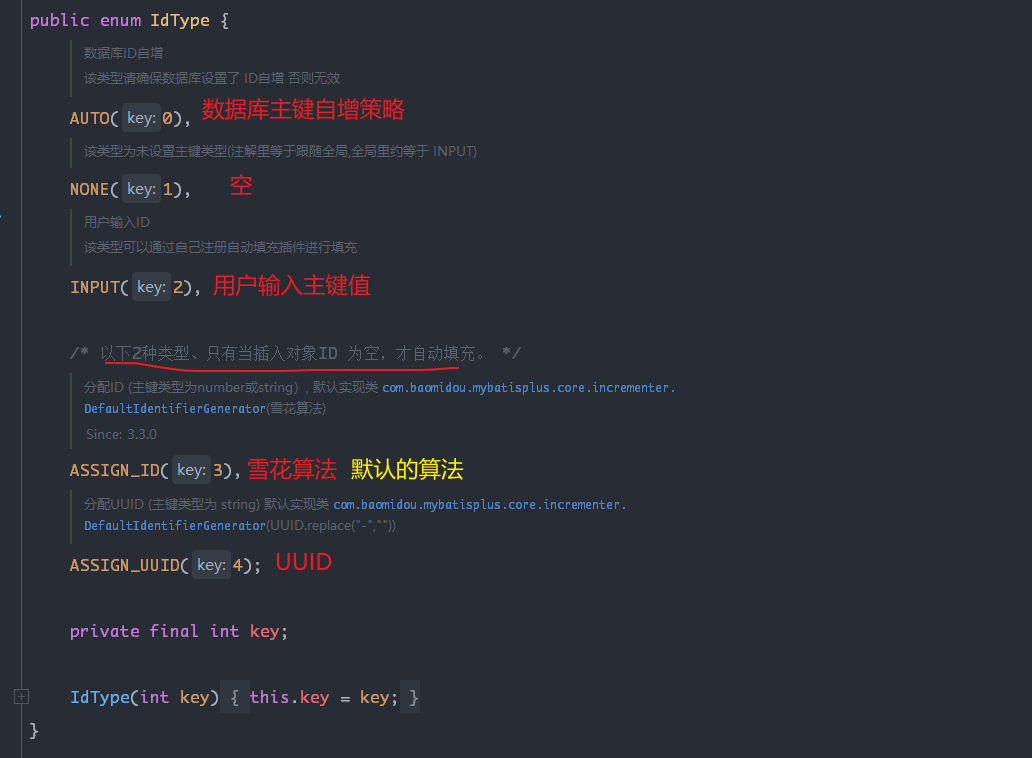
例如,修改主键的生成策略为数据库的逐渐自增
public class User {

    @TableId(value = "uid",type = IdType.AUTO)
    private Long id;

    private String name;

    private Integer age;

    private String email;

}
全局配置主键生成策略
配置所有的实体类的主键值的生成策略
在配置文件中修改
mybatis-plus:
  configuration:
    log-impl: org.apache.ibatis.logging.stdout.StdOutImpl
  global-config:
    db-config:
      table-prefix: "tb_"
      id-type: auto # 配置全局主键生成策略
@TableField
在MP中,如果我们的实体类的属性名使用了小驼峰命名规范,那么MP在对应表中的字段名称时,就会自动将小驼峰转换为下划线
即使你的实体类属性命名与表字段名相同,都是userName,那么MP默认在查找表字段属性时,也会将属性名userName转换成下划线user_name去找,然后就会报错,找不到对应的column
还有一种情况,如果实体类属性名与表字段名不一致,也会导致报错,找不到对应的column
那么此时可以使用@TableField注解来标注,实体类中属性名与表字段的映射关系。
比如说,属性名是name,表字段名称是user_name
public class User {

    @TableId(value = "uid",type = IdType.AUTO)
    private Long id;

    @TableField("user_name")
    private String name;

    private Integer age;

    private String email;

}
雪花算法
当数据量庞大时,在一张表中存储大量的数据会严重影响查询性能,增大数据库压力。
因此,目前数据库扩展方式主要包括:
- 业务分库
- 主从复制
- 数据库分表
数据库分表
将不同的业务数据分散到不同的数据库服务器,能够支撑百万甚至千万用户规模的业务,但如果业务继续发展,同一个业务的单表数据也会达到单台数据库服务的性能瓶颈。
因此需要对单表数据进行拆分,
单标拆分的两种方式:
- 垂直分表
- 水平分表
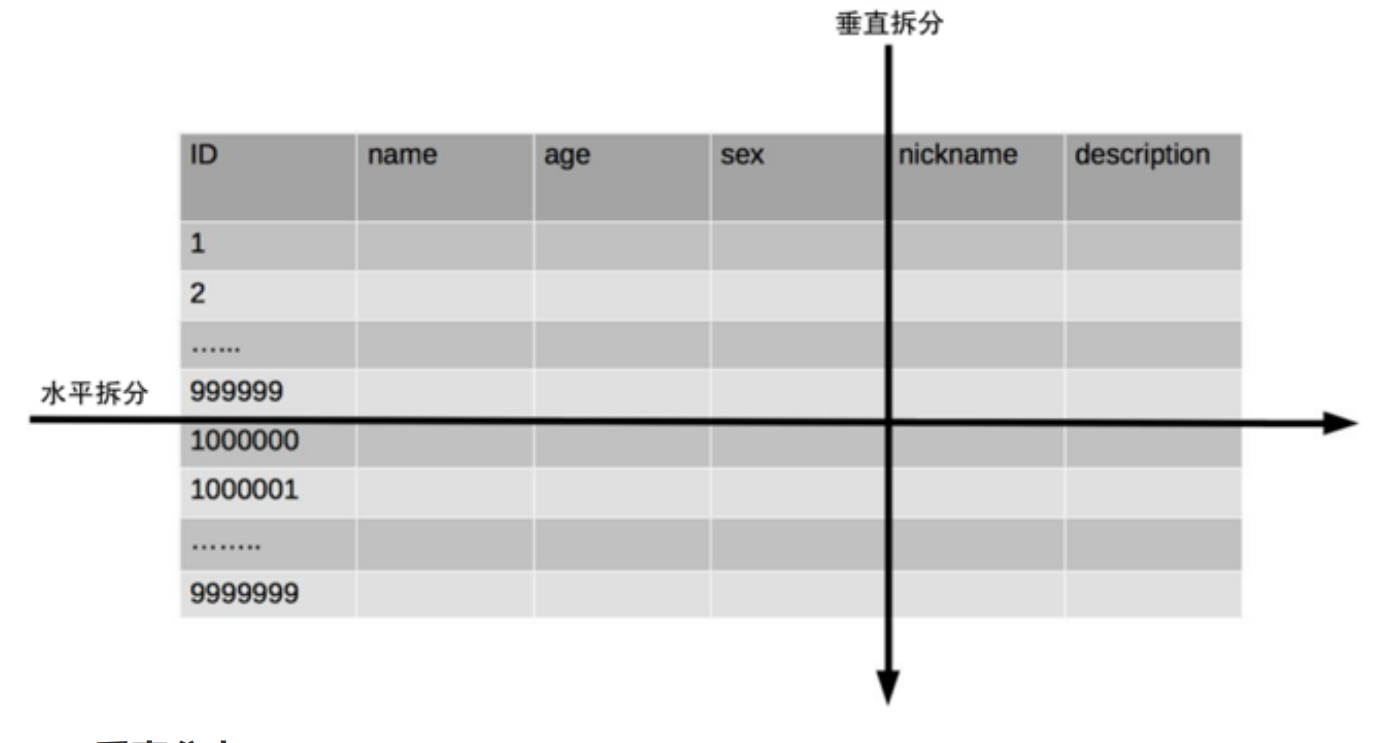
垂直分表
将表中某些不常用且占用了大量空间的列拆分出去
例如,用户表中的nickname和description字段,这两个字段的数据占用大量的空间,而且这两个字段对于业务影响不大,所以可以在用户表中将这两个字段拆分出去,用户表的体积就会大大缩小,提升查询性能。
水平分表
水平分表适合行数据特别大的表,有的公司要求单表数据超过5000万行就需要进行分表。
将行数据分到不同的表中,水平分表比垂直分表,会引入更多的复杂性操作。
如何保证不同表中的id字段也是不重复的呢?
主键自增
可以设置第一个表的数据的主键值是1~~9999,第二个表的第一行记录的主键值从10000开始。
这样两个表分别自增,就不会重复。
分析:
分段大小的选取,如果分段选的太小,就会导致拆分后的子表数量太多,增加维护的难度。
如果分段选的太大,仍然会存在单表性能问题。
优点:
可以随着数据的增加,平滑地扩充新的表。
缺点:
数据分布不均匀,假如分段是1000万,有可能存在一个表存储的数据量是1000万,另一个表的实际存储的数据量只有1条或者少量。
取模
对主键值进行取模,余数相同的放到一张表中。
这样的优点就是数据分布均匀了
但是缺点就是:扩充新的表时,还需要将所有的数据重新取模运算,扩充新表困难。
**分析:**初始的表的数量是确定的,就是一共有几张表。表数量太多维护困难,表数量太小就会导致单表数据量过大,会存在单表性能问题。
雪花算法
雪花算法是Twitter公布的分布式主键生成策略
能够保证不同表的主键的不重复性,已经相同表的主键有序性
核心思想:
根据long类型的64位来设计


● 第一个部分:1个bit,无意义,固定为0。二进制中最高位是符号位,1表示负数,0表示正数。ID都是正整数,所以固定为0。 ● 第二个部分:41个bit,表示时间戳,精确到毫秒,可以使用69年。时间戳带有自增属性。 ● 第三个部分:10个bit,表示10位的机器标识,最多支持1024个节点。此部分也可拆分成5位datacenterId和5位workerId,datacenterId表示数据中心/机房ID,workerId表示机器ID。 ● 第四部分:12个bit,表示序列化,即一些列的自增ID,可以支持同一节点同一毫秒生成最多4095个ID序号。 由于在Java中64bit的整数是long类型,所以在Java中SnowFlake算法生成的id就是long来存储的。
优点:整体上按照时间自增排序,并且整个分布式系统内不会发生id碰撞,效率较高
@TableLogic
逻辑删除
首先数据库表要有表示逻辑删除的字段

对应的实体类也要有逻辑删除属性,
使用@TableLogic来标注此属性是逻辑删除的字段
public class User {

    @TableId(value = "uid",type = IdType.AUTO)
    private Long id;

    @TableField("user_name")
    private String name;

    private Integer age;

    private String email;

    @TableLogic
    private Integer isDeleted;
}
接下来,我们进行删除操作时,MP就会将逻辑删除字段进行修改
@Test
    public void testDeleteById() {
        int lines = userMapper.deleteById(4L);
        System.out.println("受影响的记录数是" + lines);
    }
同样,进行查询操作时,MP也会自动筛选逻辑删除的字段
User user = userMapper.selectById(5L);
        System.out.println(user);
MP会默认将逻辑删除字段的值0认为是未删除,1认为是已删除
通过查看@TableLogic,我们也可以对这两个默认值进行修改

比如说,我现在是1表示未删除,0表示已删除

此时再查询,会发现SQL语句中逻辑删除字段的值也会自动修改为我们规定的

条件构造器
条件构造器就是用来封装各种条件的
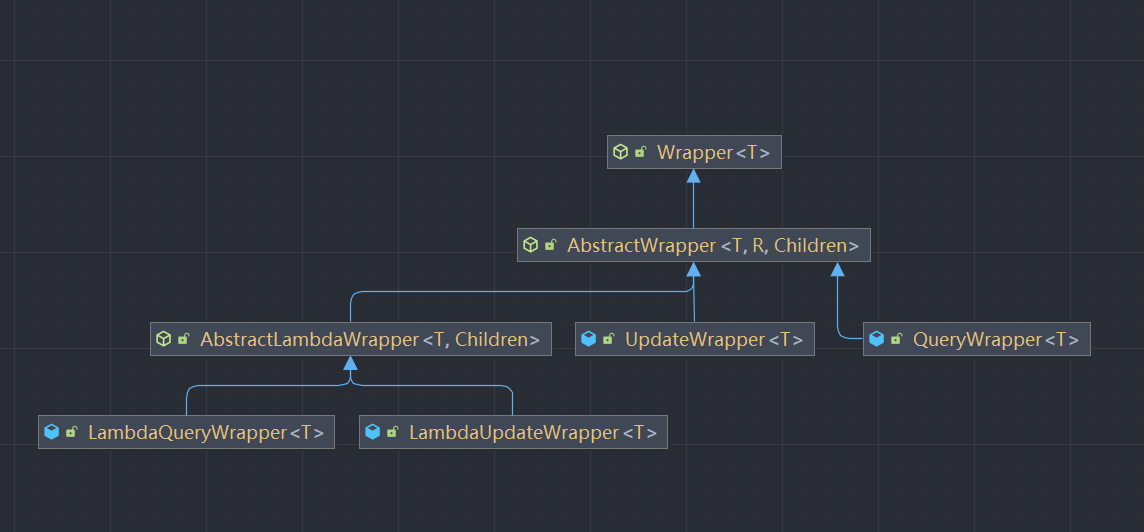
- Wrapper : 条件构造抽象类,最顶端父类
- AbstractWrapper : 用于查询条件封装,生成 sql 的 where 条件
- QueryWrapper : 查询条件封装
- UpdateWrapper : Update 条件封装
- AbstractLambdaWrapper : 使用Lambda 语法
- LambdaQueryWrapper :用于Lambda语法使用的查询Wrapper
- LambdaUpdateWrapper : Lambda 更新封装Wrapper
- AbstractWrapper : 用于查询条件封装,生成 sql 的 where 条件
QueryWrapper
普通条件
常用方法:
- le()小于等于
- ge()大于等于
- between() 范围,结合了be()和ge()
- like()模糊查询
这些方法都能做到见名知意
Wrapper中方法的名称,基本上都有SQL中的关键字有关联
比如说,SQL中模糊查询的关键字是like,则在wrapper中方法的名称就是like()
@Test
public void testQuery(){
    QueryWrapper<User> wrapper = new QueryWrapper<>();
    // 查询年龄在在20~ 25之间的,email不为null的, 名字中带有 a的

    wrapper.like("user_name", "a")
        .between("age", 20, 25)
        .isNotNull("email");

    //
    List<User> users = userMapper.selectList(wrapper);
    users.forEach(System.out::println);
}
排序条件
SQL中排序的关键字是order by ,所以在Wrapper中的方法的名称是orderBy()

QueryWrapper<User> wrapper = new QueryWrapper<>();
// 根据age降序排序,如果age相同,则按照id进行升序
wrapper.orderByAsc("age")
    .orderByDesc("uid");
List<User> users = userMapper.selectList(wrapper);
users.forEach(System.out::println);
删除

@Test
    public void testDelete() {
        QueryWrapper<User> wrapper = new QueryWrapper<>();
        // 删除name中以MP-User开头的人
        wrapper.likeRight("user_name", "MP-User");

        int lines = userMapper.delete(wrapper);
        System.out.println("受影响的行数是" + lines);
    }
修改
BaseMapper中删除的方法的参数也是一个QueryMapper
QueryWrapper<User> wrapper = new QueryWrapper<>();
// 将 ( nage为Marry并且age小于20 ) 或 email 为null 的记录
// name修改为"小明", email 修改为 “123@163.com"
wrapper.eq("user_name", "Marry")
    .lt("age", 20)
    .or()
    .isNull("email");
// 要修改的数据
User user = new User();
user.setUserName("小明");
user.setEmail("123@163.com");
int lines = userMapper.update(user, wrapper);
System.out.println("受影响的行数是" + lines);
组合条件的优先级
条件之间是利用and()和or()来进行连接的,默认是and进行连接
现在有这么一个需求
// 修改name中包含a 并且 ( age > 20  或 email为 null) 的记录
// sql中的条件是这样的
// name like "%a%" and (age > 20 or email is null)
应该怎样来构造QueryWrapper?下面这种方法是不对的
wrapper.like("user_name","a")
                .gt("age",20)
                .or()
                .isNull("email");
// 这样组装出来的条件相当于
// name like "%a%" and age > 20 or email is null
此时就可以使用and()方法来改变优先级了

and()方法的参数是一个Consumer接口类型,也就是Lambda表达式中常用的消费者类型,
这个Consumer中的泛型就是QueryWrapper类型的,在Consumer中继续为本Wrapper添加条件。
这个and()方法就相当于给其中的条件加了一个括号,or()方法也是可以这样用的。
wrapper.like("user_name","a")
    .and(new Consumer<QueryWrapper<User>>() {
        @Override
        public void accept(QueryWrapper<User> userQueryWrapper) {
            userQueryWrapper.gt("age",20)
                .or()
                .isNull("email");
        }
    });
利用Lambda表达式简化后
wrapper.like("user_name","a")
    .and(userQueryWrapper -> userQueryWrapper.gt("age",20)
         .or()
         .isNull("email"));
组装select字段部分
如果想要只查询一部分字段,而不是全部字段
则可以使用QueryWrapper中的select()方法
QueryWrapper<User> wrapper = new QueryWrapper<>();
// 查询name、age、email字段
wrapper.select("user_name","age","email");
// 因为结果集中不是User实例了,所以要选择Map,用来映射目标字段和值
// 用selectList()方法也可以,只不过实体类中的其他字段映射不上
List<Map<String, Object>> maps = userMapper.selectMaps(wrapper);
maps.forEach(System.out::println);
子查询
通过条件构造器来实现子查询的功能
举个例子,只是为了说子查询这件事
查询uid小于100的人的信息
select * from tb_user where uid in (
	select uid from tb_user wehre uid < 100
)
在MP中如何设置呢?
如果想要实现一个功能,先想sql中的关键字,然后在mp中找有这个关键字的方法,基本就是了

QueryWrapper<User> wrapper = new QueryWrapper<>();
        // 第一个参数是字段
        // 第二个参数是子查询的sql语句
        wrapper.inSql("uid","select uid from tb_user where uid < 100");

        List<User> users = userMapper.selectList(wrapper);
        users.forEach(System.out::println);
使用condition来组装参数
用户在筛选时,我们一般都是根据前台传过来的条件,对条件进行判断,然后进行组装,像这样:
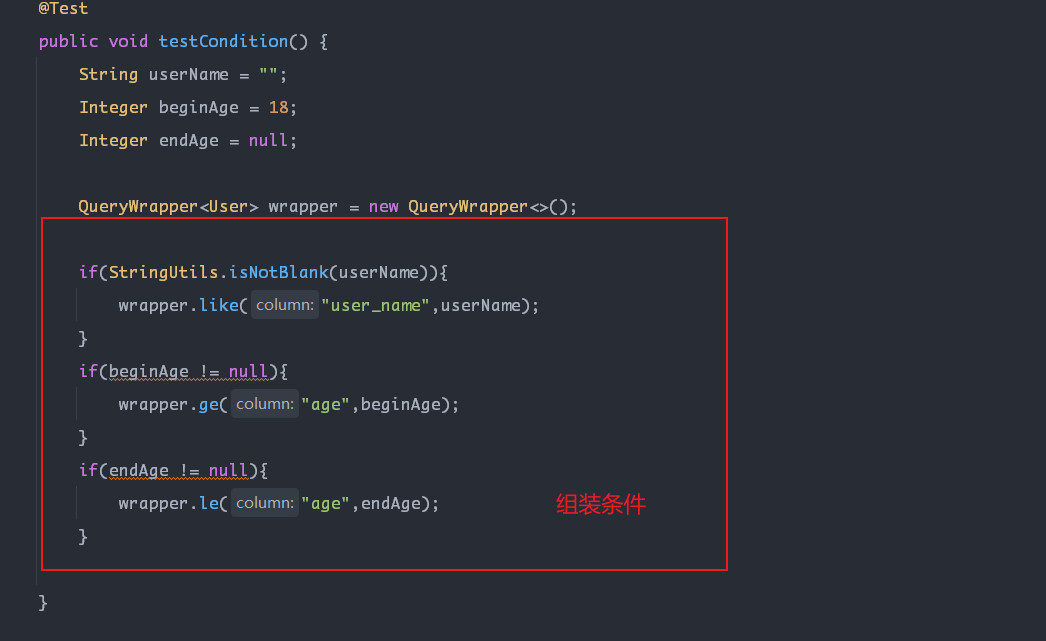
在Wrapper中的每一个方法,会发现都有一个重载,第一个参数是一个boolean类型的condition。

意思是只有当condition为true时,才会组装条件,如果为false,则改条件不会组装进入sql语句中。
利用这个condition参数,我们就能避免繁琐的if判断了
// 模拟用户的条件
String userName = "";
Integer beginAge = 18;
Integer endAge = null;

QueryWrapper<User> wrapper = new QueryWrapper<>();

wrapper.like(StringUtils.isNotBlank(userName),"user_name",userName)
    .ge(beginAge!=null,"age",beginAge)
    .le(endAge != null, "age",endAge);
UpdateWrapper
如何利用UpdateWrapper来实现修改呢?
UpdateWrapper与QueryWrapper有什么区别?
UpdateWrapper中有set()这个方法,可以直接设置要修改的字段和值,不需要借助实体类
UpdateWrapper更适用于update操作
UpdateWrapper与QueryWrapper的使用基本一致
UpdateWrapper<User> wrapper = new UpdateWrapper<>();
// 修改name中包含a 并且 ( age > 20  或 email为 null) 的记录
// name修改为"小明", email 修改为 “123@163.com"
wrapper.like("user_name", "a")
    .and(x -> x.gt("age", 20).isNull("email"));
wrapper.set("user_name","小明").set("email","123@163.com");
userMapper.update(null, wrapper);
LambdaQueryWrapper
前面提到的QueryWrapper和UpdateWrapper,我们都是直接将要操作的表的字段名给出。
对于字段名的书写容易出错,而且这样也存在硬编码的问题。
因此LambdaQueryWrapper出现了,利用JDK8中新增的Lambda表达式,通过实体类来获取要操作的表字段名。
LambdaQueryWrapper对于QueryWrapper基本没有变化,只是将QueryWrapper中的对应字段的参数换成了一个函数式接口来使用Lambda表达式

使用
LambdaQueryWrapper<User> queryWrapper = new LambdaQueryWrapper<>();
queryWrapper.like(User::getUserName,"a")
    .le(User::getAge,25)
    .ge(User::getAge,18);

List<User> users = userMapper.selectList(queryWrapper);
users.forEach(System.out::println);
LambdaUpdateWrapper
LambdaUpdateWrapper与UpdateWrapper相比,方法上基本没有变化,也是,把UpdateWrapper中对应字段的参数修改为了函数式接口类型。
LambdaUpdateWrapper<User> updateWrapper = new LambdaUpdateWrapper<>();
updateWrapper.like(User::getUserName,"a")
    .ge(User::getAge,18)
    .le(User::getAge,25);
updateWrapper.set(User::getUserName,"小明")
    .set(User::getEmail,"@qq.com");
userMapper.update(null,updateWrapper);
MP中的插件
分页插件
MP中自带分页插件,只要简单配置就可以。
配置分页插件
我们需要提供一个配置类,将Bean提供出去。
package com.liumingkai.config;

import com.baomidou.mybatisplus.annotation.DbType;
import com.baomidou.mybatisplus.extension.plugins.MybatisPlusInterceptor;
import com.baomidou.mybatisplus.extension.plugins.inner.PaginationInnerInterceptor;
import org.mybatis.spring.annotation.MapperScan;
import org.springframework.context.annotation.Bean;
import org.springframework.context.annotation.Configuration;

/**
 * 既然有了MP的配置类,那么我们把包扫描就写在这吧
 */
@Configuration
@MapperScan("com.liumingkai.mapper")
public class MyBatisPlusConfig {

    @Bean
    public MybatisPlusInterceptor mybatisPlusInterceptor() {
        MybatisPlusInterceptor mybatisPlusInterceptor = new MybatisPlusInterceptor();

        // 创建分页拦截器
        // 需要指定要操作的数据库类型
        // 因为不同的数据库, 操作是不同的,在MySQL中分页是使用的limit关键字
        PaginationInnerInterceptor paginationInnerInterceptor = new PaginationInnerInterceptor(DbType.MYSQL);
        // 将分页拦截器配置进去
        mybatisPlusInterceptor.addInnerInterceptor(paginationInnerInterceptor);
        return mybatisPlusInterceptor;
    }

}
使用分页功能
在BaseMapper中有对应的分页查询的方法名带有Page这个单词。

分页查询的两个参数:
- 第一个参数是Page类型的页对象
- 第二个是条件构造器
// 分页的原理
// limit index,pageSize
// index = (pageNum - 1) * pageSize
// pageNum 页码, pageSize 页容量

// 第二页,每页10条数据
Page<User> userPage = new Page<User>(2,10);
userMapper.selectPage(userPage, null);
// 查询后的数据在Page对象中了
Page类中常用方法
Page是页对象,其中封装了关于分析的相关信息
Page<User> userPage = new Page<User>(1, 5);
userMapper.selectPage(userPage, null);
// 查询后的数据在Page对象中了
System.out.println("当前页码" + userPage.getCurrent());
System.out.println("当前页所有数据" + userPage.getRecords());
System.out.println("是否有上一页" + userPage.hasPrevious());
System.out.println("是否有下一页" + userPage.hasNext());
System.out.println("获取总记录数"+ userPage.getTotal());
System.out.println("总页数" + userPage.getPages());
System.out.println("当前页的记录数量" + userPage.getSize());
自定义分页功能
BaseMapper中的selectPage()、selectMapsPage()方法是MP提供的,如果我们想在自己的Mapper中使用MP的分页插件功能,实现自定义的分页,该如何设置?
两个要求
- 首先是返回值,观察selectPage()方法的返回值,是一个Page类型,所以我们自定义方法的返回值也需要是一个页Page类型。
- 其次,方法的第一个参数必须是Page类型
public interface UserMapper extends BaseMapper<User> {

    Page<User> selectAgePagination(@Param("page")Page<User> page, @Param("age") Integer age);

}
对应的sql语句
<mapper namespace="com.liumingkai.mapper.UserMapper">
<!--selectAgePagination-->
    <select id="selectAgePagination" resultType="User">
        select * from tb_user where age > #{age}
    </select>
</mapper>
接下来正常使用就好了,BaseMapper中的selectPage()怎么用,自定义的分页功能就怎么用
Page<User> userPage = new Page<>(1, 5);
userMapper.selectAgePagination(userPage, 18);
System.out.println("当前页码" + userPage.getCurrent());
System.out.println("当前页所有数据" + userPage.getRecords());
System.out.println("是否有上一页" + userPage.hasPrevious());
System.out.println("是否有下一页" + userPage.hasNext());
System.out.println("获取总记录数"+ userPage.getTotal());
System.out.println("总页数" + userPage.getPages());
System.out.println("当前页的记录数量" + userPage.getSize());
乐观锁插件
乐观锁和悲观锁
悲观锁:对当前操作的数据加锁,只有当前线程可以操作,其余操作全部被堵塞。
乐观锁:不加锁,所有线程都可以访问、修改,如果发现别人已经改过了,就放弃本次修改。
乐观锁的实现:
在表中添加版本字段,用来描述行记录的版本,每次修改数据时,也会将版本号修改。
在修改数据时要检查拿到的版本号与当前的版本号是否一致,如果不一致,认为别人已经改过了,所以本次放弃。
由于乐观锁不存在加锁机制,所以业务效率会比乐观锁要高很多
sql建表
DROP TABLE IF EXISTS `tb_product`;

CREATE TABLE `tb_product` (
  `id` bigint NOT NULL AUTO_INCREMENT COMMENT '产品id',
  `name` varchar(30) DEFAULT 'null' COMMENT '产品名称',
  `price` float DEFAULT '0' COMMENT '价格',
  `version` int DEFAULT '0' COMMENT '乐观锁版本号',
  PRIMARY KEY (`id`)
) ENGINE=InnoDB AUTO_INCREMENT=3 DEFAULT CHARSET=utf8mb4 COLLATE=utf8mb4_0900_ai_ci;

/*Data for the table `tb_product` */

insert  into `tb_product`(`id`,`name`,`price`,`version`) values
(1,'上衣',19.9,0),
(2,'裤衩子',29.9,0);
乐观锁的执行流程
取出记录时,获取当前的version
select `id`,`name`,`price`,`version` from tb_product where id = 1更新时,version + 1,如果where语句中的version版本不对,则更新失败
update tb_product set price = price + 50 , version = version + 1 where id =1 and version = 1MP插件实现乐观锁
- 配置插件
package com.liumingkai.config;

import com.baomidou.mybatisplus.annotation.DbType;
import com.baomidou.mybatisplus.extension.plugins.MybatisPlusInterceptor;
import com.baomidou.mybatisplus.extension.plugins.inner.OptimisticLockerInnerInterceptor;
import com.baomidou.mybatisplus.extension.plugins.inner.PaginationInnerInterceptor;
import org.mybatis.spring.annotation.MapperScan;
import org.springframework.context.annotation.Bean;
import org.springframework.context.annotation.Configuration;

/**
 * 既然有了MP的配置类,那么我们把包扫描就写在这吧
 */
@Configuration
@MapperScan("com.liumingkai.mapper")
public class MyBatisPlusConfig {

    @Bean
    public MybatisPlusInterceptor mybatisPlusInterceptor() {
        MybatisPlusInterceptor mybatisPlusInterceptor = new MybatisPlusInterceptor();

        // 创建分页拦截器
        // 需要指定要操作的数据库类型
        // 因为不同的数据库, 操作是不同的,在MySQL中分页是使用的limit关键字
        PaginationInnerInterceptor paginationInnerInterceptor = new PaginationInnerInterceptor(DbType.MYSQL);
        // 将分页拦截器配置进去
        mybatisPlusInterceptor.addInnerInterceptor(paginationInnerInterceptor);

        // 配置乐观锁插件
        mybatisPlusInterceptor.addInnerInterceptor(new OptimisticLockerInnerInterceptor());

        return mybatisPlusInterceptor;
    }

}- 实体类上使用@Version标注
public class Product {

    private Long id;

    private String name;

    private Float price;

    @Version
    private Integer version;

}- 测试,在修改时就会自动拿当前的版本与数据库中的最新版本最对比,set时并在当前的版本号上 + 1。
@Test
public void test(){
    // 甲 获取数据
    Product p1 = productMapper.selectById(1L);
    // 乙 获取数据
    Product p2 = productMapper.selectById(1L);

    // 甲 修改
    p1.setPrice(p1.getPrice() + 50);
    int lines = productMapper.updateById(p1);
    System.out.println("受影响的行数" + lines);

    // 乙修改
    p2.setPrice(p2.getPrice() -30 );
    int res2 = productMapper.updateById(p2);
    System.out.println("乙修改影响的结果"+res2);

    if(res2 == 0){
        // 失败重试
        p2 = productMapper.selectById(1L);
        p2.setPrice(p2.getPrice() - 30);
        int lines3 = productMapper.updateById(p2);
        System.out.println("乙重试后的结果是"+ lines3);

    }

    System.out.println("真是数据" + productMapper.selectById(1L).getPrice());
}

通用枚举
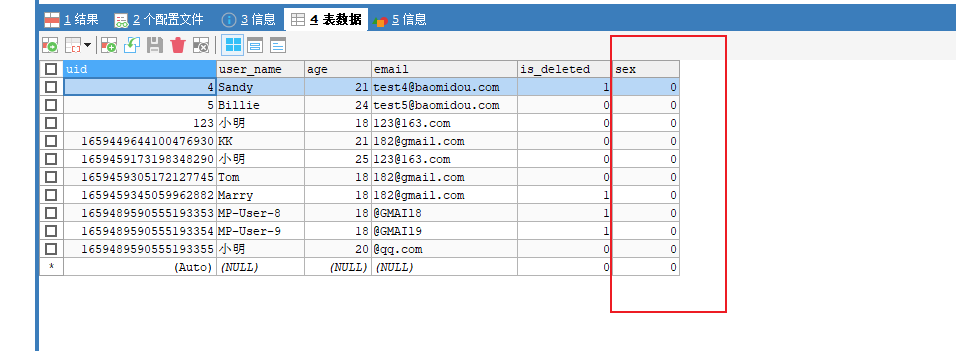
表中某些字段的值是固定的,比如性别,只有男女两个值。
可以使用MP的通用枚举来实现这些值的写入。
- 首先先来看一下表
- 创建枚举类
@Getter
public enum SexEnums {
    MALE(1,"男"),
    FEMALE(0,"女");

    private Integer sex;
    private String sexName;

    SexEnums(Integer sex, String sexName) {
        this.sex = sex;
        this.sexName = sexName;
    }
}- 修改实体类,sex字段为枚举类型
public class User {

    @TableId(value = "uid",type = IdType.AUTO)
    private Long id;

    private String userName;

    private Integer age;

    private SexEnums sex;

    private String email;

    @TableLogic
    private Integer isDeleted;

}- 测试枚举值好不好使
User user = new User();
user.setUserName("admin");
user.setAge(30);
user.setSex(SexEnums.MALE);
userMapper.insert(user);
结果报错,原因是将枚举名称进行了插入,并没有自动识别枚举值value。

在MP中,使用枚举值,我们需要两步:
- 在枚举类中,需要插入的值上使用@EnumValue注解标注
package com.liumingkai.enums;

import com.baomidou.mybatisplus.annotation.EnumValue;
import lombok.Getter;

@Getter
public enum SexEnums {
    MALE(1,"男"),
    FEMALE(0,"女");

    @EnumValue
    private Integer sex;
    private String sexName;

    SexEnums(Integer sex, String sexName) {
        this.sex = sex;
        this.sexName = sexName;
    }
}- MP全局配置,扫描枚举类所在的包
mybatis-plus:
  configuration:
    log-impl: org.apache.ibatis.logging.stdout.StdOutImpl
  global-config:
    db-config:
      table-prefix: "tb_"
      id-type: auto # 配置全局主键生成策略
  type-aliases-package: com.liumingkai.domain
  type-enums-package: com.liumingkai.enums # 扫描枚举类
在最新版的MP中,已经不需要扫描枚举类了,可以省略这一步
- 重新测试,成功
User user = new User();
user.setUserName("admin");
user.setAge(30);
user.setSex(SexEnums.MALE);
userMapper.insert(user);
代码生成器
在学习Mybatis时,会有一个逆向工程,逆向工程与代码生成器不同。
逆向工程是根据表,生成实体类、Mapper接口、Mapper文件。
在MP中的代码生成器,也是能通过表来逆向生成,但是会更多,不仅有实体列、Mapper接口、Mapper文件,还有控制层、DAO层、Service层。
- 引入依赖
<dependency>
    <groupId>com.baomidou</groupId>
    <artifactId>mybatis-plus-generator</artifactId>
    <version>3.5.1</version>
</dependency>
<dependency>
    <groupId>org.freemarker</groupId>
    <artifactId>freemarker</artifactId>
    <version>2.3.31</version>
</dependency>- 直接执行以下代码,这段代码可以从MP官网复制过来
package com.liumingkai;

import com.baomidou.mybatisplus.generator.FastAutoGenerator;
import com.baomidou.mybatisplus.generator.config.OutputFile;
import com.baomidou.mybatisplus.generator.engine.FreemarkerTemplateEngine;

import java.util.Collections;

public class Generate {
    public static void main(String[] args) {
        FastAutoGenerator.create("jdbc:mysql://localhost:3306/mybatis_plus", "root", "root")
                .globalConfig(builder -> {
                    builder.author("LiuMingkai") // 设置作者
                    //        .enableSwagger() // 开启 swagger 模式
                            .fileOverride() // 覆盖已生成文件
                            .outputDir("D://mybatis_plus"); // 指定输出目录
                })
                .packageConfig(builder -> {
                    builder.parent("com.liumingkai") // 设置父包名
                            .moduleName("mybatisplus") // 设置父包模块名
                            .pathInfo(Collections.singletonMap(OutputFile.mapperXml, "D://mybatis_plus"));// 设置mapperXml生成路径
                })
                .strategyConfig(builder -> {
                    builder.addInclude("tb_user") // 设置需要生成的表名
                            .addTablePrefix("tb_", "cb_"); // 设置过滤表前缀
                })
                .templateEngine(new FreemarkerTemplateEngine()) // 使用Freemarker引擎模板,默认的是Velocity引擎模板
                .execute();
    }
}
运行完成以上代码后,就会自动打开生成的文件目录
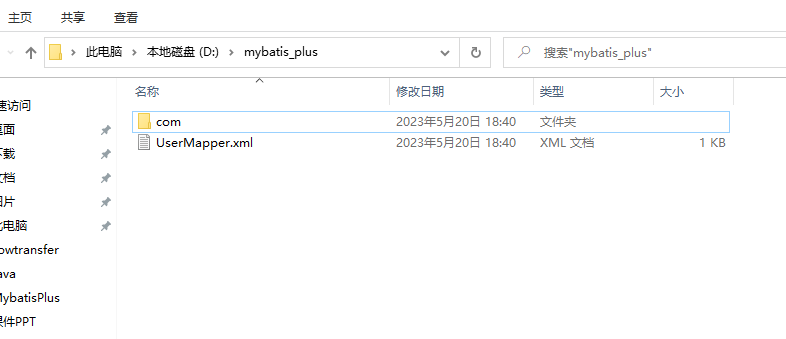
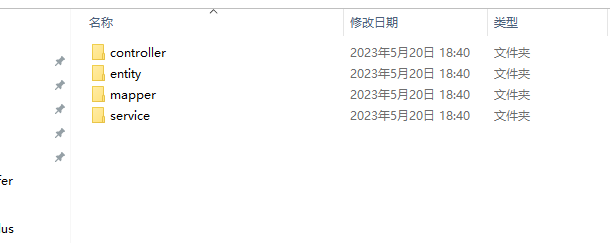

我们只需要将这些文件复制到自己的项目中直接用即可。
多数据源管理
在一个项目中需要连接多个不同的数据库。
常见场景:纯粹多库、 读写分离、 一主多从、 混合模式等
- 引入依赖:
<dependency>
    <groupId>com.baomidou</groupId>
    <artifactId>dynamic-datasource-spring-boot-starter</artifactId>
    <version>3.5.2</version>
</dependency>- 配置多数据源

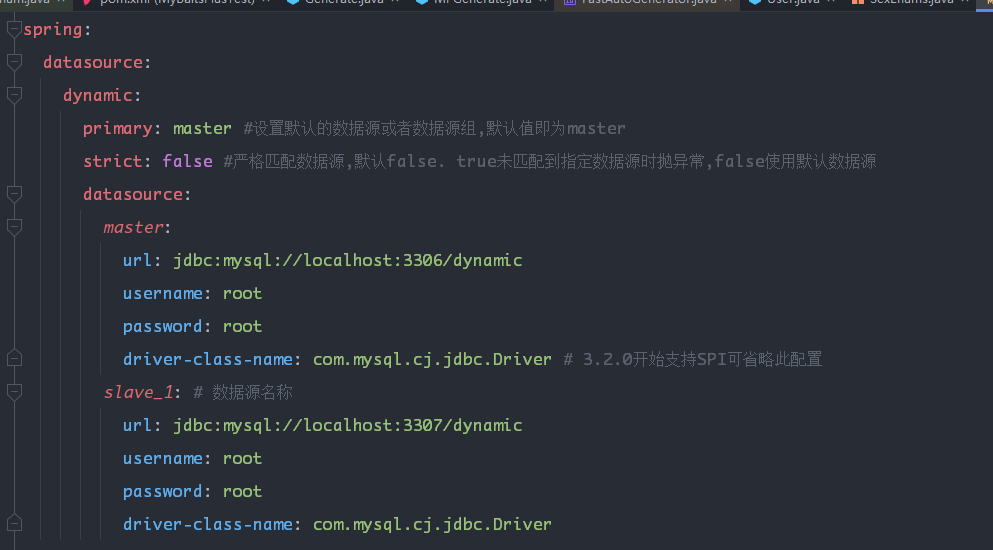
spring:
  datasource:
    dynamic:
      primary: master #设置默认的数据源或者数据源组,默认值即为master
      strict: false #严格匹配数据源,默认false. true未匹配到指定数据源时抛异常,false使用默认数据源
      datasource:
        master:
          url: jdbc:mysql://localhost:3306/dynamic
          username: root
          password: root
          driver-class-name: com.mysql.cj.jdbc.Driver # 3.2.0开始支持SPI可省略此配置
        slave_1: # 数据源名称
          url: jdbc:mysql://localhost:3307/dynamic
          username: root
          password: root
driver-class-name: com.mysql.cj.jdbc.Driver- 在Service层使用@DS注解标注要使用的数据源
@Service
@DS("master")
public class UserServiceImpl extends ServiceImpl<UserMapper, User> implements IUserService {
}
MyBatisX插件
一般来说,一个项目中会有十多个Mapper接口,同样就会对应十多个mapper.xml,而且在每个mapper.xml中会有几十条sql语句,MyBbatisX插件能够实现我们Mapper接口中的方法与Mapper.xml文件中的sql的自动映射,帮助我们更好的梳理Maper接口和mapper.xml。


点击小鸟图标就能实现mapper接口中的方法与mapper.xml中的语句的映射
MyBatisX代码生成
- 在IDEA中连接数据库
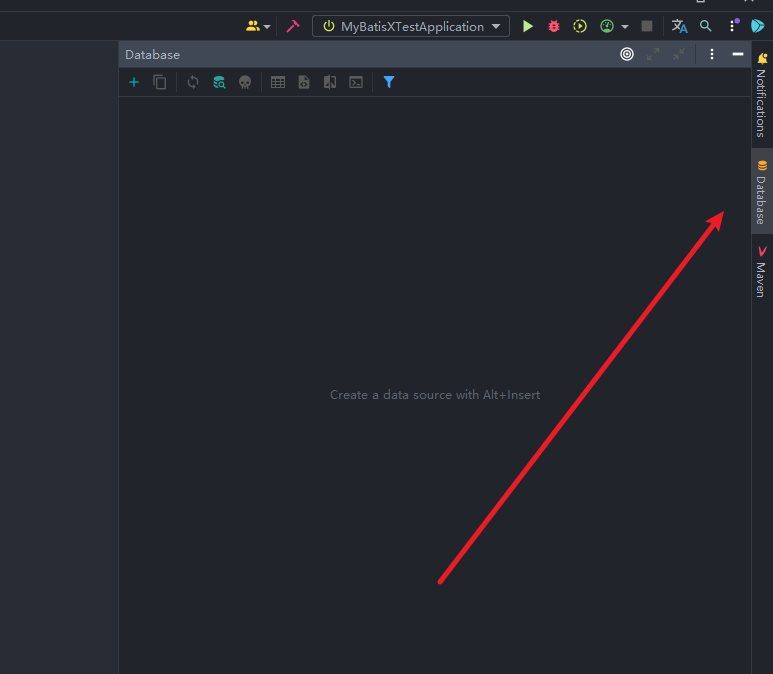

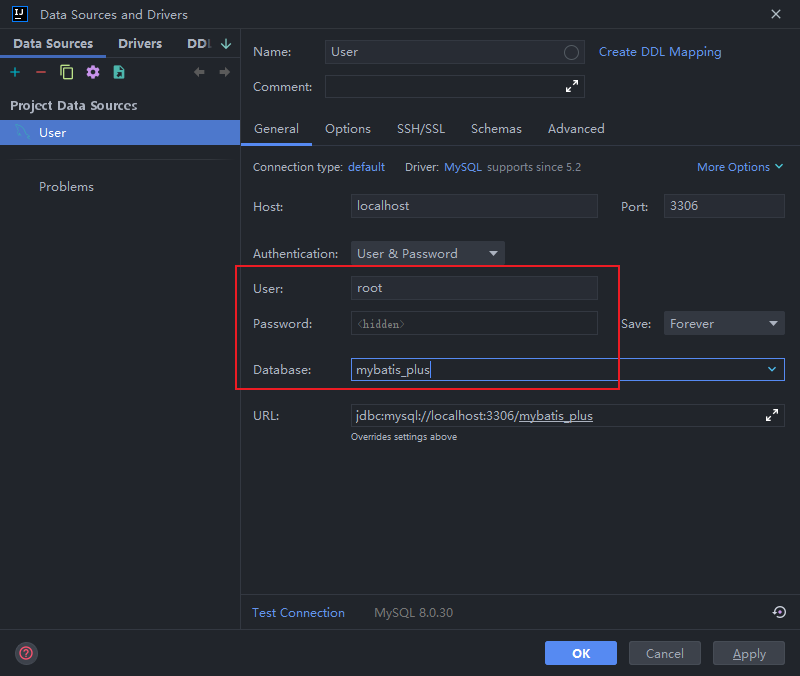
- 代码生成
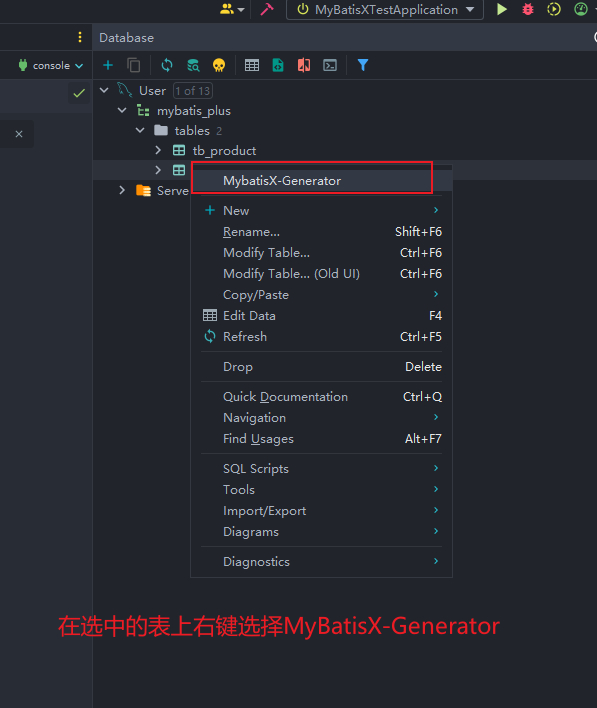

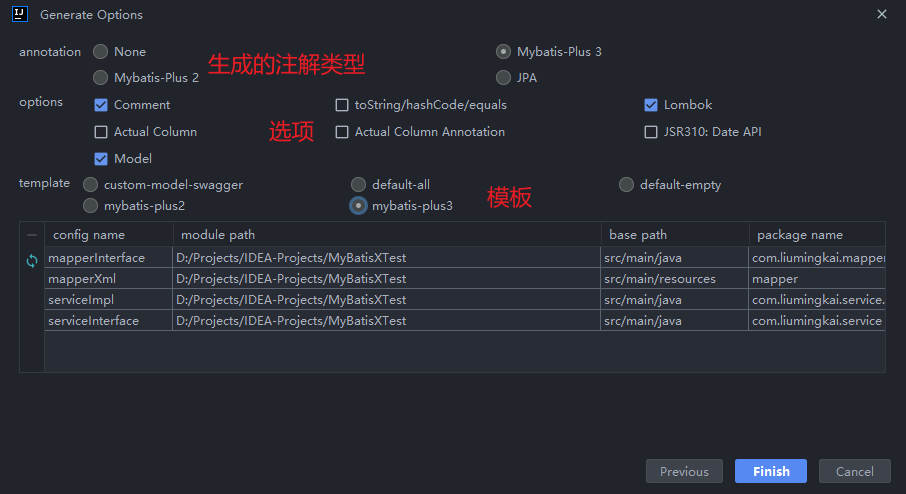
自动生成成功
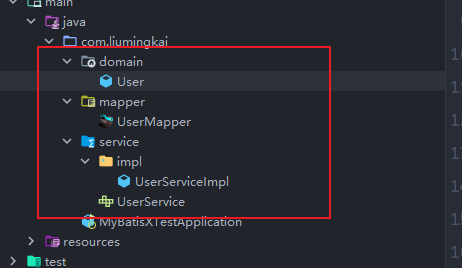
MyBatisX生成CRUD
- 插入insert
- 删除delete
- 修改update
- 查询select
只需要在Mapper接口中输入方法名,选择带有小鸟标志的方法,就是使用MyBatisX中的代码模板 。

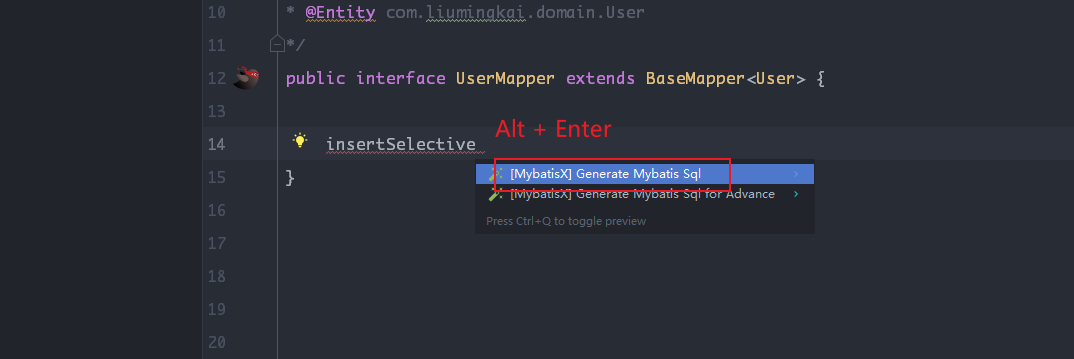
然后就会自动生成代码

