初识Spring
介绍
概述
原始的JavaEE开发存在的缺陷:
- 开发过程复杂
- 代码侵入性强
- 应用程序的测试和部署较为困难
Spring诞生:一个分层的JavaEE一站式轻量级开源框架
核心理念:
- IoC控制反转,Inversion of Control
- Spring整个框架的基础,支撑着Spring对Java Bean的管理
- AOP面向切面编程,Aspect Oriented Programming
- 通过预编译和运行期间动态代理实现不修改源程序的情况下,为程序统一添加功能
Spring贯穿整个MVC层次:
- 在表现层有SpringMVC框架
- 在业务层可以管理事务、记录日志等
- 在持久层可以整合MyBatis、Hibernate、JdbcTemplate等技术
Spring框架优点
非侵入式设计
允许应用程序自由选择和组装Spring框架的各个模块,并且不要求应用程序的类必须继承或实现某个类或接口。
业务中不必体现Spring的API,所以业务逻辑代码可以无缝衔接到其他的框架。
降低耦合性
可以将所有对象的创建和依赖关系的维护工作都交给Spring容器管理,从而降低组件之间的耦合性。
支持AOP
支持声明式事务
可以直接通过Spring配置文件管理数据库事务,省去了手动编程的繁琐。
方便测试
整合Junit
方便集成各种优秀框架
降低JavaEE API的使用难度
Spring对java中的API(JDBC、JavaMail等)进行了封装,降低这些API的使用难度
Spring 的体系结构

主要分为8大模块,灰色的模块为主要模块。
Core Container核心容器
核心容器模块是Spring的功能体系中起着支撑作用,是其他模块的基石。
核心容器层主要有Beans、Core、Context、SpEL组成。
Beans
Beans模块提供了BeanFactory类,是工厂模式的经典实现,Beans模块的主要作用是创建和管理Bean对象
Core
Core模块提供了Spring框架的基本组成部分,包括IoC和依赖注入DI功能。
Context
Context模块构建于Beans和Core模块基础之上,他可以通过ApplicationContext接口提供上下文信息。
SpEL
Spring3.0之后新增的模块,Spring Expression Language的支持,SpELl是一个在程序运行时支持操作对象图的表达式语言
核心模块直接的关系

Data Access / Integration数据访问及集成
数据访问及集成模块用于访问和操作数据库中的数据,它主要包含JDBC模块、ORM模块、OXM模块、JMS模块和Transactions模块
JDBC模块
JDBC模块提供了一个JDBC的抽象层,JDBC模块消除了冗长的JDBC编码并能够解析数据库供应商特有的错误代码。
ORM模块
ORM模块为主流的对象关系映射API提供了集成层,用于集成主流的对象关系映射框架,例如MyBatis、Hibernate等
OXM模块
OXM模块提供了对XML映射的抽象层的支持
JMS模块
JMS模块主要用于传递消息,包含消息的生产和消费
Transactions模块
Transactions模块的主要功能是事务管理,支持Spring自动处理的声明式事务
Web
Web模块的实现基于ApplicationContext,他提供了Web应用的各种工具类,包括了WebSocket模块、Servlet模块、Web模块和Porlet模块
WebSocket模块
Spring4.0 以后新增的模块,提供了WebSocket和SockJS的实现,有一集对STOMP的支持。
Servlet模块
Servlet模块提供了Spring的模型、视图、控制器,以及Web应用程序的REST Web服务器
Web模块
Web模块提供了针对Web开发的集成特性,如大部分文件上传功能等。
Portlet模块
Portlet模块的功能类似于Servlet模块,提供了Portlet环境下的MVC实现。
其他模块
AOP模块
提供了面向切面编程的支持,程序可以自定义方法拦截器和切入点,将代码按照功能进行分离,以降低程序的耦合性。
Aspects模块
Aspects模块提供了与AspectJ集成的支持,AspectJ是一个功能强大且成熟的AOP框架,为面向切面编程提供了多种实现方法
Instrumentation模块
Instrumentation提供了对类工具的支持,并且实现了类加载器,该模块可以在特定的应用服务器中使用。
Messaging模块
Spring4.0以后新增的模块,他提供了对消息传递体系结构和协议的支持
Test模块
提供对单元测试和集成测试的支持
Spring5新特性
- 对JDK的最低要求是JDK8
- 支持Junit 5 Jupiter
入门程序
基于Maven构建项目
- 在pom文件中只需要引入spring-context依赖,就会自动引入此依赖需要的依赖
<dependency>
    <groupId>org.springframework</groupId>
    <artifactId>spring-context</artifactId>
    <version>5.2.10.RELEASE</version>
</dependency>- 新建一个实体类
package com.liumingkai509;

/**
 * @author 刘明凯
 * @version 0.0.1
 * @date 2023年4月3日 20:29
 */

public class HelloSpring {
    private String userName;

    public void setUserName(String userName) {
        this.userName = userName;
    }

    public void show(){
        System.out.println(userName + "欢迎学习Spring");
    }
}- 创建Spring核心配置文件(不用记,直接粘贴复制)
<?xml version="1.0" encoding="UTF-8"?>
<beans xmlns="http://www.springframework.org/schema/beans"
       xmlns:xsi="http://www.w3.org/2001/XMLSchema-instance"
       xsi:schemaLocation="http://www.springframework.org/schema/beans http://www.springframework.org/schema/beans/spring-beans.xsd">

    <bean id="helloSpring" class="com.liumingkai509.HelloSpring">
        <property name="userName" value="LiuMingkai"/>
    </bean>

</beans>- 测试一下
@Test
    public void testHelloSpring(){
//        读取Spring核心配置文件
//        创建ApplicationContext 上下文对象
        ApplicationContext app = new ClassPathXmlApplicationContext("applicationContext.xml");
//        获取Bean,传入id值
        HelloSpring helloSpring = (HelloSpring) app.getBean("helloSpring");
        helloSpring.show();
        // LiuMingkai欢迎学习Spring
    }
运行结果

控制反转和依赖注入
控制反转的概念
控制反转,简称IoC,面向对象编程的一种设计原则,用于降低程序代码之间的耦合度
传统面向对象编程:
获取对象的方式通过“new”关键字,主动创建对象,应用程序拥有对象的控制权,导致模块之间的耦合度较高,难以测试

!!!控制反转:
对象的控制权不在交由调用者,而是由Spring IoC容器统一管理。IoC容器负责控制模块之间的关系,不是由调用者直接控制,对象的控制权由调用者转移到了IoC容器,控制权发生反转
应用程序引入IoC容器之后,在客户端类中不会再创建对象,而是直接从IoC容器中获取所需要的对象。

依赖注入的概念
依赖注入,简称DI,是指IoC容器在运行期间动态地将某种依赖资源注入到对象中。
依赖注入的类型
依赖注入的方式,有两种构造方法注入、setter注入
构造方法注入
Spring容器调用构造方法注入所依赖的实例
构造方法可以是有参或无参。
通过反射发现是有参的,然后就会先去创建参数实例,然后创建此对象。
来看一个案例
这里有一个实体类,需要有对应的构造方法
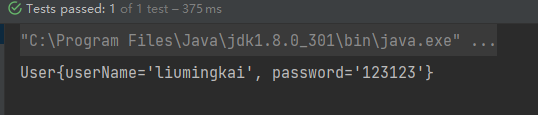
public class User {

    private String userName;

    private String password;


    public User(String userName, String password) {
        this.userName = userName;
        this.password = password;
    }

    @Override
    public String toString() {
        return "User{" +
                "userName='" + userName + '\'' +
                ", password='" + password + '\'' +
                '}';
    }
}
配置文件中的配置如下
<?xml version="1.0" encoding="UTF-8"?>
<beans xmlns="http://www.springframework.org/schema/beans"
       xmlns:xsi="http://www.w3.org/2001/XMLSchema-instance"
       xsi:schemaLocation="http://www.springframework.org/schema/beans http://www.springframework.org/schema/beans/spring-beans.xsd">

    <bean id="user" class="com.liumingkai.pojo.User">
        <constructor-arg name="userName" value="liumingkai"/>
        <constructor-arg name="password" value="123123"/>
    </bean>

</beans>
测试
@Test
public void testConstructorArg(){
    ApplicationContext app = new ClassPathXmlApplicationContext("applicationContext.xml");
    User user = (User) app.getBean("user");
    System.out.println(user);
}
通过<constructor-arg>标签来指定构造方法的参数,参数顺序无关,需要用此标签的name属性来指定形参名称,value指定要注入的字面值,也可以使用type属性来指定形参的类型
一个<constructor-arg>标签只能指定一个参数
<bean id="user" class="com.liumingkai.pojo.User">
    <constructor-arg name="userName" value="liumingkai" type="java.lang.String"/>
    <constructor-arg name="password" value="123123" type="java.lang.String"/>
</bean>
setter 注入
实体类
package com.liumingkai.pojo;

/**
 * @author 刘明凯
 * @version 0.0.1
 * @date 2023年4月3日 22:01
 */

public class Student {

    private String stuName;

    private String className;

    @Override
    public String toString() {
        return "Student{" +
                "stuName='" + stuName + '\'' +
                ", className='" + className + '\'' +
                '}';
    }


    public void setStuName(String stuName) {
        this.stuName = stuName;
    }

    public void setClassName(String className) {
        this.className = className;
    }

}配置文件,使用**<property>来指定要注入的属性,同样,一个<property>指定一个属性**
<bean id="student" class="com.liumingkai.pojo.Student">
        <property name="stuName" value="liumingkai"/>
        <property name="className" value="软件20-5"/>
    </bean>
使用name属性给出属性名,value给出字面量
测试,
@Test
    public void testSetter(){
        ApplicationContext app = new ClassPathXmlApplicationContext("applicationContext.xml");
        Student student = (Student) app.getBean("student");
        System.out.println(student);
    }
案例
使用<property>和<constructor-arg>标签中的ref属性来注入Spring IoC容器中的引用类型。
来实现一个简单的分层模块应用
编写Dao层
- Dao层接口
package com.liumingkai.dao;

/**
 * @author 刘明凯
 * @version 0.0.1
 * @date 2023年4月3日 22:14
 */

public interface UserDao {

    void login();

}- Dao层实现
package com.liumingkai.dao.impl;

import com.liumingkai.dao.UserDao;

/**
 * @author 刘明凯
 * @version 0.0.1
 * @date 2023年4月3日 22:15
 */

public class UserDaoImpl implements UserDao {

    @Override
    public void login() {
        System.out.println("Dao 层调用");
        System.out.println("登录成功....");
    }
}- Service接口
package com.liumingkai.service;

public interface UserService {
    void login();
}- Service实现类
package com.liumingkai.service.impl;

import com.liumingkai.dao.UserDao;
import com.liumingkai.service.UserService;

/**
 * @author 刘明凯
 * @version 0.0.1
 * @date 2023年4月3日 22:18
 */

public class UserServiceImpl implements UserService {

    private UserDao dao;

    @Override
    public void login() {
        System.out.println("service调用");
        dao.login();
    }

    public void setDao(UserDao dao) {
        this.dao = dao;
    }
}- 配置文件
<?xml version="1.0" encoding="UTF-8"?>
<beans xmlns="http://www.springframework.org/schema/beans"
       xmlns:xsi="http://www.w3.org/2001/XMLSchema-instance"
       xsi:schemaLocation="http://www.springframework.org/schema/beans http://www.springframework.org/schema/beans/spring-beans.xsd">

    <bean id="userDao" class="com.liumingkai.dao.impl.UserDaoImpl"/>

    <bean id="userService" class="com.liumingkai.service.impl.UserServiceImpl">
        <property name="dao" ref="userDao"/>
    </bean>
</beans>
测试
@Test
    public void testCase(){
        ApplicationContext app = new ClassPathXmlApplicationContext("applicationContext.xml");
        UserService userService = (UserService)  app.getBean("userService");
        userService.login();
    }
Spring 中的Bean管理
Spring IoC容器
Spring框架的主要功能是由Spring容器来实现的,Spring容器可以管理各种Bean
Spring中提供了相对应的API来管理Bean,最常用的是BeanFactory和ApplicationContext这两个接口
BeanFactory接口
BeanFactory是Spring容器最基本的接口,实现机制是经典的工厂模式
BeanFactory接口提供了创建和管理Bean的方法

ApplicationContext接口
ApplicationContext接口建立在BeanFactory接口之上,丰富了BeanFactory接口。
ApplicationContext可以为单例的Bean提供预初始化,并根据<property>元素执行setter方法,单例的Bean可以直接使用,提高了程序获取Bean实例的性能
常用的ApplicationContext接口的实现类

Bean 的配置
Spring支持XML 和Properties两个格式的配置文件,最常用的是XML格式的配置文件。
**XML配置文件的根元素是<beans>,<beans>元素包含多个<bean>子元素,一个<bean>定义一个Bean **
可以使用<bean >元素来将Bean注册到Spring IoC容器中,并作出一些配置
<bean>标签的常用属性
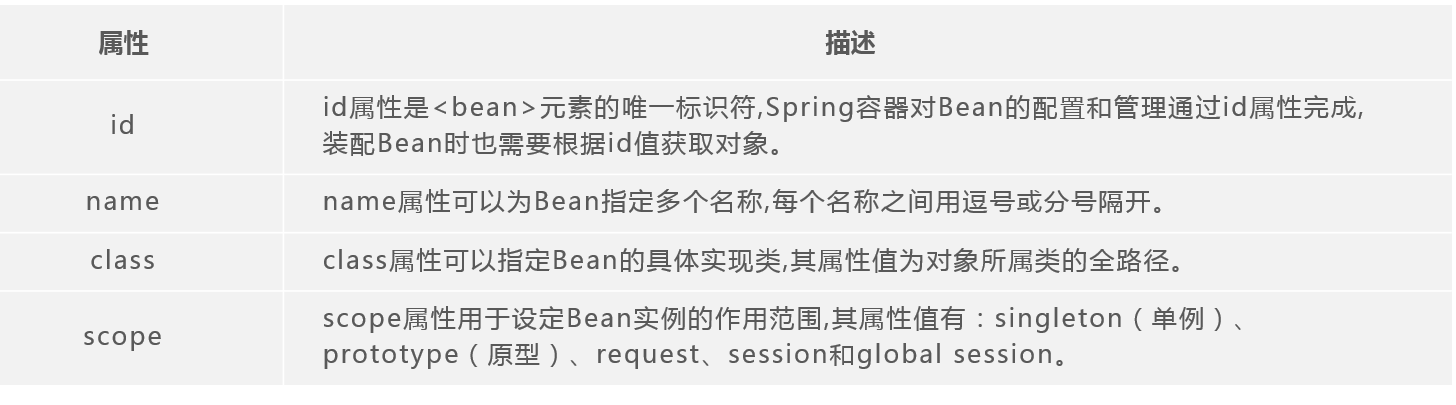
一个普通的Bean通常只定义id和clas两个属性
如果在bean中未指定id和name属性,则Spring会将class属性值作为id使用,默认将类名作为id
<bean id="userDao" class="com.liumingkai.dao.impl.UserDaoImpl"/><bean>标签的子元素
| 元素 | 说明 |
|---|---|
<constructor-arg> | 用来指定构造方法的形参 |
<property> | 用来指定属性,通过setter注入 |
ref是<constructor-arg>和<property>属性,用来指定该属性是Spring IoC容器中的某个实例的引用
value也是<constructor-arg>和<property>的属性,用来注入字面量
Bean的实例化
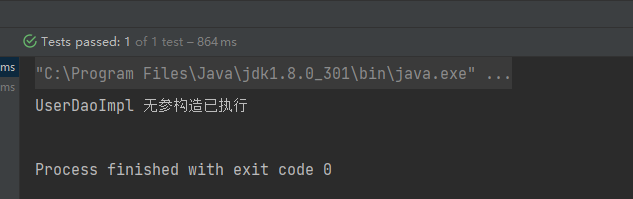
构造方法实例化
Spring会默认调用无参构造来实例化Bean
来看一个实例
public class UserDaoImpl {

    public UserDaoImpl() {
        System.out.println("UserDaoImpl 无参构造已执行");
    }

}
配置文件
<?xml version="1.0" encoding="UTF-8"?>
<beans xmlns="http://www.springframework.org/schema/beans"
       xmlns:xsi="http://www.w3.org/2001/XMLSchema-instance"
       xsi:schemaLocation="http://www.springframework.org/schema/beans http://www.springframework.org/schema/beans/spring-beans.xsd">

    <bean id="userDao" class="com.liumingkai.dao.impl.UserDaoImpl"/>
</beans>
测试
@Test
    public void testCase(){
        ApplicationContext app = new ClassPathXmlApplicationContext("applicationContext.xml");
    }
静态工厂实例化
Spring如何利用静态工厂的机制来实例化Bean
静态工厂代码
public class UserUtil {

    public UserUtil(){
        System.out.println("user工具类执行了");
    }

    public static User getUser(){
        return new User();
    }

}
配置文件 !!!!!!!
<?xml version="1.0" encoding="UTF-8"?>
<beans xmlns="http://www.springframework.org/schema/beans"
       xmlns:xsi="http://www.w3.org/2001/XMLSchema-instance"
       xsi:schemaLocation="http://www.springframework.org/schema/beans http://www.springframework.org/schema/beans/spring-beans.xsd">

    <bean id="user" class="com.liumingkai.utils.UserUtil" factory-method="getUser"/>

</beans>
bean的class是静态工厂的位置,使用factory-method属性来指定工厂中获取产品的方法
此时通过getBean()方法获取此bean,获取到的不是静态工厂类,而是工厂的产品类
@Test
    public void testCase(){
        ApplicationContext app = new ClassPathXmlApplicationContext("applicationContext.xml");
        Object user = app.getBean("user");
        System.out.println(user.getClass());
    }
可以看到,并没有输出工具类的无参构造中的内容,说明IoC容器并没有实例化静态工厂类,而是直接通过调用静态工厂类的静态方法来创建Bean的
实例工厂实例化
静态工厂实例化Bean的特点是不需要实例化工厂类
但是实例工厂需要首先实例化工厂类,然后再调用实例的方法来创建Bean
实例工厂类
package com.liumingkai.utils;

import com.liumingkai.pojo.User;

/**
 * @author 刘明凯
 * @version 0.0.1
 * @date 2023年4月3日 23:09
 */

public class UserFactory {
    public User getUser() {
        return new User();
    }
}
所以首先需要在IoC中有工厂的实例
配置文件
<?xml version="1.0" encoding="UTF-8"?>
<beans xmlns="http://www.springframework.org/schema/beans"
       xmlns:xsi="http://www.w3.org/2001/XMLSchema-instance"
       xsi:schemaLocation="http://www.springframework.org/schema/beans http://www.springframework.org/schema/beans/spring-beans.xsd">

    <bean id="userFactory" class="com.liumingkai.utils.UserFactory"/>

    <bean id="user" factory-bean="userFactory" factory-method="getUser" />

</beans>
首先要有一个普通的工厂实例,然后目标的User实例,通过factory-bean属性来说明此Bean是实例工厂的产品,指定IoC容器中工厂的引用,再通过factory-method属性指定工厂获取产品的方法
测试,直接获取User产品实例就可,就会自动调用实例工厂的方法
@Test
    public void testCase(){
        ApplicationContext app = new ClassPathXmlApplicationContext("applicationContext.xml");
        Object user = app.getBean("user");
        System.out.println(user.getClass());
    }
Bean 的作用域
Bean的作用域是Bean实例的有效的范围
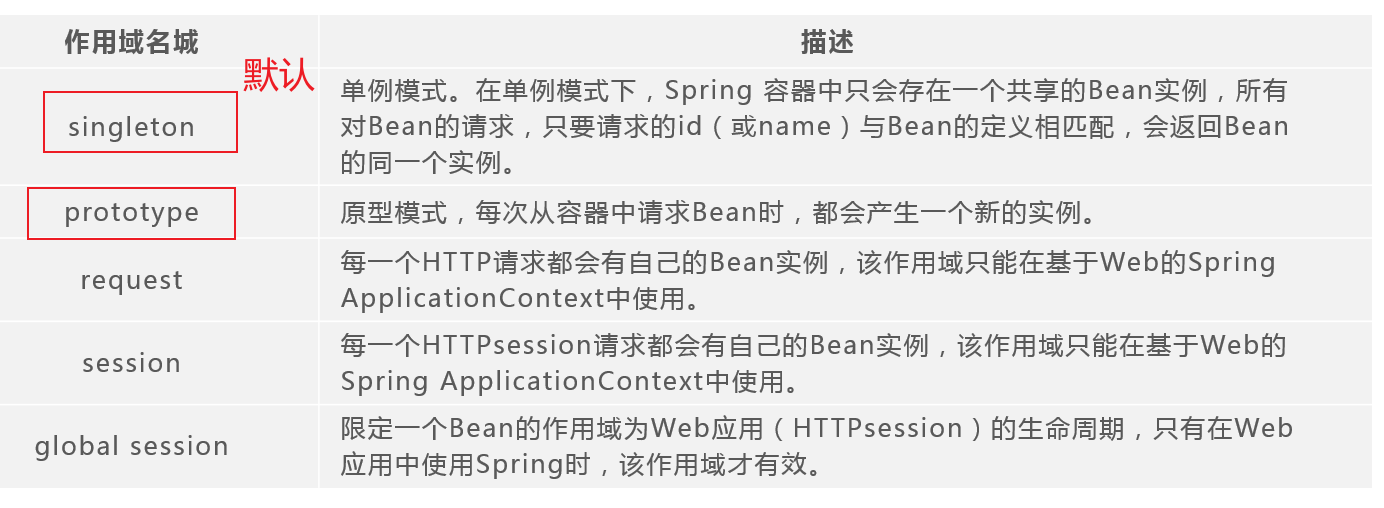
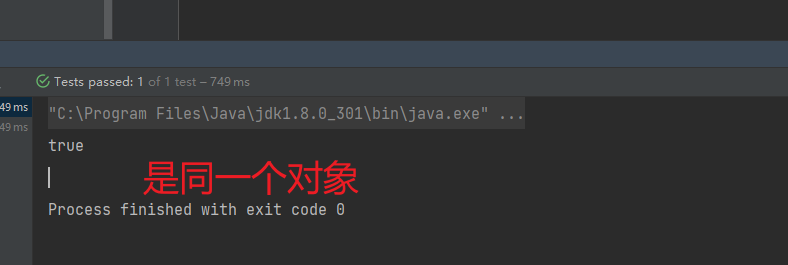
singleTon作用域
singleTon是Spring容器默认的作用域,SPring容器会只创建一个此Bean的实例,该实例可以重复使用
!!!signleTon也叫作单例模式,因为此Bean在Spring IoC 容器中只有一个!!!
对于作用域是singlTon 的Bean,Spring IoC管理此Bean的生命周期,负责该Bean的创建、初始化、销毁
因为Bean的创建、销毁会带来一定的系统开销,所以singleTon作用域可以避免反复创建、销毁造成的资源消耗。
来看一个演示案例
package com.liumingkai.pojo;

/**
 * @author 刘明凯
 * @version 0.0.1
 * @date 2023年4月3日 21:51
 */

public class User {

    private String userName;

    private String password;

    public User() {
    }
	// getter、setter省略
}
配置文件,因为Spring默认的Bean作用域是singleTon,此处scope可以省略不写。
<?xml version="1.0" encoding="UTF-8"?>
<beans xmlns="http://www.springframework.org/schema/beans"
       xmlns:xsi="http://www.w3.org/2001/XMLSchema-instance"
       xsi:schemaLocation="http://www.springframework.org/schema/beans http://www.springframework.org/schema/beans/spring-beans.xsd">

    <bean id="user" class="com.liumingkai.pojo.User" scope="singleton"/>
</beans>
测试
@Test
    public void testCase(){
        ApplicationContext app = new ClassPathXmlApplicationContext("applicationContext.xml");
        User user1 = (User) app.getBean("user");
        User user2 = (User) app.getBean("user");
        // 判断两个对象是否是同一个
        System.out.println(user1 == user2);
    }
prototype作用域
每次对Bean的请求都会创建一个新的实例,Spring容器值负责创建Bean,不管理其生命周期
还是上面的一个代码,把配置文件中的scope修改为prototype
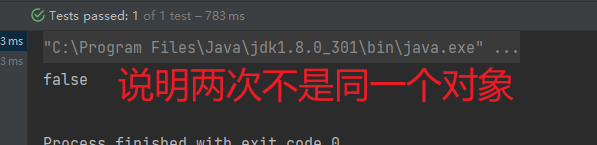
对比!!!
- singleTon的Bean
- 在Spring 容器创建后就会自动实例化此Bean
- 在Spring容器中只会有一个此类型的Bean实例
- Spring容器会管理此Bean的生命周期,负责创建、初始化、销毁
- prototye的Bean
- 在Spring容器创建后不会自动实例化此Bean,而是在请求此Bean时才会实例化此Bean
- 此类型的实例在Spring容器中可能有很多个
- Spring容器只会负责Bean的实例化,不管理其生命周期
Bean的装配方式
Bean的装配是Bean依赖注入。
Spring容器提供了3种装配方式
基于XML的装配
利用配置文件的方式来进行依赖注入,提供了两种XML装配的方式
构造方法注入
- 使用
<constructor-arg>标签
- 使用
setter注入
- 使用
<property>标签 - Bean必须要有一个默认的无参构造方法
- Bean类必须要为此属性提供setter方法
- 使用
基于注解的装配
注解配置bean,如果项目中的Bean太多,xml配置文件就会显得臃肿


演示一波
- 配置文件中引入依赖,会自动引入spring-aop的依赖
<dependency>
    <groupId>org.springframework</groupId>
    <artifactId>spring-context</artifactId>
    <version>5.2.10.RELEASE</version>
</dependency>- 配置文件
<?xml version="1.0" encoding="UTF-8"?>
<beans xmlns="http://www.springframework.org/schema/beans"
       xmlns:xsi="http://www.w3.org/2001/XMLSchema-instance"
       xmlns:context="http://www.springframework.org/schema/context"
       xsi:schemaLocation="http://www.springframework.org/schema/beans
       http://www.springframework.org/schema/beans/spring-beans.xsd
       http://www.springframework.org/schema/context
       http://www.springframework.org/schema/beans/spring-context.xsd
">

    <!--    使用context 命名空间,在配置文件中开启相应的注解处理器-->
    <context:component-scan base-package="com.liumingkai"/>

</beans>- 实体类
package com.liumingkai.pojo;

import org.springframework.beans.factory.annotation.Value;
import org.springframework.context.annotation.Scope;
import org.springframework.stereotype.Component;

/**
 * @author 刘明凯
 * @version 0.0.1
 * @date 2023年4月3日 21:51
 */
@Component("user")
@Scope("singleton")
public class User {

    @Value("张三")
    private String userName;

    @Value("123123")
    private String password;

    public User() {
    }

    public User(String userName, String password) {
        this.userName = userName;
        this.password = password;
    }

    @Override
    public String toString() {
        return "User{" +
                "userName='" + userName + '\'' +
                ", password='" + password + '\'' +
                '}';
    }
}- Dao 层接口
package com.liumingkai.dao;

/**
 * @author 刘明凯
 * @version 0.0.1
 * @date 2023年4月3日 22:14
 */

public interface UserDao {

    void login();

}- Dao 层实现类
package com.liumingkai.dao.impl;

import com.liumingkai.dao.UserDao;
import com.liumingkai.pojo.User;
import org.springframework.stereotype.Repository;

import javax.annotation.Resource;

/**
 * @author 刘明凯
 * @version 0.0.1
 * @date 2023年4月3日 22:15
 */
@Repository("userDao")
public class UserDaoImpl implements UserDao {
    @Resource(name = "user")
    private User user;

    @Override
    public void login() {
        System.out.println("Dao 层调用");
        System.out.println(user);
        System.out.println("登录成功....");
    }
}- Service层接口
package com.liumingkai.service;

public interface UserService {
    void login();
}- Service层实现类
@Service("userService")
public class UserServiceImpl implements UserService {

    @Resource(name = "userDao")
    private UserDao dao;

    @Override
    public void login() {
        System.out.println("service调用");
        dao.login();
    }
}- Controller层
@Controller
public class UserController {
    @Resource(name = "userService")
    private UserService userService;

    public void login(){
        System.out.println("controller执行");
        userService.login();
    }
}- 测试
@Test
    public  void testAnnotation(){
        ApplicationContext app = new ClassPathXmlApplicationContext("applicationContext.xml");
//        如果没有为指定名称,就默认是类名
        UserController userController = (UserController) app.getBean("userController");
        userController.login();
    }
自动装配
Spring 的 <bean>元素中包含一个autowrie属性,可以通过autowire属性来自动装配

例如

Bean 的生命周期
Bean的生命周期就是bean被创建、初始化、销毁的过程
在Bean的生命周期中,有两个比较重要的节点:
- Bean 实例初始化后
- Bean实例销毁前
对这两个节点的监控有两种方式,XML和注解的配置方式
注解控制
先来看如何使用注解来监控这两个节点,需要我们定义两个方法
package com.liumingkai.pojo;
import org.springframework.beans.factory.annotation.Value;
import org.springframework.context.annotation.PropertySource;
import org.springframework.context.annotation.Scope;
import org.springframework.stereotype.Component;
import javax.annotation.PostConstruct;
import javax.annotation.PreDestroy;
/**
* @author 刘明凯
* @version 0.0.1
* @date 2023年4月3日 21:51
*/
@Component("user")
@Scope("singleton")
public class User {
@Value("张三")
private String userName;
@Value("123123")
private String password;
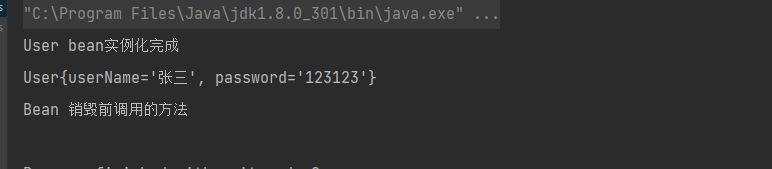
@PostConstruct
public void afterInit(){
System.out.println("User bean实例化完成");
}
public User() {
}
public User(String userName, String password) {
this.userName = userName;
this.password = password;
}
@Override
public String toString() {
return "User{" +
"userName='" + userName + '\'' +
", password='" + password + '\'' +
'}';
}
@PreDestroy
public void beforDestroy(){
System.out.println("Bean 销毁前调用的方法");
}
}配置文件
<?xml version="1.0" encoding="UTF-8"?>
<beans xmlns="http://www.springframework.org/schema/beans"
       xmlns:xsi="http://www.w3.org/2001/XMLSchema-instance"
       xmlns:context="http://www.springframework.org/schema/context"
       xsi:schemaLocation="http://www.springframework.org/schema/beans
       http://www.springframework.org/schema/beans/spring-beans.xsd
       http://www.springframework.org/schema/context
       http://www.springframework.org/schema/context/spring-context.xsd
">

    <!--    使用context 命名空间,在配置文件中开启相应的注解处理器-->
    <context:component-scan base-package="com.liumingkai"/>


</beans>
测试
@Test
    public void testLife(){
        ApplicationContext app = new ClassPathXmlApplicationContext("applicationContext.xml");
        User user = (User) app.getBean("user");
        System.out.println(user);
        // 销毁SpringIoC容器中所有的Bean
        AbstractApplicationContext ac = (AbstractApplicationContext) app;
        ac.registerShutdownHook();
    }
XML控制
在<bean>中通过init-method和destroy-method属性来指定要实例化后、销毁前执行的方法
package com.liumingkai.pojo;

import org.springframework.beans.factory.annotation.Value;
import org.springframework.context.annotation.PropertySource;
import org.springframework.context.annotation.Scope;
import org.springframework.stereotype.Component;

import javax.annotation.PostConstruct;
import javax.annotation.PreDestroy;

/**
 * @author 刘明凯
 * @version 0.0.1
 * @date 2023年4月3日 21:51
 */
public class User {

    @Value("张三")
    private String userName;

    @Value("123123")
    private String password;

    public void afterInit() {
        System.out.println("User bean实例化完成");
    }

    public User() {
    }

    public User(String userName, String password) {
        this.userName = userName;
        this.password = password;
    }

    @Override
    public String toString() {
        return "User{" +
                "userName='" + userName + '\'' +
                ", password='" + password + '\'' +
                '}';
    }

    public void beforDestroy() {
        System.out.println("Bean 销毁前调用的方法");
    }

}
配置文件
<?xml version="1.0" encoding="UTF-8"?>
<beans xmlns="http://www.springframework.org/schema/beans"
       xmlns:xsi="http://www.w3.org/2001/XMLSchema-instance"
       xsi:schemaLocation="http://www.springframework.org/schema/beans
       http://www.springframework.org/schema/beans/spring-beans.xsd
">
    <bean id="user" class="com.liumingkai.pojo.User" init-method="afterInit" destroy-method="beforDestroy"/>

</beans>
测试
@Test
    public void testLife(){
        ApplicationContext app = new ClassPathXmlApplicationContext("applicationContext.xml");
        User user = (User) app.getBean("user");
        System.out.println(user);
        // 销毁SpringIoC容器中所有的Bean
        AbstractApplicationContext ac = (AbstractApplicationContext) app;
        ac.registerShutdownHook();
    }
Spring AOP
Spring AOP 介绍
OOP面向对象编程
AOP面向切面编程,主打将程序中的业务逻辑进行横向隔离,将重复逻辑抽取到一个独立的模块中,以达到提高程序复用性和开发效率

OOP的问题:
虽然OOP可以通过组合或继承的方式来实现代码的复用,但是如果在多个模块中执行同一个功能,同样的代码就会被分散到每个模块中,不能够统一管理。
优点:
提供复用性,提高代码开发效率,增强代码可维护性
AOP的术语
切面Aspect
切面是指关注点(只类中重复的代码)形成的类,通常是指封装的、用于横向插入系统的功能类(如事务管理、日志记录等)
切面也是一个类,也需要接收Spring IoC容器的控制,所以也需要通过<bean>或@Component注入
连接点 Joinpoint
程序执行过程中某个特点的节点,一般认为是被插入类的某个方法。
连接点就是需要被增强的那个点
切入点 Pointcut
当某个连接点满足预先指定的条件时,AOP就会定位到这个连接点,在连接点处插入切面,该连接点也就成了切入点。
即,用来描述连接点的信息,等价于连接点
增强/通知 处理 Advice
通知、增强就是要插入的切面的程序代码,一般指切面中的方法。
目标对象 Target
目标对象是指要被插入切面的方法
织入 Weaving
将切面代码插入到目标对象上,从而生成代理对象的过程。
代理 Proxy
将通知应用到目标对象上之后,程序动态创建的通知对象
引介 Introduction
一种特殊的通知,可以为目标对象添加一些属性和方法。
Spring AOP的实现机制
Spring AOP实现需要创建一个代理对象,根据代理对象的创建方式,将AOP实现机制分为两种:
- JDK动态代理
- CGLib动态代理
JDK动态代理
默认情况下,Spring AoP使用JDK动态代理。
JDK动态代理是通过java.lang.reflect.Proxy类实现的,可以调用Proxy类的newProxyInstance()方法来创建代理对象
JDK动态代理可以实现无侵入式的代码拓展,并且可以在不修改源代码的情况下实现增强某些方法
来看一下如何利用JDK动态代理实现增强?
- UserDao
package com.liumingkai.dao;

/**
 * @author 刘明凯
 * @version 0.0.1
 * @date 2023年4月3日 22:14
 */

public interface UserDao {

    void addUser();
    void deleteUser();

}- UserDaoImpl
package com.liumingkai.dao.impl;

import com.liumingkai.dao.UserDao;
import com.liumingkai.pojo.User;
import org.springframework.stereotype.Repository;

import javax.annotation.Resource;

/**
 * @author 刘明凯
 * @version 0.0.1
 * @date 2023年4月3日 22:15
 */
public class UserDaoImpl implements UserDao {

    @Override
    public void addUser() {
        System.out.println("添加用户");
    }

    @Override
    public void deleteUser() {
        System.out.println("删除用户");
    }
}- 创建切面类,模拟对方法的增强
package com.liumingkai.aspect;

/**
 * @author 刘明凯
 * @version 0.0.1
 * @date 2023年4月4日 11:37
 */

public class MyAspect {

    public void checkPermission() {
        System.out.println("模拟权限校验");
    }

    public void log() {
        System.out.println("模拟记录日志");
    }
}- 创建代理类
该类需要实现InvocationHandler接口,设置代理类的调用处理程序
package com.liumingkai.aspect;

import com.liumingkai.dao.UserDao;

import java.lang.reflect.InvocationHandler;
import java.lang.reflect.Method;
import java.lang.reflect.Proxy;

/**
 * @author 刘明凯
 * @version 0.0.1
 * @date 2023年4月4日 11:40
 */

public class MyProxy implements InvocationHandler {
    // 声明目标类接口
    private UserDao userDao;

    //    创建代理方法
    public Object createProxy(UserDao userDao) {
        this.userDao = userDao;
        // 1. 类加载器, 获取此类的类加载器
        ClassLoader classLoader = MyProxy.class.getClassLoader();
        // 2. 被代理对象实现所有接口
        Class<?>[] interfaces = userDao.getClass().getInterfaces();
        // 3. 使用代理类进行增强,返回的是代理对象
        return Proxy.newProxyInstance(classLoader, interfaces, this);
        /**
         * 第一个参数classLoader 表示当前类的类加载器
         * 第二个参数 interfaces 表示被代理对象身上的所有接口
         * 第三个参数是 InvocationHandler,此处是this,表示代理类MyProxy本身,因此本类实现了InvocationHandler,
         * 要知道InvocationHandler的实现,否则不知道增强的具体逻辑
         */
    }

    /**
     * 所有动态代理类的方法调用,都会交由invoke()方法区处理
     *
     * @param proxy  被代理的对象
     * @param method 将要被执行的方法信息(反射)
     * @param args   执行方法需要的参数
     * @return
     * @throws Throwable
     */
    @Override
    public Object invoke(Object proxy, Method method, Object[] args) throws Throwable {
        // 创建切面对象
        MyAspect myAspect = new MyAspect();
        // 前增强
        myAspect.checkPermission();
        // 在目标类调用目标方法,传入参数
        Object obj = method.invoke(userDao, args);
        // 后增强
        myAspect.log();
        return obj;
    }
}
总结JDK动态代理

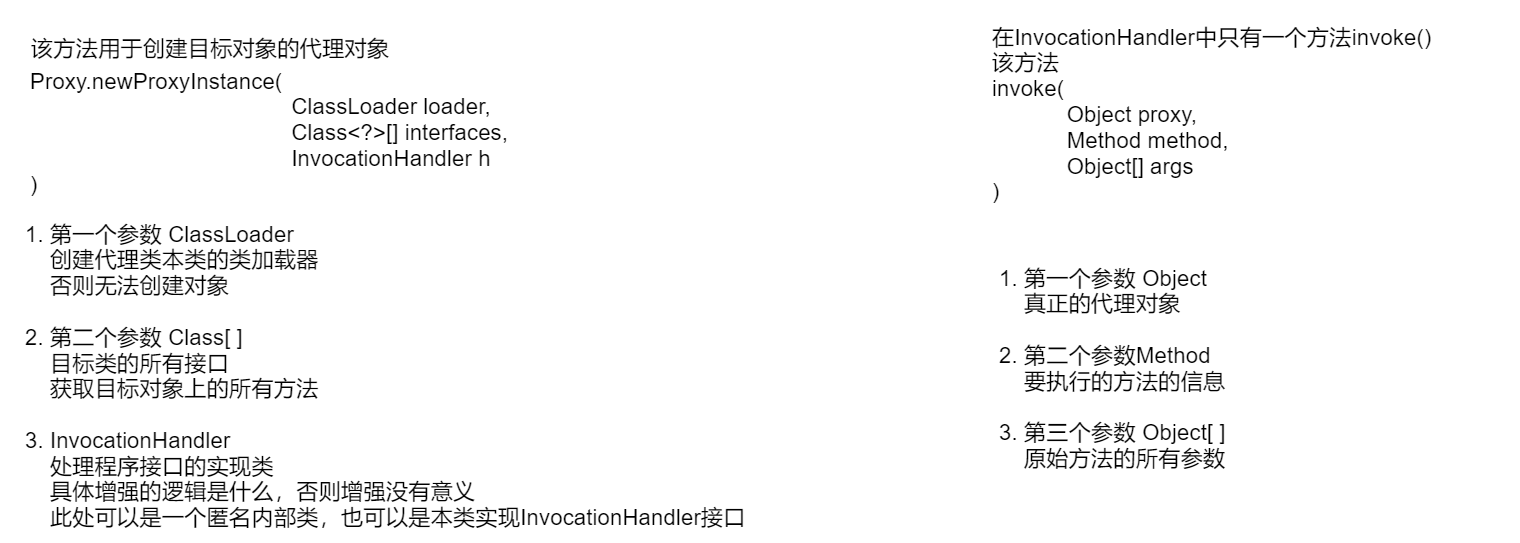

InvocationHandler中的invoke()方法的第一个参数Object proxy是什么?有用吗?
第一个参数是真正的代理对象,不是被代理对象
那么该对象存在的意义是什么?
看我整理的这篇文章 JDK动态代理解析,InvocationHandler的第一个参数的解析
CGLib动态代理
JDK动态代理存在缺陷,只能为有接口的类创建代理对象
如果一个类没有接口,那么就需要使用CGLib来实现动态代理了
CGLib(Code Generation Library),CGLib动态代理不要求目标类实现接口,底层采用字节码技术,通过继承的方式来动态创建代理对象。
Spring的核心包已经集成了CGLib所需要的包,所以开发中不需要额外导入依赖。
演示一波
目标对象
public class StudentDao {

    public void addStudent(){
        System.out.println("添加用户");
    }

    public void deleteStudent(){
        System.out.println("删除用户");
    }

}
创建代理类
package com.liumingkai.aspect;

import org.springframework.cglib.proxy.Enhancer;
import org.springframework.cglib.proxy.MethodInterceptor;
import org.springframework.cglib.proxy.MethodProxy;

import java.lang.reflect.Method;

/**
 * @author 刘明凯
 * @version 0.0.1
 * @date 2023年4月4日 15:53
 */

public class CGLibProxy implements MethodInterceptor {

    public Object create(Object target) {
        // 创建动态类对象
        Enhancer enhancer = new Enhancer();
        // 确定要增强的类、设置父类
        enhancer.setSuperclass(target.getClass());
        // 添加回调函数
        enhancer.setCallback(this);
        // 返回创建的代理类对象
        return enhancer.create();
    }


    /**
     * 设置调用处理程序,明确增强的逻辑
     *
     * @param proxy       根据指定父类生成的代理对相关
     * @param method      拦截的方法,原始的方法
     * @param args        拦截的方法的参数数组
     * @param methodProxy 方法的代理对象,用于执行父类的方法
     * @return
     * @throws Throwable
     */
    @Override
    public Object intercept(Object proxy, Method method, Object[] args, MethodProxy methodProxy) throws Throwable {
        // 前增强
        System.out.println("cglib 前置增强");

        // 目标方法执行
        Object obj = methodProxy.invokeSuper(proxy, args);

        // 后增强
        System.out.println("cglib 后置增强");
        return obj;
    }
}
测试
// 创建代理对象
        MyProxy myProxy = new MyProxy();
        // 创建目标对象
        UserDao userdao = new UserDaoImpl();
        // 从代理对象中获取增强后的目标对象
        UserDao userDaoPro = (UserDao) myProxy.createProxy(userdao);
        // 判断两个对象是否是同一个对象
总结CGLib动态代理
基于XML的AOP实现
Spring AOP 中代理对象由IoC容器自动生成,我们无需过多关注代理对象生成的过程,只需要提供连接点、创建切面、定义切点。
Spring提供了一系列配置Spring AOP的XML元素,
配置Spring AOP的XML元素
配置切面
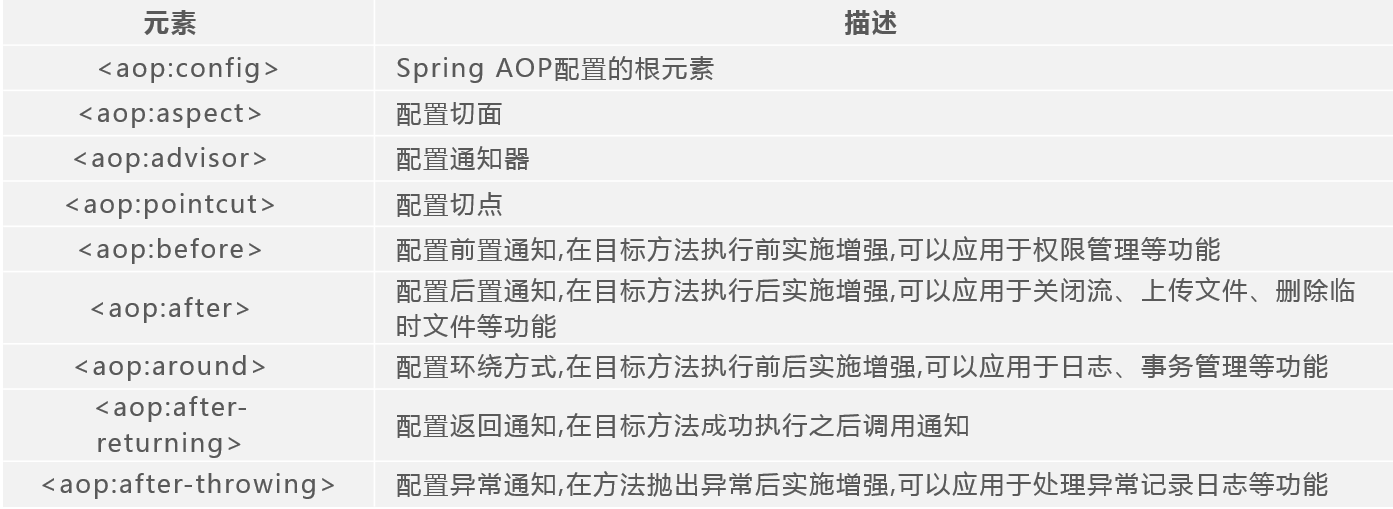
在Spring 的配置文件中,配置切面使用的是<aop:aspect>元素,该元素会将一个已经定义好的Spring Bean转换为切面。
因此,在使用<aop:aspect>元素之前,一定要保证配置文件中已经配置了一个普通的Bean。
然后通过<aop:aspect>的ref属性引用该Bean
<aop:aspect>的属性

配置切入点
通过<aop:pointcut>元素来定义,
<aop:pointcut>元素作为<aop:config>元素的子元素定义时,表示该切入点是全局切入点,他可以被多个切面共享。
<aop:pointcut>元素作为<aop:aspect>的子元素时,表示该切入点只对当前切面有效。
在定义<aop:pointcut>元素时,通常会指定id和expression这两个属性,

Spring Aop 切入点表达式的基本格式:
execution(modifiers-pattern? ret-type-pattern declaring-type-pattern? name-pattern(param-pattern)
throws-pattern?)参数说明:带有?的部分,是可选项,其他部分是必备选项
- modifiers-pattern:表示定义的目标方法的权限修饰符,例如public、private等
- ret-type-pattern: 表示定义的目标方法的返回值类型,如void,String
- declaring-type-pattern:表示定义的目标方法的类路径,
- name-pattern:表示具体的要被代理的目标方法,如addUser()方法
- pattern-pattern:表示要被代理的目标方法的参数
- throws-pattern:表示需要被代理的目标方法抛出异常的类型
看一个例子
// 表示要增强的方法的返回值类型是void
// 表示要增强的方法的全路径名
// 方法没有参数
execution(void com.dao.impl.DaoImpl.save())

// 权限控制符可以省略, public
//
// 抛出异常类型可以省略
//
还可以使用通配符
// UserDaoImpl中的所有方法
// 任意返回值类型
// 方法名称任意
// 方法参数任意
execution(* com.liumingkai.dao.impl.UserDaoImpl.*(..))
如果使用上述的格式来一个一个描述切入点,非常繁琐,效率太低。
此时就可以使用通配符来对切入点进行批量的描述
*:用来匹配单个任意的符号,可以独立出现,也可以作为前缀或后缀的匹配符来出现
@Pointcut("execution(* com.*.dao.Serviec.find*(*))")
//返回值为任意类型
// com包下的任意包中的Service类中的以find开头的方法,参数是一个任意类型..:用来匹配多个任意的符号,可以独立出现,通常用来描述包名和方法参数
@Pointcut("execution(void com..UserService.findById(..))")
//匹配com任意包下的UserService类的findById方法,参数是多个任意参数+:专用于匹配子类类型
@Pointcut("execution(* *..*Service+.*(..))")
// 返回值为任意类型
// 任意包下的以Service结尾的类名的子类中的任意方法
配置通知
使用<aop:aspect>元素配置了5种常用通知

案例
- 导入依赖,AspectJ的依赖
AspectJ是一个功能强大且成熟的AOP框架,为面向切面编程提供了多种实现方法。
spring-aop:AOP核心功能,例如代理工厂等等
aspectjweaver:简单理解,支持切入点表达式等等
aspectjrt:简单理解,支持aop相关注解等等
aspectjweaver包含aspectjrt,所以我们只需要引入aspectjweaver依赖包就可以了

<dependency>
    <groupId>org.aspectj</groupId>
    <artifactId>aspectjweaver</artifactId>
    <version>1.9.4</version>
</dependency>- 创建接口
package com.liumingkai.dao;

/**
 * @author 刘明凯
 * @version 0.0.1
 * @date 2023年4月3日 22:14
 */

public interface UserDao {
    void insert();

    int update();

    void delete();

    void select();
}- 创建实现类
package com.liumingkai.dao.impl;

import com.liumingkai.dao.UserDao;

/**
 * @author 刘明凯
 * @version 0.0.1
 * @date 2023年4月3日 22:15
 */
public class UserDaoImpl implements UserDao {

    @Override
    public void insert() {
        System.out.println("insert.....");
    }

    @Override
    public int update() {
        System.out.println("update.....");
        return 1000;
    }

    @Override
    public void delete() {
        System.out.println("delete.....");
    }

    @Override
    public void select() {
        System.out.println("select.....");
    }
}- 创建通知类
package com.liumingkai.aspect;

import org.aspectj.lang.JoinPoint;
import org.aspectj.lang.ProceedingJoinPoint;

/**
 * @author 刘明凯
 * @version 0.0.1
 * @date 2023年4月4日 17:26
 */

public class MyAdvice {

    // 前置通知
    public void before(JoinPoint joinPoint) {
        System.out.print("这是前置通知");
        System.out.print("目标类是" + joinPoint.getTarget());
        System.out.println(",被织入增强处理的目标方法为" + joinPoint.getSignature().getName());
    }

    // 后置通知
    public void after() {
        System.out.println("z这是后置通知");
    }

    // 返回通知
    public void afterReturn(JoinPoint joinPoint) {
        System.out.print("这是返回通知,(方法不出现异常时调用)");
        System.out.println("被织入增强的目标方法是" + joinPoint.getSignature().getName());

    }

    // 异常后通知
    public void afterExcption() {
        System.out.println("异常通知");
    }

    /**
     * 环绕通知
     *
     * @param pjp ProceedingJoinPoint是 JoinPoint 的子接口,表示可以执行目标方法
     *            环绕通知的要求:
     *            1. 必须是Object类型的返回值
     *            2. 必须接收一个参数,类型为ProceedingJointPoint
     *            3. 必须throws Throwable
     */
    public Object around(ProceedingJoinPoint pjp) throws Throwable {
        System.out.println("这是环绕之前的通知");
        // 调用目标方法
        Object res = pjp.proceed();
        System.out.println("这是环绕之后的通知");
        return res;
    }

}
注意:环绕通知的方法
- 必须接收一个ProceedingJoinPoint的参数
- 必须要有返回值,必须是Object类型
- 必须抛出异常
- 配置文件
<?xml version="1.0" encoding="UTF-8"?>
<beans xmlns="http://www.springframework.org/schema/beans"
       xmlns:xsi="http://www.w3.org/2001/XMLSchema-instance"
       xmlns:context="http://www.springframework.org/schema/aop" xmlns:aop="http://www.springframework.org/schema/aop"
       xsi:schemaLocation="http://www.springframework.org/schema/beans
       http://www.springframework.org/schema/beans/spring-beans.xsd
       http://www.springframework.org/schema/aop
       http://www.springframework.org/schema/aop/spring-aop.xsd
">
    <!--    注册Bean-->
    <bean id="userDao" class="com.liumingkai.dao.impl.UserDaoImpl"/>
    <bean id="myAdvice" class="com.liumingkai.aspect.MyAdvice"/>

    <!--    配置SpringAOP-->
    <aop:config>
        <!--        指定切入点-->
        <aop:pointcut id="pointcut" expression="execution(* com.liumingkai.dao.impl.UserDaoImpl.*(..))"/>
        <!--        指定切面-->
        <aop:aspect ref="myAdvice">
            <!--            指定前置通知-->
            <aop:before method="before" pointcut-ref="pointcut"/>
            <!--            指定返回通知-->
            <aop:after-returning method="afterReturn" pointcut-ref="pointcut"/>
            <!--            指定环绕通知-->
            <aop:around method="around" pointcut-ref="pointcut"/>
            <!--            指定异常通知-->
            <aop:after-throwing method="afterExcption" pointcut-ref="pointcut"/>
            <!--            指定后置通知-->
            <aop:after method="after" pointcut-ref="pointcut"/>
        </aop:aspect>
    </aop:config>

</beans>- 测试
ApplicationContext app = new ClassPathXmlApplicationContext("applicationContext.xml");
        UserDao userDao = app.getBean("userDao", UserDao.class);
        userDao.insert();
        System.out.println();
        userDao.delete();
        System.out.println();
        userDao.update();
        System.out.println();
        userDao.select();
基于注解的AOP实现
基于XML的AOP实现,需要在SPring配置文件中配置大量的代码信息,导致配置文件过于臃肿。

直接来看通知类
package com.liumingkai.aspect;

import org.aspectj.lang.JoinPoint;
import org.aspectj.lang.ProceedingJoinPoint;
import org.aspectj.lang.annotation.*;

/**
 * @author 刘明凯
 * @version 0.0.1
 * @date 2023年4月4日 17:26
 */
@Aspect
public class MyAdvice {

    // 切点:
    @Pointcut("execution(* com.liumingkai.dao.impl.UserDaoImpl.*(..))")
    public void pointcut() {
    }


    // 前置通知
    @Before("pointcut()")
    public void before(JoinPoint joinPoint) {
        System.out.print("这是前置通知");
        System.out.print("目标类是" + joinPoint.getTarget());
        System.out.println(",被织入增强处理的目标方法为" + joinPoint.getSignature().getName());
    }

    // 后置通知
    @After("pointcut()")
    public void after() {
        System.out.println("z这是后置通知");
    }

    // 返回通知
    @AfterReturning("pointcut()")
    public void afterReturn(JoinPoint joinPoint) {
        System.out.print("这是返回通知,(方法不出现异常时调用)");
        System.out.println("被织入增强的目标方法是" + joinPoint.getSignature().getName());

    }

    // 异常后通知
    @AfterThrowing("pointcut()")
    public void afterExcption() {
        System.out.println("异常通知");
    }

    /**
     * 环绕通知
     *
     * @param pjp ProceedingJoinPoint是 JoinPoint 的子接口,表示可以执行目标方法
     *            环绕通知的要求:
     *            1. 必须是Object类型的返回值
     *            2. 必须接收一个参数,类型为ProceedingJointPoint
     *            3. 必须throws Throwable
     */
    @Around("pointcut()")
    public Object around(ProceedingJoinPoint pjp) throws Throwable {
        System.out.println("这是环绕之前的通知");
        // 调用目标方法
        Object res = pjp.proceed();
        System.out.println("这是环绕之后的通知");
        return res;
    }

}
配置文件
开启自动代理<aop:aspectj-autoproxy>
<?xml version="1.0" encoding="UTF-8"?>
<beans xmlns="http://www.springframework.org/schema/beans"
       xmlns:xsi="http://www.w3.org/2001/XMLSchema-instance"
       xmlns:context="http://www.springframework.org/schema/aop" xmlns:aop="http://www.springframework.org/schema/aop"
       xsi:schemaLocation="http://www.springframework.org/schema/beans
       http://www.springframework.org/schema/beans/spring-beans.xsd
       http://www.springframework.org/schema/aop
       http://www.springframework.org/schema/aop/spring-aop.xsd
">
    <!--    注册Bean-->
    <bean id="userDao" class="com.liumingkai.dao.impl.UserDaoImpl"/>
    <bean id="myAdvice" class="com.liumingkai.aspect.MyAdvice"/>

    <!--    开启aspectj自动代理的支持-->
    <aop:aspectj-autoproxy/>
</beans>
Spring 数据库编程
我们已经学习了MyBatis,后期会将Spring、MyBatis整合到一起,所以SpringJDBC模块的内容作为了解。
Spring提供了JDBC模块,SpringJDBC 可以管理数据库连接资源,简化传统JDBC的操作,进而提升数据库操作的效率。
Spring JDBC
传统JDBC的步骤,获取连接、执行Sql语句、封装结果集,最后关闭数据库连接。
频繁操作地操作数据库,会产生大量重复的代码,代码冗余,Spring 的JDBC模块负责数据库资源管理和错误处理,简化了开发人员对数据库的操作。
JdbcTemplate概述
针对数据库操作,Spring提供了JdbcTemplate类,JdbcTemplate类是一个模板类,spring JDBC中更高层次的抽象类均以JdbcTemplate为基础而建立。
JdbcTemplate类的继承关系非常简单,JdbcTemplate继承自抽象类JdbcAccessor,同时实现了JdbcTemplate接口。
抽象类JdbcAccessor提供了一些访问数据库时的公共属性:
DataSource,数据库连接池接口,主要功能是获取数据库连接。
在具体的数据库操作中,DataSource还可以提供对数据库连接的缓冲池和分布式事务支持。
SQLExceptionTranslator,是一个接口,负责对SQLException异常进行转译工作。
Spring JDBC的配置
Spring JDBC 主要由4个包组成:

Spring对数据库的操作都封装在了core、dataSource、object、support这4个包中,想要使用Spring JDBC就需要对这些包进行配置。
首先在项目中导入spring-jdbc的依赖
<dependency>
    <groupId>org.springframework</groupId>
    <artifactId>spring-jdbc</artifactId>
    <version>5.2.10.RELEASE</version>
    </dependency>
具体配置:
<?xml version="1.0" encoding="UTF-8"?>
<beans xmlns="http://www.springframework.org/schema/beans"
       xmlns:xsi="http://www.w3.org/2001/XMLSchema-instance"
       xsi:schemaLocation="http://www.springframework.org/schema/beans
       http://www.springframework.org/schema/beans/spring-beans.xsd
">
    <!--    1. 配置数据源-->
    <bean id="dataSource"
          class="org.springframework.jdbc.datasource.DriverManagerDataSource">
        <!--         数据库驱动-->
        <property name="driverClassName" value="com.mysql.cj.jdbc.Driver"/>
        <!--         数据库url-->
        <property name="url" value="jdbc:mysql://localhost:3306/learn"/>
        <!--        数据库用户名-->
        <property name="username" value="root"/>
        <!--        数据密码-->
        <property name="password" value="root"/>
    </bean>

    <!--    2. 配置JDBC模板-->
    <bean id="jdbcTemplate"
          class="org.springframework.jdbc.core.JdbcTemplate">
        <!--        默认必须使用数据源-->
        <property name="dataSource" ref="dataSource"/>
    </bean>

    <!--    3. 配置注入类-->
    <bean id="xxxx" class="xxxx">
        <property name="jdbcTemplate" ref="jdbcTemplate"/>
    </bean>
</beans>
配置了两个Bean,
- DriverManagerDataSource类用于配置数据源
- JdbcTemplate
需要将dataSource注入到JdbcTemplate中,而其他需要使用JdbcTemplate的Bean,需要将JdbcTemplate注入到该Bean中(通常注入到Dao 类中,在Dao类中进行与数据库的相关操作)
JdbcTemplate的常用方法
JdbcTemplate提供了大量查询和更新数据库的方法。
execute()
execute()方法用于执行SQL语句,其语法格式如下:
jdbcTemplate.execute("sql语句");演示一波
首先导入依赖spirng-jdbc和数据库驱动
<dependency>
            <groupId>org.springframework</groupId>
            <artifactId>spring-jdbc</artifactId>
            <version>5.2.10.RELEASE</version>
        </dependency>

        <dependency>
            <groupId>com.mysql</groupId>
            <artifactId>mysql-connector-j</artifactId>
            <version>8.0.31</version>
        </dependency>
配置文件
<?xml version="1.0" encoding="UTF-8"?>
<beans xmlns="http://www.springframework.org/schema/beans"
       xmlns:xsi="http://www.w3.org/2001/XMLSchema-instance"
       xsi:schemaLocation="http://www.springframework.org/schema/beans
       http://www.springframework.org/schema/beans/spring-beans.xsd
">
    <!--    1. 配置数据源-->
    <bean id="dataSource"
          class="org.springframework.jdbc.datasource.DriverManagerDataSource">
        <!--         数据库驱动-->
        <property name="driverClassName" value="com.mysql.cj.jdbc.Driver"/>
        <!--         数据库url-->
        <property name="url" value="jdbc:mysql://localhost:3306/learn"/>
        <!--        数据库用户名-->
        <property name="username" value="root"/>
        <!--        数据密码-->
        <property name="password" value="root"/>
    </bean>

    <!--    2. 配置JDBC模板-->
    <bean id="jdbcTemplate"
          class="org.springframework.jdbc.core.JdbcTemplate">
        <!--        默认必须使用数据源-->
        <property name="dataSource" ref="dataSource"/>
    </bean>

</beans>
测试一下
ApplicationContext app = new ClassPathXmlApplicationContext("applicationContext.xml");
        JdbcTemplate jdbcTemplate = app.getBean("jdbcTemplate", JdbcTemplate.class);
        String sql = "create table user(" +
                "id int primary key," +
                "name varchar(255))";
        jdbcTemplate.execute(sql);
sql语句执行成功

update()
update()方法可以完成插入、更新、删除的操作。
update()的不同重载

query()

看到在query()方法中有一个RowMapper参数,RowMapper是一个接口,目的是实现查询结果集与java实体类的映射,RowMapper来定义结果集与java实体类的映射关系。
体验一下
User实体类
package com.liumingkai.pojo;

/**
 * @author 刘明凯
 * @version 0.0.1
 * @date 2023年4月3日 21:51
 */
public class User {
    private Integer id;

    private String name;

    public User() {
    }

// ....省略getter和setter
}
UserDao
package com.liumingkai.dao;

import com.liumingkai.pojo.User;

import java.util.List;

/**
 * @author 刘明凯
 * @version 0.0.1
 * @date 2023年4月3日 22:14
 */

public interface UserDao {

    User getUserById(Integer id);

    List<User> getAllUsers();

}
UserDaoImpl
package com.liumingkai.dao.impl;

import com.liumingkai.dao.UserDao;
import com.liumingkai.pojo.User;
import org.springframework.jdbc.core.BeanPropertyRowMapper;
import org.springframework.jdbc.core.JdbcTemplate;
import org.springframework.jdbc.core.RowMapper;

import java.util.List;

/**
 * @author 刘明凯
 * @version 0.0.1
 * @date 2023年4月3日 22:15
 */
public class UserDaoImpl implements UserDao {

    private JdbcTemplate jdbcTemplate;

    public void setJdbcTemplate(JdbcTemplate jdbcTemplate) {
        this.jdbcTemplate = jdbcTemplate;
    }

    @Override
    public User getUserById(Integer id) {
        String sql = "select * from user where id  = ?";
        RowMapper<User> rowMapper = new BeanPropertyRowMapper<>(User.class);
        User user = jdbcTemplate.queryForObject(sql, rowMapper, id);
        return user;
    }

    @Override
    public List<User> getAllUsers() {
        String sql = "select * from user;";
        // 行记录映射对象
        RowMapper<User> rowMapper = new BeanPropertyRowMapper<>(User.class);
        List<User> res = jdbcTemplate.query(sql, rowMapper);
        return res;
    }


}
测试一下
@Test
    public void testGetAll(){
        ClassPathXmlApplicationContext app = new ClassPathXmlApplicationContext("applicationContext.xml");
        UserDao userDao = app.getBean("userDao", UserDao.class);
        List<User> allUsers = userDao.getAllUsers();
        for (User user : allUsers) {
            System.out.println(user);
        }

    }


    @Test
    public void testGetUserById(){
        ClassPathXmlApplicationContext app = new ClassPathXmlApplicationContext("applicationContext.xml");
        UserDao userDao = app.getBean("userDao",UserDao.class);
        User user = userDao.getUserById(1);
        System.out.println(user);
    }
BeanPropertyRowMapper是RowMapper接口的实现类,他可以自动将结果集中的数据映射到用户自定义的实体类中,前提是要保证结果集中的字段名称与实体类中属性名称保持,相对应
Spring事务管理概述
只要操作数据库,就避不开涉及事务的管理,Spring 提供了专门用于事务处理的API。
Spring的事务管理简化了传统的事务管理流程,一定程度上减少了开发人员的工作量。
事务管理的核心接口
Spring对事务的管理,整合到了名称叫做 spring-tx-xxx.jar的包中,需要引入该依赖。
只要引入了spring-jdbc的依赖,就会自动引入spring-tx的依赖。
spring-tx依赖中提供了3个接口实现事务管理:
- PlatformTransactionManager接口:用于根据属性管理事务
- TransactionDefinition接口:用于定义事务的属性
- TransactionStatus接口:用于界定事务的状态
PlatformTransactionManager
PlatformTransactionManager接口主要用于管理事务,该接口中提供了3个管理事务的方法:

在实际应用中,Spring事务管理实际是由具体的持久化技术完成的,而PlatformTransactionManager接口只提供统一的抽象方法。为了应对不同持久化技术的差异性,Spring为他们提供了具体的实现类,
例如,Spring为Spring JDBC和MyBatis等依赖于DataSource的持久化技术提供了实现类DataSourceTransactionManager,
如此以来,Spring JDBC或MyBatis等持久化技术的事务管理可以由DataSourceTransactionManager类实现,
而且Spring可以通过PlatformTransactionManager接口对这些实现类进行统一管理。
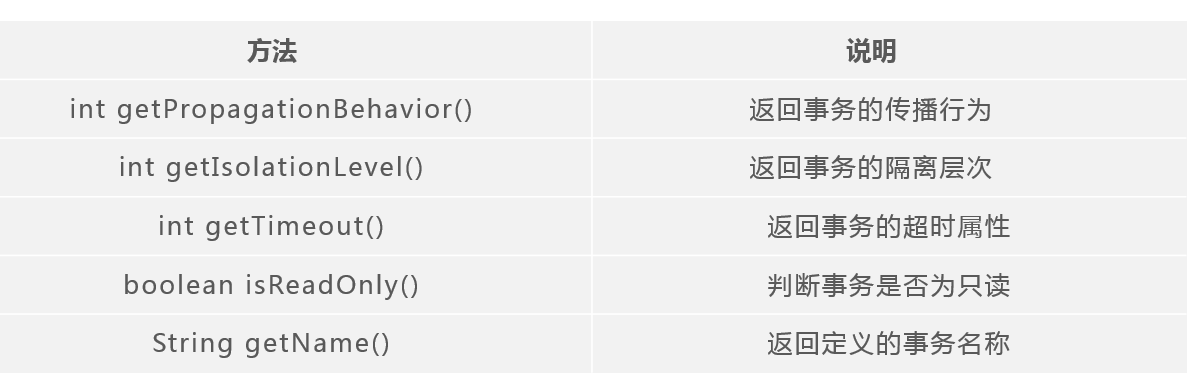
TransactionDefinition
TransactionDefinition接口定义了事务描述相关的几个常量
其中包括事务的隔离级别、事务的传播行为、事务的超时时间、是否为只读事务
事务的隔离级别

事务的传播行为
事务的传播行为是指处于不同事务中的方法在相互调用时,方法执行期间,事务的维护情况。
例如,当一个事务的方法B调用另一个事务的方法A时,可以规定A方法继续在B方法所属的现有事务中运行,也可以规定A方法开启一个新事务,在新事务中运行,B方法所属的现有事务先挂起,等A方法的新事务执行完毕后再恢复。

事务的超时时间
事务的超时时间是值事务执行的时间界限,超过这个时间界限,事务将会回滚
TransactionDefinition接口中提供了TIMEOUT_DEFAULT常量定义事务的超时时间。
是否是只读事务
当事务是只读时,该事务不修改任何数据,只读事务有助于提升性能,如果在只读事务中修改数据,会引发异常。
其他方法
TransactionDefinition接口中除了定义了事务隔离级别、事务的传播行为、事务的超时时间、是否为只读事务的常量外,
还提供了一系列方法来获取事务的属性。
TransactionStatus
TransactionStatus主要用于界定事务的状态,通常情况下,编程式事务中使用该接口较多。
TransactionStatus接口提供了一些列返回事务状态信息的方法:

事务管理方式
Spring中事务管理方式分为两种方式:
传统的编程式事务管理
通过编写代码实现事务管理,包括事务的开始、正常执行后的事务提交、发生异常时的事务回滚
声明式事务管理
通过AOP技术实现事务的管理,主要思想是将事务管理作为一个”切面“单独编写,然后通过AOP技术将事务管理的”切面“织入到业务目标类中。
声明式事务管理最大的优点是:开发人员无需通过编程的方式来管理事务,只需在配置文件中进行相关代码的单独编写,就可以将事务规则应用到业务逻辑中,这使得开发人员可以更加转注入于核心事务的编写,提高开发效率。
声明式事务
Spring 声明式事务两种实现方式:
- 基于XML配置文件
- 基于注解实现
基于XML方式的声明式事务
首先在配置文件中引入并开启tx命名空间,在引入tx命名空间之后,可以使用<tx-advice>元素来配置事务管理的通知,进而通过AOP实现事务管理
配置<tx-advice>元素时,通常需要指定id和transaction-manager属于,其中
- id属性用于唯一标识
- transaction-manager用于指定事务管理器
<tx-advice>元素还包含子元素<tx-attributes>,<tx:attributes>用于配置多个<tx-method>,<tx-method>用于配置事务属性。

来模拟银行转账的操作
- 导入依赖
<dependency>
            <groupId>org.aspectj</groupId>
            <artifactId>aspectjweaver</artifactId>
            <version>1.9.4</version>
        </dependency>

        <dependency>
            <groupId>org.springframework</groupId>
            <artifactId>spring-jdbc</artifactId>
            <version>5.2.10.RELEASE</version>
        </dependency>
        <!-- https://mvnrepository.com/artifact/aopalliance/aopalliance -->
        <dependency>
            <groupId>aopalliance</groupId>
            <artifactId>aopalliance</artifactId>
            <version>1.0</version>
        </dependency>

        <dependency>
            <groupId>com.mysql</groupId>
            <artifactId>mysql-connector-j</artifactId>
            <version>8.0.31</version>
</dependency>- 定义AccountDao接口
package com.liumingkai.dao;

public interface AccountDao {

    void transfer(String outUser, String inUser, Double money);


}- 实现AccountDao层方法
package com.liumingkai.dao.impl;

import com.liumingkai.dao.AccountDao;
import org.springframework.jdbc.core.JdbcTemplate;

/**
 * @author 刘明凯
 * @version 0.0.1
 * @date 2023年4月5日 07:10
 */

public class AccountDaoImpl implements AccountDao {

    private JdbcTemplate jdbcTemplate;

    public void setJdbcTemplate(JdbcTemplate jdbcTemplate) {
        this.jdbcTemplate = jdbcTemplate;
    }


    @Override
    public void transfer(String outUser, String inUser, Double money) {
        String sql = "update tb_account set balance = balance + ? where username = ? ";
        jdbcTemplate.update(sql, money, inUser);
        //模拟系统故障
        int i = 1 / 0;
        String sql2 = "update tb_account set balance = balance - ? where username = ? ";
        jdbcTemplate.update(sql2, money, outUser);
    }
}- 配置文件
<?xml version="1.0" encoding="UTF-8"?>
<beans xmlns="http://www.springframework.org/schema/beans"
       xmlns:xsi="http://www.w3.org/2001/XMLSchema-instance"
       xmlns:aop="http://www.springframework.org/schema/aop"
       xmlns:tx="http://www.springframework.org/schema/tx"
       xsi:schemaLocation="http://www.springframework.org/schema/beans
       http://www.springframework.org/schema/beans/spring-beans.xsd
       http://www.springframework.org/schema/tx
       http://www.springframework.org/schema/tx/spring-tx.xsd
       http://www.springframework.org/schema/aop
       http://www.springframework.org/schema/aop/spring-aop.xsd
">
    <!--    1. 配置数据源-->
    <bean id="dataSource"
          class="org.springframework.jdbc.datasource.DriverManagerDataSource">
        <!--         数据库驱动-->
        <property name="driverClassName" value="com.mysql.cj.jdbc.Driver"/>
        <!--         数据库url-->
        <property name="url" value="jdbc:mysql://localhost:3306/learn"/>
        <!--        数据库用户名-->
        <property name="username" value="root"/>
        <!--        数据密码-->
        <property name="password" value="root"/>
    </bean>

    <!--    2. 配置JDBC模板-->
    <bean id="jdbcTemplate"
          class="org.springframework.jdbc.core.JdbcTemplate">
        <!--        默认必须使用数据源-->
        <property name="dataSource" ref="dataSource"/>
    </bean>

    <!--  定义dao层bean-->
    <bean id="accountDao" class="com.liumingkai.dao.impl.AccountDaoImpl">
        <property name="jdbcTemplate" ref="jdbcTemplate"/>
    </bean>

<!--    4. 事务管理器-->
    <bean id="transactionManager" class="org.springframework.jdbc.datasource.DataSourceTransactionManager">
        <property name="dataSource" ref="dataSource"/>
    </bean>

</beans>- 执行测试
ApplicationContext app = new ClassPathXmlApplicationContext("applicationContext.xml");
        // 获取Dao实例
        AccountDao dao = app.getBean("accountDao", AccountDao.class);
        dao.transfer("lisi","zhangsan",100.0);
        // 提示信息
        System.out.println("转账成功");
异常发生,业务终止,但是李四的账户加100,但是张三的账户并没有 减100.
由于没有添加事务管理,系统无法保证数据的安全性和一致性
在配置文件中配置事务管理
<!--    5.编写通知:对事务进行增强需要编写切入点和具体事务的细节-->
    <tx:advice id="txAdvice" transaction-manager="transactionManager">
        <tx:attributes>
<!--            name: * 表示任意方法-->
            <tx:method name="*" propagation="REQUIRED"
                    isolation="DEFAULT" read-only="false"
            />
        </tx:attributes>
    </tx:advice>

<!--  6. 编写AOP,让Spring自动为目标生成代理,需要使用AspectJ表达式  -->
    <aop:config>
<!--        切入点-->
        <aop:pointcut id="txPoincut" expression="execution(* com.liumingkai.*.*.*(..))"/>

<!--        切面:将切入点与通知整合-->
        <aop:advisor advice-ref="txAdvice" pointcut-ref="txPoincut"/>
    </aop:config>
再测试,虽然发生异常 ,但是两个账户的余额是一致的。
基于注解的声明式事务
基于XML方式的声明式事务,导致配置文件臃肿。
利用注解简化配置
Spring提供了@Transactional注解实现事务管理,类似于XML中的<tx-advice>

@Transactional可以标注在接口、接口方法、类或类方法上
- 在类上标注,该类的所有public方法都将具有同样类型的事务属性
- 标注在类方法上,则该方法具有单独的事务属性。如果该方法所在的类也有@Transactional注解,则会覆盖类上的注解属性
当使用@Transational注解时,还需要在Spring的XML文件中通过<tx-annotation-driven>元素配置事务注解驱动,该元素还有一个属性是transaction-manager,该属性用于指定事务管理器
同样是模拟银行转账的业务
修改配置文件
<?xml version="1.0" encoding="UTF-8"?>
<beans xmlns="http://www.springframework.org/schema/beans"
       xmlns:xsi="http://www.w3.org/2001/XMLSchema-instance"
       xmlns:aop="http://www.springframework.org/schema/aop"
       xmlns:tx="http://www.springframework.org/schema/tx"
       xmlns:context="http://www.springframework.org/schema/context"
       xsi:schemaLocation="http://www.springframework.org/schema/beans
       http://www.springframework.org/schema/beans/spring-beans.xsd
       http://www.springframework.org/schema/tx
       http://www.springframework.org/schema/tx/spring-tx.xsd
       http://www.springframework.org/schema/context
       http://www.springframework.org/schema/context/spring-context.xsd
       http://www.springframework.org/schema/aop
       http://www.springframework.org/schema/aop/spring-aop.xsd
">
    <!--    1. 配置数据源-->
    <bean id="dataSource"
          class="org.springframework.jdbc.datasource.DriverManagerDataSource">
        <!--         数据库驱动-->
        <property name="driverClassName" value="com.mysql.cj.jdbc.Driver"/>
        <!--         数据库url-->
        <property name="url" value="jdbc:mysql://localhost:3306/learn"/>
        <!--        数据库用户名-->
        <property name="username" value="root"/>
        <!--        数据密码-->
        <property name="password" value="root"/>
    </bean>

    <!--    2. 配置JDBC模板-->
    <bean id="jdbcTemplate"
          class="org.springframework.jdbc.core.JdbcTemplate">
        <!--        默认必须使用数据源-->
        <property name="dataSource" ref="dataSource"/>
    </bean>

    <!--  定义dao层bean-->
    <bean id="accountDao" class="com.liumingkai.dao.impl.AccountDaoImpl">
        <property name="jdbcTemplate" ref="jdbcTemplate"/>
    </bean>

    <!--    4. 事务管理器-->
    <bean id="transactionManager" class="org.springframework.jdbc.datasource.DataSourceTransactionManager">
        <property name="dataSource" ref="dataSource"/>
    </bean>

    <!-- 5. 注册事务管理器驱动-->
    <tx:annotation-driven transaction-manager="transactionManager"/>
</beans>
在AccountDaoImpl类上添加@Transactional注解
package com.liumingkai.dao.impl;

import com.liumingkai.dao.AccountDao;
import org.springframework.jdbc.core.JdbcTemplate;
import org.springframework.transaction.annotation.Isolation;
import org.springframework.transaction.annotation.Propagation;
import org.springframework.transaction.annotation.Transactional;

/**
 * @author 刘明凯
 * @version 0.0.1
 * @date 2023年4月5日 07:10
 */
@Transactional(propagation = Propagation.REQUIRED,
isolation = Isolation.DEFAULT,
readOnly = false)
public class AccountDaoImpl implements AccountDao {

    private JdbcTemplate jdbcTemplate;

    public void setJdbcTemplate(JdbcTemplate jdbcTemplate) {
        this.jdbcTemplate = jdbcTemplate;
    }


    @Override
    public void transfer(String outUser, String inUser, Double money) {
        String sql = "update tb_account set balance = balance + ? where username = ? ";
        jdbcTemplate.update(sql, money, inUser);
        //模拟系统故障
        int i = 1 / 0;
        String sql2 = "update tb_account set balance = balance - ? where username = ? ";
        jdbcTemplate.update(sql2, money, outUser);
    }
}
初始SpringMVC框架
Java web中,学习了JSP Model2架构模型图,采用 JSP +Servlet +JavaBean的技术实现页面显示、流程控制、业务逻辑的分离。
但是JSP Model2存在缺陷,页面显示、流程控制、业务逻辑都是硬编码,每次重新开发Web应用程序,都需要重新从头编写这些代码。
Spring MVC 介绍
SpringMVC 概述
JavaEE开发中,系统经典的三层架构包括表现层、业务层、持久层。
- 表现层(Web层):接收客户端请求,并向客户端响应结果
- 业务层(Service层):负责业务逻辑处理
- 持久层(DAO层):负责数据库交互
SpringMVC是基于Servlet API构建的原始Web框架,属于Spring中的一个模块,正式名称是Spring Web MVC,简称SpringMVC。
SpringMVC提供了对MVC模式的全面支持,将表现层进行解耦。
SpringMVC是基于请求-响应处理模型的请求驱动程序,简化表现层开发
SpringMVC作用于三层架构中的表现层,用于接收客户端请求并进行响应
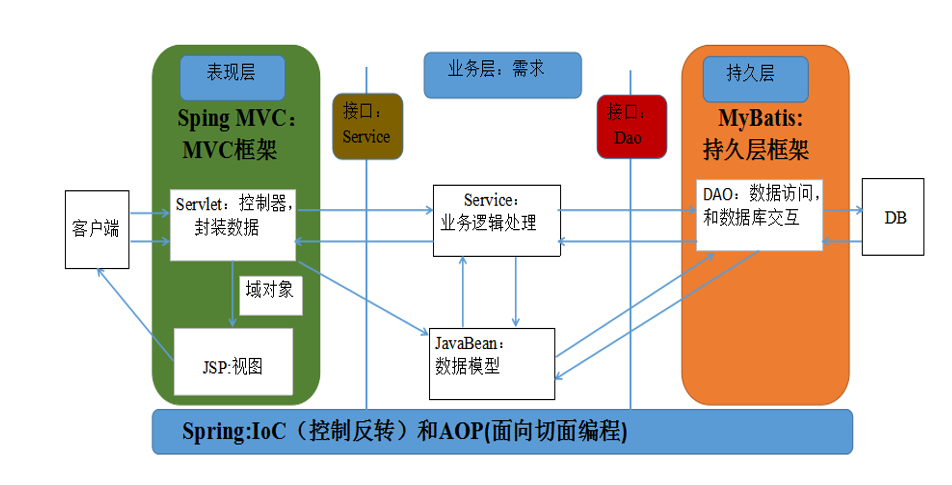
SpringMVC中包含了控制器和视图,控制器用于接收客户端的请求,对请求数据进行解析和封装,将请求交给业务层。
业务层对请求进行处理,最后将处理结果返回给表现层。
表现层接收到业务层的处理结果后,再由视图对处理结果进行渲染,渲染完成后返回客户端。
SpringMVC的特点
- Spring框架的后续产品,可以方便地使用Spring框架提供的其他功能
- 使用简单,简化Web层开发
- 支持各种你请求资源的映射策略
- 具有非常灵活的数据验证、格式化、数据绑定机制,能使用任何对象进行数据绑定,不必实现特点框架的API
- 支持国际化,可以根据用户区域显示多国家语言
- 支持多种视图技术,支持JSP、Velocity、FreeMarker等视图技术
- 灵活性强,易拓展。
入门程序
- 创建一个Maven webapp项目

- 引入依赖
<dependency>
      <groupId>junit</groupId>
      <artifactId>junit</artifactId>
      <version>4.11</version>
      <scope>test</scope>
    </dependency>

    <dependency>
      <groupId>org.springframework</groupId>
      <artifactId>spring-context</artifactId>
      <version>5.2.10.RELEASE</version>
    </dependency>

    <dependency>
      <groupId>org.springframework</groupId>
      <artifactId>spring-webmvc</artifactId>
      <version>5.2.10.RELEASE</version>
    </dependency>

    <dependency>
      <groupId>javax.servlet</groupId>
      <artifactId>javax.servlet-api</artifactId>
      <version>4.0.1</version>
    </dependency>

    <dependency>
      <groupId>javax.servlet.jsp</groupId>
      <artifactId>jsp-api</artifactId>
      <version>2.2</version>
      <scope>provided</scope>
    </dependency>
SpringMVC基于Servlet实现,所以需要导入Servlet的依赖。
SpringMVC作为Spring的一个模块,需要导入Spring框架的核心依赖。
- 配置运行插件,使用本地的Tomcat也是可以的
在pom.xml中
<plugin>
    <groupId>org.apache.tomcat.maven</groupId>
    <artifactId>tomcat7-maven-plugin</artifactId>
    <version>2.1</version>
    <configuration>
        <port>8888</port>
        <path>/springmvc</path>
    </configuration>
</plugin>
- 配置前端控制器
SpringMVC通过前端控制器拦截客户端的请求并进行转发,因此在使用SpringMVC时,配置前端控制器是不可缺少的一步。
SpringMVC的前端控制器也是一个Servlet,所以可以在Web.xml中配置
作用是:通知Tomcat哪一些请求要交给SpringMVC。
<?xml version="1.0" encoding="UTF-8"?>
<web-app xmlns="http://xmlns.jcp.org/xml/ns/javaee"
         xmlns:xsi="http://www.w3.org/2001/XMLSchema-instance"
         xsi:schemaLocation="http://xmlns.jcp.org/xml/ns/javaee http://xmlns.jcp.org/xml/ns/javaee/web-app_4_0.xsd"
         version="4.0"
         metadata-complete="false"
>

    <display-name>Archetype Created Web Application</display-name>

    <!--    配置Spring MVC的前端控制器-->
    <servlet>
        <servlet-name>DispatcherSevlet</servlet-name>
        <servlet-class>org.springframework.web.servlet.DispatcherServlet</servlet-class>
        <!--    配置初始化参数,用于读取SpringMVC的配置文件-->
        <init-param>
            <param-name>contextConfigLocation</param-name>
            <param-value>classpath:spring-mvc.xml</param-value>
        </init-param>
        <!--    应用加载时创建-->
        <load-on-startup>1</load-on-startup>
    </servlet>

    <servlet-mapping>
        <servlet-name>DispatcherSevlet</servlet-name>
        <url-pattern>/</url-pattern>
    </servlet-mapping>
</web-app>- 创建SpringMVC 配置文件
<?xml version="1.0" encoding="UTF-8"?>
<beans xmlns="http://www.springframework.org/schema/beans"
       xmlns:context="http://www.springframework.org/schema/contxt"
       xmlns:xsi="http://www.w3.org/2001/XMLSchema-instance"
       xmlns:contxt="http://www.springframework.org/schema/context"
       xsi:schemaLocation="
       http://www.springframework.org/schema/beans
       http://www.springframework.org/schema/beans/spring-beans.xsd
       http://www.springframework.org/schema/contxt
       http://www.springframework.org/schema/context/spring-context.xsd
">
    <!--    配置SpringMVC要扫描的包-->
    <contxt:component-scan base-package="com.liumingkai.controller"/>
    <!--    配置视图解析器-->
    <bean class="org.springframework.web.servlet.view.InternalResourceViewResolver">
        <property name="prefix" value="/WEB-INF/pages"/>
        <property name="suffix" value=".jsp"/>
    </bean>
</beans>- 创建处理器
package com.liumingkai.controller;

import org.springframework.stereotype.Controller;
import org.springframework.web.bind.annotation.RequestMapping;

/**
 * @author 刘明凯
 * @version 0.0.1
 * @date 2023年4月5日 08:55
 */
@Controller
public class FirstController {
//        设定当前方法的访问映射路径
    @RequestMapping("/hello")
    public String sayHello(){
        System.out.println("你好!你已经成功访问到FirstController");
        return "success";
    }

}- 创建视图页面
<%--
  Created by IntelliJ IDEA.
  User: 刘明凯的专属computer
  Date: 2023年4月5日
  Time: 08:57
  To change this template use File | Settings | File Templates.
--%>
<%@ page contentType="text/html;charset=UTF-8" language="java" %>
<html>
<head>
    <title>Title</title>
</head>
<body>
<h1>Spring MVC FirstController</h1>
</body>
</html>
步骤分析
首先要导入Spring-webmvc和servlet的依赖,因为spring-webmvc是在servlet的基础上建立而来的
springmvc是工作在表现层,也就是这个框架运行在Web容器(Tomcat容器)之中的。
在Javaweb阶段中了解到,Tomcat容器(servlet容器)中放的是一个个的Servlet,一个基本的Filter也是Servlet
所以要想springmvc能够起作用,就要在servlet容器中配置一个springmvc的servlet,在web.xml中配置,这个servelt就是DispatcherServelt,简称springmvc的前端控制器
当在web.xml中配置了这个DispatcherServlet,Tomcat去哪找这个Bean呢?此时spring容器的作用就到了,需要的spring的配置文件中配置这个Bean,这个Bean实例化后,Tomcat就能获取到这个实例化好后的Servelt。
当tomcat接收到请求时,根据请求路径匹配到springmvc的DispatcherServlet,然后就将这个请求交给DispatcherServlet。
请求到达Dispatcher后,就已经属于springmvc控制的领域了,就属于框架内部的逻辑处理了。
Dispatcher处理完成后,就会将响应结果返回给Tomcat,tomcat再返回给浏览器。
整个Web应用的结构

Spring MVC 工作原理
SpringMVC的三大组件:
- 处理器映射器 HandlerMapping
- 处理器适配器 HandlerAdapter
- 视图解析器 ViewResolver
- 处理器映射器HandlerMapping
处理器映射器可以理解为一个Map<URL,Handler>,HandlerMapping负责根据用户请求的URL找到Handler(处理器),SpringMVC提供了不同的映射器来实现不同的映射方式。类似于传统的Serlvet中,servlet-mapping 的作用。
- 处理器适配器HandlerAdapter
处理器适配器的作用是**根据处理器映射器找到Handler信息,**去执行相关的Handler。不同的处理器映射器映射出来的Handler对象是不一样的,不同的映射由不同的适配器来负责解析。
- 视图解析器ViewResolver
视图解析器进行视图解析时,首相将逻辑视图名解析成物理视图名,即具体的页面地址,再生成View视图对象返回。
原理图

- 用户通过浏览器向服务器发送请求,请求会被SpringMVC的前端控制器DispatcherServlet拦截
- Dispatcher拦截到请求后,会调用处理器映射器(HandlerMapping)
- 处理器映射器根据请求URL找到具体的处理器,生成处理器对象及处理器拦截器(如果有则生成)一并返回给DispatcherServlet
- DispatcherServlet会通过返回信息选择合适的处理器适配器(HandlerAdapter)
- HandlerAdapter会调用并执行处理器,这里的处理器是编写的Controller类,也被称为后端控制器
- Controller执行完成后,会返回一个ModelAndView对象,该对象中包含了视图名或包含模型和视图名
- HandlerAdapter将ModelAndView对象返回给DispatcherServlet
- 前端控制器请求视图解析器根据逻辑视图名解析真正的视图
- ViewResolver解析后,会向DispatcherServlet中返回具体的视图对象
- Dispatcher对View进行渲染(即将模型数据填充至视图中)
- 前端控制器向用户响应就结果
DispatcherServlet、HandlerMapping、HandlerAdapter和ViewResolver对象的工作是在框架内部执行的,我们只需要配置Dispatcher,完成Controller中的逻辑业务处理即可
SpringMVC的核心类和注解
DispatcherServlet
DispatcherServlet是SpringMVC的核心类,全限定名:
org.springframework.web.servlet.DispatcherServletDispatcherServlet是Spring MVC的流程控制中心,也被称为Spring MVC的前端控制器,他可以拦截到客户端的请求
DispatcherServlet拦截到请求后,会根据具体规则将请求交给其他组件处理,所有的请求都要经过DispatcherServlet进行转发处理,这就降低了Spring MVC各组件之间的耦合性。
DispatcherServlet本质上是一个Servlet,可以在Web.xml中完成对DispatcherServlet的配置和映射。
在Web.xml中可以这样配置
<!--    配置Spring MVC的前端控制器-->
    <servlet>
        <servlet-name>DispatcherSevlet</servlet-name>
        <servlet-class>org.springframework.web.servlet.DispatcherServlet</servlet-class>
        <!--    配置初始化参数,用于读取SpringMVC的配置文件-->
        <init-param>
            <param-name>contextConfigLocation</param-name>
            <param-value>classpath:spring-mvc.xml</param-value>
        </init-param>
        <!--    应用加载时创建-->
        <load-on-startup>1</load-on-startup>
    </servlet>

    <servlet-mapping>
        <servlet-name>DispatcherSevlet</servlet-name>
        <url-pattern>/</url-pattern>
</servlet-mapping><init-param>用于指定DispatcherServlet的初始化参数<load-on-startup>指定该servelt立即加载
如果没有指定Dispatcher要加载的配置文件,则应用程序会从WEB-INF目录下寻找并加载配置文件,默认配置文件的名称规则:
[servlet-name]-servlet.xml@Controller
在Spring MVC的执行流程中,DispatcherServlet会将请求转发给处理类中的Handler,Handler对用户请求进行处理。
在SpringMVC中,传统的处理器类是需要直接或间接地实现Contoller接口,这种方式需要在SpringMVC配置文件中定义映射关系。
SpringMVC提供了@Controller注解,标注在普通的Java类上
然后通过Spring的扫描机制找到该标注的类,此类就成为了SpringMVC的处理器类
为了保证SpringMVC能够找到该处理器类,需要设置包扫描
配置文件中引入spring-context声明,用于支持配置文件中所需要使用<context:componet-scan>元素
<?xml version="1.0" encoding="UTF-8"?>
<beans xmlns="http://www.springframework.org/schema/beans"
       xmlns:context="http://www.springframework.org/schema/context"
       xmlns:xsi="http://www.w3.org/2001/XMLSchema-instance"
       xmlns:contxt="http://www.springframework.org/schema/context"
       xsi:schemaLocation="
       http://www.springframework.org/schema/beans
       http://www.springframework.org/schema/beans/spring-beans.xsd
       http://www.springframework.org/schema/context
       http://www.springframework.org/schema/context/spring-context.xsd
">
    <!--    配置SpringMVC要扫描的包-->
    <context:component-scan base-package="com.liumingkai.controller"/>
    <!--    配置视图解析器-->
    <bean class="org.springframework.web.servlet.view.InternalResourceViewResolver">
        <property name="prefix" value="/WEB-INF/pages/"/>
        <property name="suffix" value=".jsp"/>
    </bean>
</beans>
@RequestMapping
使用该注解为处理器类设置映射信息,将请求url映射到此处理器类
@RequestMapping的使用
@RequestMapping可以用在类、方法上
标注在方法上
标注在方法上,那么该方法就成为了一个可以处理客户请求的Handler。
通过项目访问路径 + 映射路径 就能找到该处理器类
@Controller
public class FirstController {
//        设定当前方法的访问映射路径
    @RequestMapping("/hello")
    public String sayHello(){
        System.out.println("你好!你已经成功访问到FirstController");
        return "success";
    }

}
标注在类上
相当于给本处理器类添加了一个命名空间,要想访问其中的处理方法,就要加上此路径
package com.liumingkai.controller;

import org.springframework.stereotype.Controller;
import org.springframework.web.bind.annotation.RequestMapping;

/**
 * @author 刘明凯
 * @version 0.0.1
 * @date 2023年4月5日 08:55
 */
@Controller
@RequestMapping("/student")
public class FirstController {

    @RequestMapping("/hello")
    public String sayHello() {
        System.out.println("你好!你已经成功访问到FirstController");
        return "success";
    }

}以上配置,需要通过项目路径 + /student/hello才能访问到
@RequestMapping的属性

value属性
value属性用于定义映射路径,如果value是此注解的唯一显式使用 ,则可以省略
@RequestMapping(value="/student")
@RequestMapping("/stduent")
value属性是所有注解的默认属性,如果只使用这一个属性,则可以省略value的名称,直接给出值
method属性
可以定义此处理器的请求方式,
只能使用规定的请求方式才可以访问到该处理器
@RequestMapping(value="/hello",method = RequestMethod.GET)
@RequestMapping(value = "/hello", method = {RequestMethod.POST, RequestMethod.PUT})
如果没有给出method的属性值,则所有的请求方式都可以
params属性
只有当请求中的参数符合该参数要求时,才可以访问到该处理器
@RequestMapping(value = "/find", params = "id = 1")
@RequestMapping(value = "/find", params = {"id = 1", "id =2"})
来看一个例子
@Controller
@RequestMapping("/student")
public class FirstController {
    @RequestMapping(value = "/find", params = {"id = 1", "id =2"})
    public String findStudentById() {
        System.out.println("你好!你已经成功访问到FirstController");
        return "success";
    }

}只有访问项目路径 + /student/find?id=1或项目路径 + /student/find?id=2时,才可以正确触发该处理器
请求映射方式
基于请求方式的URL路径映射
在@RequestMapping的基础上,指定特定的method属性,就有了下面的特定注解:
@GetMapping匹配GET方式的请求@PostMapping匹配Post方式的请求@PutMapping匹配PUT方式的请求@DeleteMapping匹配DELETE方式的请求@PatchMapping:匹配PATCH方式的请求
基于Ant风格的URL路径映射
所谓的Ant风格就是一种通配符风格,可以在处理器映射路径中使用通配符对访问的URL路径进行关联。
Ant风格的通配符有以下三种:
- ?匹配任意单个字符
- *匹配0或任意多个数量的字符
- **匹配0或多级目录

当多个通配符冲突时,路径就会遵循最长匹配原则
例如,/ant/a/path同时满足/**/path和/ant/*/path匹配规则,但/ant/path最终会匹配/ant/*/path路径。
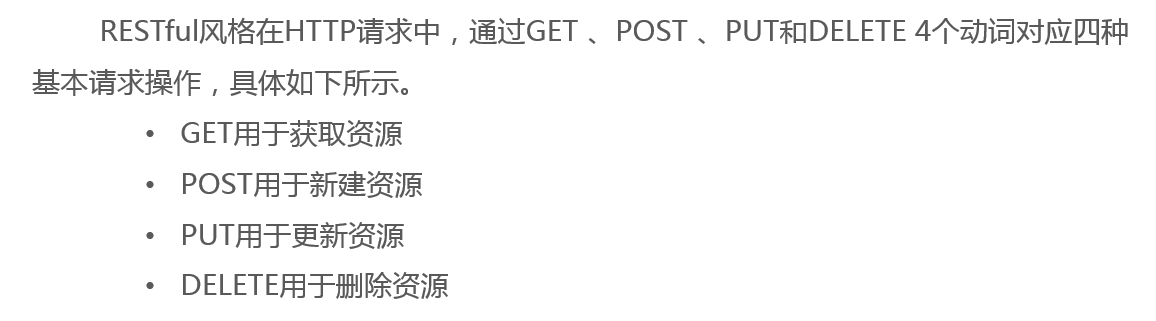
基于RESTFul风格的URL路径映射
传统风格的url路径
http://localhost:8888/project/findStudent?id=1RESTFul风格
http://localhost:8888/project/student/id/1RESTFul风格中的请求参数id= 1变成了请求路径的一部分。
Spring MVC数据绑定和响应
数据绑定
SpringMVC将请求消息数据与处理器的形参建立连接的过程
在SpringMVC数据绑定的过程中,SpringMVC会通过数据绑定组件DataBinder对请求中的参数内容进行类型转换,然后将转换后的值赋给处理器的形参中,这样Spring MVC就完成了对客户端请求参数的获取和绑定。

步骤分析:
- SpringMVC将ServletRequest对象传递给DataBinder
- 将处理方法的入参对象传递给DataBinder
- DataBinder调用ConversionService组件进行数据类型转换、数据格式化工作,并将ServletRequest对象中的消息填充到参数对象中。
- 调用Validator组件对已经绑定了请求消息数据的参数对象进行数据合法性校验
- 校验完成后会生成数据绑定结果BindingResult对象,SpringMVC会将BindingResult对象中的内容赋给处理方法的相关参数
SpringMVC的请求参数的绑定是框架自动实现的,根据请求参数类型和参数个数等数据信息的复杂程度,可以将SpringMVC中的数据绑定分为简单数据绑定和复杂数据绑定
简单数据绑定
简单数据绑定是指请求参数不是基于列表或多层级的数据,参数直接和服务器的处理方法的形参绑定。
简单数据绑定:
- 默认类型数据绑定
- 简单数据类型绑定
- POJO绑定
默认类型数据绑定
SpringMVC数据绑定的类型中,有一些是SpringMVC框架默认支持的数据类型。
当使用SpringMVC默认支持的数据类型作为处理器形参类型时,SpringMVC的参数处理适配器会默认识别这些类型并进行赋值
SpringMVC常见的默认类型是:
- HttpServletRequest获取请求信息
- HttpServletResponse处理响应信息
- HttpSession获取session中存放的对象
- Model / ModelMap: Model是一个接口,ModelMap是一个类,Model的实现类对象和ModelMap对象都可以设置model数据,model数据会填充到request域。
演示
@Controller
public class UserController {

    @RequestMapping("/getUserById")
    public void getUserById(HttpServletRequest request){
        String userid = request.getParameter("userid");
        System.out.println("userid = " + userid);
    }

}
HttpServletRequest就是JavaWeb中,用于封装请求消息的对象,获取请求参数的方法是getParameter()
浏览器访问http://localhost:9999/getUserById?userid=2

简单数据类型绑定
简单数据类型是指java中的基本类型(如Integer、String、Double等)数据的绑定。
在SpringMVC中进行简单数据类型绑定,只需要客户端的请求参数名称与处理器的形参名称一致接口
请求参数会自动映射到处理器的形参
@RequestMapping("/getUser")
    public void getUserByNameAndId(String name, Integer id){
        System.out.println("name =  " + name + " id = " + id);

}访问http://localhost:9999/getUser?name=zhangsan&id=2

!!!!!!!
如果请求参数与处理器形参不一致,就会导致处理器无法正确绑定并接收客户端的请求中的参数
此时可以使用SpringMVC提供的@RequestParam注解来指定请求参数的别名,解决请求参数与处理器形参不一致的情况
@RequestParam的属性

请求参数名称为name,但是形参名称为username
@RequestMapping("/getUserByName")
    public void getUserByName(@RequestParam("name") String username){
        System.out.println("username = " + username);
}访问http://localhost:9999/getUserByName?name=zhangsan

RESTFul风格的请求参数的设置是@PathVariable

实例代码
@GetMapping("/rest/getUser/{name}")
    public void getUser(@PathVariable("name") String username){
        System.out.println("username = " + username);
}访问http://localhost:9999/rest/getUser/zhangsan

POJO 绑定
请求的参数有很多,可以封装到一个POJO中。
首先要有一个POJO类型
package com.liumingkai.pojo;

/**
 * @author 刘明凯
 * @version 0.0.1
 * @date 2023年4月6日 17:26
 */

public class User {

    private String userName;
    private String password;

    public User() {
    }

    @Override
    public String toString() {
        return "User{" +
                "userName='" + userName + '\'' +
                ", password='" + password + '\'' +
                '}';
    }

    public String getUserName() {
        return userName;
    }

    public void setUserName(String userName) {
        this.userName = userName;
    }

    public String getPassword() {
        return password;
    }

    public void setPassword(String password) {
        this.password = password;
    }
}
定义一个处理器
@PostMapping("/register")
    public void register(User user){
        System.out.println("username = " + user.getUserName() + ", password = " + user.getPassword());
    }
请求页面
<%--
  Created by IntelliJ IDEA.
  User: 刘明凯的专属computer
  Date: 2023年4月6日
  Time: 17:29
  To change this template use File | Settings | File Templates.
--%>
<%@ page contentType="text/html;charset=UTF-8" language="java" %>
<html>
<head>
    <title>Title</title>
</head>
<body>
<form method="post" action="/register">
    <label for="userName" >用户名</label>
    <input id="userName" placeholder="请输入用户名" type="text" name="userName"><br>
    <label for="password" >密码</label>
    <input id="password" type="password" name="password">
    <input type="submit" value="提交">
</form>
</body>
</html>
测试

表单中的元素的name属性要与出来形参的POJO类型的属性名保持一致,否则无法绑定成功
POST请求中文乱码
客户端POST提交的表单数据中有中文,在服务器端会就出现乱码。
为了防止服务端接收到的参数乱码,可以使用Spring提供的编码过滤器来统一编码
在web.xml中配置filter
<filter>
    <filter-name>CharacterEncodingFilter</filter-name>
    <filter-class>org.springframework.web.filter.CharacterEncodingFilter</filter-class>
    <init-param>
        <param-name>encoding</param-name>
        <param-value>UTF-8</param-value>
    </init-param>
</filter>
<filter-mapping>
    <filter-name>CharacterEncodingFilter</filter-name>
    <url-pattern>/*</url-pattern>
</filter-mapping>
自定义类型转换器
SpringMVC提供了一些常用的类型转换器。
然后SpringMVC提供的常用的类型转换器不能满足所有的需求,此时我们可以自定义类型转换器,来将参数为程序所需要的类型。
SpringMVC提供了org.framework.core.convert.converter.Converter接口作为类型转换
public interface Converter<S, T> {
    @Nullable
    T convert(S var1);
}
在上述代码中,泛型参数S表示源类型,T表示目标类型,而convert()方法是处理类型转换的逻辑部分,需要我们自己写,最后将目标类型对象返回
演示一波
要求实现Date类型的数据绑定
- 首先实现Convert 接口
package com.liumingkai.convert;

import org.springframework.core.convert.converter.Converter;

import java.text.SimpleDateFormat;
import java.util.Date;

/**
 * @author 刘明凯
 * @version 0.0.1
 * @date 2023年4月6日 17:47
 */

public class DateConvert implements Converter<String, Date> {
    // 定义日期格式
    private String datePattern = "yyyy-MM-dd";

    @Override
    public Date convert(String source) {
        // 格式化日期
        SimpleDateFormat sdf = new SimpleDateFormat(datePattern);
        try {
            return sdf.parse(source);
        } catch (Exception e) {
            throw new IllegalArgumentException("无效的日期格式,请使用这种日期格式" + this.datePattern);
        }
    }
}
为了让SpringMVC知道并使用我们自定义的类型转换器DateConvert类,需要在Spring-mvc的配置文件中做出修改
<?xml version="1.0" encoding="UTF-8"?>
<beans xmlns="http://www.springframework.org/schema/beans"
       xmlns:context="http://www.springframework.org/schema/context"
       xmlns:xsi="http://www.w3.org/2001/XMLSchema-instance"
       xmlns:contxt="http://www.springframework.org/schema/context"
       xmlns:mvc="http://www.springframework.org/schema/mvc"
       xsi:schemaLocation="
       http://www.springframework.org/schema/beans
       http://www.springframework.org/schema/beans/spring-beans.xsd
       http://www.springframework.org/schema/context
       http://www.springframework.org/schema/context/spring-context.xsd
       http://www.springframework.org/schema/mvc
       http://www.springframework.org/schema/mvc/spring-mvc.xsd
">
    <!--    配置SpringMVC要扫描的包-->
    <context:component-scan base-package="com.liumingkai.controller"/>
    <!--    配置视图解析器-->
    <bean class="org.springframework.web.servlet.view.InternalResourceViewResolver">
        <property name="prefix" value="/WEB-INF/pages/"/>
        <property name="suffix" value=".jsp"/>
    </bean>

    <!--    配置类型转换器工厂-->
    <bean id="convertService" class="org.springframework.context.support.ConversionServiceFactoryBean">
        <!--        给工厂注入一个新的类型转换器-->
        <property name="converters">
            <array>
                <!--                配置自定义类型转换器-->
                <bean class="com.liumingkai.convert.DateConvert"/>
            </array>
        </property>
    </bean>
    <!--    装载转换器-->
    <mvc:annotation-driven conversion-service="convertService"/>
</beans>
配置自定义类型转换器,并将自定义类型转换器注册到转换器工厂ConversionServiceFactoryBean中
最后<mvc:annotation-driven>标签转载自定义的类型转换服务。
除了可以将自定义转换器配置到类型转换器工厂ConversionServiceFactoryBean外,
也可以将自定义转换器配置在格式化工厂,只需要将class="org.springframework.context.support.ConversionServiceFactoryBean"替换为class="org.springframework.format.support.FormattingConversionServiceBean",效果是一样的。
测试一下我们的自定义类型转换器有没有起作用
自定义处理器
@RequestMapping("/getBirthday")
    public void getBirthday(Date birthday) {
        System.out.println("birthday = " + birthday);
}测试,访问http://localhost:9999/getBirthday?birthday=2001-09-12,成功转换

!!!!!!!!!!!!!!
上面的例子是基于XML配置自定义转换器实现的,处理XML方式外,还可以通过@DateTimeFormat注解来简化日期类型的格式转换
使用@DateTimeFormat完成日期类型的格式转换无需自定义转换器,也无需在配置文件中定义转换器工厂或格式化工厂,只需要在方法的形参前面或成员变量的上方
修改处理器
@RequestMapping("/getBirthday")
    public void getBirthday(@DateTimeFormat(pattern = "yyyy-MM-dd") Date birthday) {
        System.out.println("birthday = " + birthday);
    }
删除配置文件中的转换器工厂,配置文件中的内容为
<?xml version="1.0" encoding="UTF-8"?>
<beans xmlns="http://www.springframework.org/schema/beans"
       xmlns:context="http://www.springframework.org/schema/context"
       xmlns:xsi="http://www.w3.org/2001/XMLSchema-instance"
       xmlns:contxt="http://www.springframework.org/schema/context"
       xmlns:mvc="http://www.springframework.org/schema/mvc"
       xsi:schemaLocation="
       http://www.springframework.org/schema/beans
       http://www.springframework.org/schema/beans/spring-beans.xsd
       http://www.springframework.org/schema/context
       http://www.springframework.org/schema/context/spring-context.xsd
       http://www.springframework.org/schema/mvc
       http://www.springframework.org/schema/mvc/spring-mvc.xsd
">
    <!--    配置SpringMVC要扫描的包-->
    <context:component-scan base-package="com.liumingkai.controller"/>
    <!--    配置视图解析器-->
    <bean class="org.springframework.web.servlet.view.InternalResourceViewResolver">
        <property name="prefix" value="/WEB-INF/pages/"/>
        <property name="suffix" value=".jsp"/>
    </bean>

    <!--    装载转换器-->
    <mvc:annotation-driven />
</beans>注意:注解方式的类型转换是依赖注解驱动的支持,所以在配置文件中必须保留<mvn:annotation-driven>标签
测试,访问http://localhost:9999/getBirthday?birthday=2001-09-12是可以的

如果处理器形参是POJO,Date作为POJO的属性,此时可以将注解标注在POJO的成员属性上
public class User {
    @DateTimeFormat(pattern = "yyyy-MM-dd")
    private Date birthday;
}
复杂数据绑定
数组、集合、复杂POJO的绑定,以及JSON的绑定。
数组绑定
客户端发送多个同名参数,此时需要使用数组来接收请求参数。
form表单的元素的name属性与处理器数组形参名保持一致
测试页面
<%--
  Created by IntelliJ IDEA.
  User: 刘明凯的专属computer
  Date: 2023年4月6日
  Time: 19:05
  To change this template use File | Settings | File Templates.
--%>
<%@ page contentType="text/html;charset=UTF-8" language="java" %>
<html>
<head>
    <title>Title</title>
</head>
<body>
<form method="post" action="/getProducts">
    <h3>请选择商品</h3>
    <table border="1">
        <tr>
            <td><input type="checkbox" name="ids" value="1"></td>
            <td>Java基础教程</td>
        </tr>
        <tr>
            <td><input type="checkbox" name="ids" value="2"></td>
            <td>Spring高级教程</td>
        </tr>
        <tr>
            <td><input type="checkbox" name="ids" value="3"></td>
            <td>SpringCloud高级教程</td>
        </tr>
    </table>
    <input type="submit">
</form>
</body>
</html>
处理器
@Controller
public class ProductController {
    @RequestMapping("/getProducts")
    public void getProducts(String[] ids) {
        for (String id : ids) {
            System.out.println("获取到商品为" + id + "的信息");
        }
    }

}
集合绑定
同样,保证form表单的元素的name属性与处理器集合形参名称一致
不同的是,使用集合绑定时,处理器的形参名需要使用@RequestParam注解标注
@Controller
public class ProductController {
    @RequestMapping("/getProducts")
    public void getProducts(@RequestParam("productIds") List<String> productIds) {
        for (String id : productIds) {
            System.out.println("读取到id为" + id + "的商品的信息");
        }
    }

}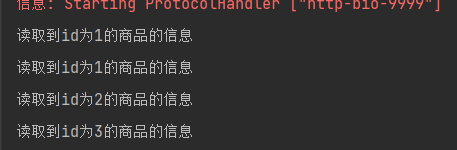
!!!!!!!!!
如果不使用@RequestParam注解List形参,SpringMVC就会将List作为对象去创建,赋值前先去创建List对象,然后将proIds作为List对象的属性进行处理,但是List是接口,无法实例化。
如果把形参类型修改为ArrayList,但是ArrayList没有productIds这个属性,仍然不会绑定成功。
使用@RequestParam注解标注该形参,此时SpringMVC就会认为productIds是一组数据,而不是单一个数据。
通过@RequestParam注解将参数打包成参数数组或集合后,SpringMVC才能识别该数据格式,判定形参类型是否为数组或集合,并按数组或集合对象的形式操作数据。
复杂POJO绑定
一个对象的属性又是对象,此时赋值比较困难了。
属性为对象类型的数据绑定
在form表单元素的name属性为 属性名.属性的方式绑定
模拟获取用户订单的案例
订单类
package com.liumingkai.pojo;

/**
 * 订单类
 *
 * @author 刘明凯
 * @version 0.0.1
 * @date 2023年4月6日 19:35
 */

public class Order {

    private String orderId;

    @Override
    public String toString() {
        return "Order{" +
                "orderId='" + orderId + '\'' +
                '}';
    }

    public String getOrderId() {
        return orderId;
    }

    public void setOrderId(String orderId) {
        this.orderId = orderId;
    }
}
用户类
package com.liumingkai.pojo;

import java.util.Date;

/**
 * @author 刘明凯
 * @version 0.0.1
 * @date 2023年4月6日 17:26
 */

public class User {

    private String userName;
    private String password;
    private Order order;

    public Order getOrder() {
        return order;
    }

    @Override
    public String toString() {
        return "User{" +
                "userName='" + userName + '\'' +
                ", password='" + password + '\'' +
                ", order=" + order +
                '}';
    }

    public void setOrder(Order order) {
        this.order = order;
    }

    public User() {
    }

    public String getUserName() {
        return userName;
    }

    public void setUserName(String userName) {
        this.userName = userName;
    }

    public String getPassword() {
        return password;
    }

    public void setPassword(String password) {
        this.password = password;
    }
}- 定义处理器
@RequestMapping("/findOrderWithUser")
    public void findOrderWithUser(User user){
        System.out.println("订单即用户信息为");
        System.out.println(user);
    }
测试页面
<%--
  Created by IntelliJ IDEA.
  User: 刘明凯的专属computer
  Date: 2023年4月6日
  Time: 19:41
  To change this template use File | Settings | File Templates.
--%>
<%@ page contentType="text/html;charset=UTF-8" language="java" %>
<html>
<head>
    <title>Title</title>
</head>
<body>
<form method="post" action="/findOrderWithUser">
    <label for="userName">用户名</label><input id="userName" name="userName" type="text"><br>
    <label for="password">密码</label><input id="password" name="password" type="password"><br>
    <label for="orderId">订单号</label><input id="orderId" name="order.orderId" type="text"><br>
    <input type="submit">
</form>
</body>
</html>
!!!
通过属性名.属性名的方式来进行赋值,要保证form表单元素的name属性的名称与POJO的属性名保持一致

属性为List类型的数据绑定
用户的订单是多个,用户的下单地址是多个,需要用集合存储。
用户类
package com.liumingkai.pojo;

import org.springframework.format.annotation.DateTimeFormat;

import java.util.Date;
import java.util.List;

/**
 * @author 刘明凯
 * @version 0.0.1
 * @date 2023年4月6日 17:26
 */

public class User {

    private String userName;
    private String password;
    private List<String> address;// 订单地址
    private List<Order> orders;// 订单


    @Override
    public String toString() {
        return "User{" +
                "userName='" + userName + '\'' +
                ", password='" + password + '\'' +
                ", address=" + address +
                ", orders=" + orders +
                '}';
    }

    public List<Order> getOrders() {
        return orders;
    }

    public void setOrders(List<Order> orders) {
        this.orders = orders;
    }

    public List<String> getAddress() {
        return address;
    }

    public void setAddress(List<String> address) {
        this.address = address;
    }

    public User() {
    }

    public String getUserName() {
        return userName;
    }

    public void setUserName(String userName) {
        this.userName = userName;
    }

    public String getPassword() {
        return password;
    }

    public void setPassword(String password) {
        this.password = password;
    }
}
订单类
package com.liumingkai.pojo;

/**
 * 订单类
 *
 * @author 刘明凯
 * @version 0.0.1
 * @date 2023年4月6日 19:35
 */

public class Order {

    private String orderId;

    private String orderName;

    public String getOrderName() {
        return orderName;
    }

    public void setOrderName(String orderName) {
        this.orderName = orderName;
    }

    @Override
    public String toString() {
        return "Order{" +
                "orderId='" + orderId + '\'' +
                ", orderName='" + orderName + '\'' +
                '}';
    }

    public String getOrderId() {
        return orderId;
    }

    public void setOrderId(String orderId) {
        this.orderId = orderId;
    }
}
处理器
@RequestMapping("/getOrders")
    public void getOrders(User user){
        System.out.println(user);
    }
测试页面
<%--
  Created by IntelliJ IDEA.
  User: 刘明凯的专属computer
  Date: 2023年4月6日
  Time: 19:53
  To change this template use File | Settings | File Templates.
--%>
<%@ page contentType="text/html;charset=UTF-8" language="java" %>
<html>
<head>
    <title>Title</title>
</head>
<body>
<form method="post" action="/getOrders">
    <table border="1">
        <tr>
            <th>用户ID</th>
            <td><input value="1" type="text" name="userName"></td>

        </tr>
        <tr>
            <th>订单编号</th>
            <th>订单名称</th>
            <th>订单地址</th>
        </tr>
        <tr>
            <td><input value="sf12901239999" type="text" name="orders[0].orderId"></td>
            <td><input value="SpringCloud高级教程" type="text" name="orders[0].orderName"></td>
            <td><input value="山东威海" type="text" name="address"></td>
        </tr>
        <tr>
            <td><input value="sf12901239999" type="text" name="orders[1].orderId"></td>
            <td><input value="数据结构与算法" type="text" name="orders[1].orderName"></td>
            <td><input value="山东滨州" type="text" name="address"></td>
        </tr>
        <tr>
            <td><input value="sf12901239999" type="text" name="orders[2].orderId"></td>
            <td><input value="深入理解JVM" type="text" name="orders[2].orderName"></td>
            <td><input value="山东威海荣成" type="text" name="address"></td>
        </tr>

    </table>
    <input type="submit">
</form>
</body>
</html>
!!!!!总结
如果List的泛型是简单类型
则form表单元素的属性名必须与List集合的名称保持一致
如果List的泛型是对象类型
则form表单元素的属性名要与 属性名层次结构保持一致,
集合[索引].属性名
属性为Map类型的数据绑定
对象属性为Map,如何绑定
订单类
package com.liumingkai.pojo;

import java.util.HashMap;

/**
 * 订单类
 *
 * @author 刘明凯
 * @version 0.0.1
 * @date 2023年4月6日 19:35
 */

public class Order {

    private String orderId;

    private String orderName;

    private HashMap<String, Product> productInfo;// 商品信息


    @Override
    public String toString() {
        return "Order{" +
                "orderId='" + orderId + '\'' +
                ", orderName='" + orderName + '\'' +
                ", productInfo=" + productInfo +
                '}';
    }

    public HashMap<String, String> getProductInfo() {
        return productInfo;
    }

    public void setProductInfo(HashMap<String, String> productInfo) {
        this.productInfo = productInfo;
    }

    public String getOrderName() {
        return orderName;
    }

    public void setOrderName(String orderName) {
        this.orderName = orderName;
    }

    public String getOrderId() {
        return orderId;
    }

    public void setOrderId(String orderId) {
        this.orderId = orderId;
    }
}
Product类
package com.liumingkai.pojo;

/**
 * @author 刘明凯
 * @version 0.0.1
 * @date 2023年4月6日 20:14
 */

public class Product {

    private String productId;
    private String productName;


    @Override
    public String toString() {
        return "Product{" +
                "productId='" + productId + '\'' +
                ", productName='" + productName + '\'' +
                '}';
    }

    public String getProductId() {
        return productId;
    }

    public void setProductId(String productId) {
        this.productId = productId;
    }

    public String getProductName() {
        return productName;
    }

    public void setProductName(String productName) {
        this.productName = productName;
    }
}
处理器
package com.liumingkai.controller;

import com.liumingkai.pojo.Order;
import org.springframework.stereotype.Controller;
import org.springframework.web.bind.annotation.RequestMapping;

/**
 * @author 刘明凯
 * @version 0.0.1
 * @date 2023年4月6日 20:10
 */
@Controller
public class OrderController {

    @RequestMapping("/getOrderInfo")
    public void getOrderInfo(Order order){
        System.out.println(order);
    }

}
测试页面
<%--
  Created by IntelliJ IDEA.
  User: 刘明凯的专属computer
  Date: 2023年4月6日
  Time: 20:12
  To change this template use File | Settings | File Templates.
--%>
<%@ page contentType="text/html;charset=UTF-8" language="java" %>
<html>
<head>
    <title>Title</title>
</head>
<body>
<form method="post" action="/getOrderInfo">
    <table border="1">
        <tr>
            <th>订单编号</th>
            <th>
                <input type="text" value="sf222211x" name="orderId">
            </th>
        </tr>

        <tr>
            <td>商品id</td>
            <td>商品名称</td>
        </tr>

        <tr>
            <td>
                <input type="text" name="productInfo['饮料'].productId" value="2">
            </td>
            <td>
                <input type="text" name="productInfo['饮料'].productName" value="脉动回来饮料500ml">
            </td>
        </tr>

        <tr>
            <td>
                <input type="text" name="productInfo['水果'].productId" value="3">
            </td>
            <td>
                <input type="text" name="productInfo['水果'].productName" value="新疆葡萄1kg">
            </td>
        </tr>
    </table>

    <input type="submit">
</form>

</body>
</html>
同理
如果Map的value是普通类型
通过
mapName[key]直接赋值即可如果Map的value是对象类型
通过
mapName[key].属性名的方式赋值
JSON数绑定
JSON是一种轻量级的数据交互格式,相比XML,JSON的解析速度更快,占用空间更小
针对客户端不同的请求,HttpServletRequest中的MediaType也会不同
如果想将HttpServletRequest中的数据类型转换为指定的对象,或者将对象转换成指定格式的数据,需要使用消息转换器来实现。
Spring中提供了一个HttpMessageConverter接口作为消息转换器 因为数据类型有多种,所以Spring中提供了多个HttpMessageConverter接口的实现类
其中,MappingJackson2HttpMessageConverter是实现类之一,可以实现将请求中的JSON转换为Java中的对象,也可以将响应的Java对象转换为JSON格式的数据
首先需要导入Jackson的依赖,只需要导入jackson-databind,然后jackson-core和jackson-annotations的依赖就会自动引入
<!--        Jackson转换的数据绑定依赖-->
        <dependency>
            <groupId>com.fasterxml.jackson.core</groupId>
            <artifactId>jackson-databind</artifactId>
            <version>2.13.5</version>
        </dependency>
Product类
package com.liumingkai.pojo;

/**
 * @author 刘明凯
 * @version 0.0.1
 * @date 2023年4月6日 20:14
 */

public class Product {

    private String productId;
    private String productName;


    @Override
    public String toString() {
        return "Product{" +
                "productId='" + productId + '\'' +
                ", productName='" + productName + '\'' +
                '}';
    }

    public String getProductId() {
        return productId;
    }

    public void setProductId(String productId) {
        this.productId = productId;
    }

    public String getProductName() {
        return productName;
    }

    public void setProductName(String productName) {
        this.productName = productName;
    }
}
测试页面
<%--
  Created by IntelliJ IDEA.
  User: 刘明凯的专属computer
  Date: 2023年4月6日
  Time: 19:05
  To change this template use File | Settings | File Templates.
--%>
<%@ page contentType="text/html;charset=UTF-8" language="java" %>
<html>
<head>
    <title>Title</title>
    <script src="/js/jquery-3.6.0.min.js"/>
</head>
<body>
<form method="post" action="/getProducts">
    <table border="1">
        <tr>
            <th>商品id</th>
            <th>商品名称</th>
            <th>提交</th>
        </tr>
        <tr>
            <td>
                <input name="productId" type="text" value="1" id="productId1">
            </td>
            <td>
                <input name="productName" type="text" value="活蹦乱跳的大草鱼" id="productName1">
            </td>
            <td>
                <input type="button" value="提交单个商品(可以点)" onclick="">
            </td>
        </tr>
        <tr>
            <td>
                <input name="productId" type="text" value="2" id="productId2">
            </td>
            <td>
                <input name="productName" type="text" value="喔喔直叫的大公鸡" id="productName2">
            </td>
            <td>
                <input type="button" value="提交单个商品(别点)" onclick="submitProduct()">
            </td>
        </tr>
        <tr>
            <td>
                <input name="productId" type="text" value="3" id="productId3">
            </td>
            <td>
                <input name="productName" type="text" value="喷香的粘苞米" id="productName3">
            </td>
            <td>
                <input type="button" value="提交单个商品(别点)" onclick="submitProduct()">
            </td>
        </tr>
    </table>
    <input type="button" value="提交所有商品(可以点)" onclick="submitProducts()">
</form>
<script>
    function submitProduct1() {
        var productId = $("#productId1").val()
        var productName = $("#productName1").val()
        $.ajax({
            url: "/getProduct",
            type: "post",
            data: JSON.stringify({productId: productId, productName: productName}),
            contentType: "application/json;charset=UTF-8",
            dataType: "json",
            success: function (response) {
                alert(response)
            }
        })

    }

    function submitProducts() {
        var product1 = {productId:${"#productId1"}.val(), productName: $("#productName1").val()}
        var product2 = {productId:${"#productId2"}.val(), productName: $("#productName2").val()}
        var product3 = {productId:${"#productId3"}.val(), productName: $("#productName3").val()}
        $.ajax({
            url: "/getProductList",
            type: "post",
            data: JSON.stringify([product1,product2,product3]),
            contentType: "application/json;charset=UTF-8",
            dataType: "json",
            success: function (response) {
                alert(response)
            }
        })
    }
</script>
</body>
</html>
处理器
@RequestMapping("/getProduct")
    public void getProduct(@RequestBody Product product) {
        System.out.println(product);
    }

    @RequestMapping("/getProductList")
    public void getProductList(@RequestBody List<Product> products) {
        System.out.println(products);
}我们之前的web.xml中配置DispatcherServelt的拦截路径时,配置的拦截路径为/,就是所有的请求都会拦截,导致项目中的静态资源也会被DispatcherServlet拦截到,如果想要放行静态资源,需要在spring-mvc.xml中进行资源配置
<?xml version="1.0" encoding="UTF-8"?>
<beans xmlns="http://www.springframework.org/schema/beans"
       xmlns:context="http://www.springframework.org/schema/context"
       xmlns:xsi="http://www.w3.org/2001/XMLSchema-instance"
       xmlns:contxt="http://www.springframework.org/schema/context"
       xmlns:mvc="http://www.springframework.org/schema/mvc"
       xsi:schemaLocation="
       http://www.springframework.org/schema/beans
       http://www.springframework.org/schema/beans/spring-beans.xsd
       http://www.springframework.org/schema/context
       http://www.springframework.org/schema/context/spring-context.xsd
       http://www.springframework.org/schema/mvc
       http://www.springframework.org/schema/mvc/spring-mvc.xsd
">
    <!--    配置SpringMVC要扫描的包-->
    <context:component-scan base-package="com.liumingkai.controller"/>
    <!--    配置视图解析器-->
    <bean class="org.springframework.web.servlet.view.InternalResourceViewResolver">
        <property name="prefix" value="/WEB-INF/pages/"/>
        <property name="suffix" value=".jsp"/>
    </bean>

    <!--    装载转换器-->
    <mvc:annotation-driven/>
    <!--  配置访问静态资源的访问映射,此配置中的文件将不被DispatcherServlet拦截-->
    <mvc:resources mapping="/js/**" location="/js/"/>
</beans><mvn:resources>有两个重要属性location和mapping,这两个属性
- location 用于定位需要访问的本地静态资源文件路径,具体到某个文件夹
- mapping 匹配静态资源全路径,其中
/**表示文件夹及其子文件夹下的某个具体文件
测试

为了使得JSON能够正确转换称为Java对象,要保证Json中数据的key与java对象的属性名保持一致
配置JSON转换器
在配置JSON转换器时,除了常用的<mvn:annotation-driven>元素外,还可以使用<bean>元素进行显式的配置。
<!--使用<bean>元素配置注解方式的处理器适配器-->
<bean class="org.springframework.web.servlet.mvc.method.annotation.RequestMappingHandlerAdapter">
    <property name="messageConverters">
        <list>
            <!--              在注解适配器中配置JSON转换器-->
            <bean class="org.springframework.http.converter.json.MappingJackson2HttpMessageConverter"/>
        </list>
    </property>
</bean>使用<bean>元素配置JSON转换器时,需要同时设置处理器映射器和处理器适配器,并且JSON转换器应配置在适配器中。
静态资源访问的配置方式
除了可以使用<mvn:resources>元素实现对静态资源的访问外,SpringMVC还提供了另外2种静态资源访问的配置方式
- 使用
<mvc:default-servlet-handler>配置静态资源
使用<mvc:default-servlet-handler>元素配置静态资源,也可以实现对静态资源的访问。
只需要在配置文件中加入
<mvc:default-servlet-handler/>添加该配置后,SpringMVC会在SpringMVC的上下文中定义一个默认的Servlet请求处理器org.springframework.web.servlet.resource.DefaultServletHttpRequestHandler,该处理器就像一个检查员,会对进入DispatcherServlet的url进行检查,如果发现是静态资源的请求,就将该请求转给Web服务器默认的Servlet处理,默认的Servlet就会对静态资源放行;如果不是静态资源的请求,则会放行给DispatcherServlet处理。
- 激活Tomcat默认的Servlet来处理静态资源访问
在web.xml中激活tomcat默认的servlet去处理对应的静态资源,web.xml配置代码如下
<servlet-mapping>
        <servlet-name>default</servlet-name>
        <url-pattern>*.js</url-pattern>
    </servlet-mapping>
    <servlet-mapping>
        <servlet-name>default</servlet-name>
        <url-pattern>*.css</url-pattern>
    </servlet-mapping>
页面跳转
SpringMVC使用页面跳转的方式进行响应时,可以通过方法的返回值指定跳转页面,处理器方法的返回值可以设定为void、String和ModelAndView类型。
返回值为void类型的页面跳转
处理器
package com.liumingkai.controller;

import org.springframework.stereotype.Controller;
import org.springframework.web.bind.annotation.RequestMapping;

/**
 * @author 刘明凯
 * @version 0.0.1
 * @date 2023年4月6日 21:41
 */

@Controller
public class PageController {

    @RequestMapping("/register")
    public void showPageByVoid(){
        System.out.println("show page by void running");
    }
}
在webapp/WEB-INF文件夹下有一个pages文件夹,放一个register.jsp页面。
浏览器访问http://localhost:9999/register,然后就会跳转到该页面。
访问该URL后,执行处理器方法,并且在处理器方法执行成功后跳转到了WEB-INF文件夹下的register.jsp页面,页面虽然跳转了,但是浏览器的地址栏没有发生变化,原因是SpringMVC对请求默认按照转发的方式进行跳转(因为我们对视图解析器的配置是/WEB-INF/pages)
返回值为String类型的页面跳转
当处理器方法的返回值类型是String时,控制器方法执行后,SpringMVC会根据方法的返回值跳转到对应的资源。
如果SpringMVC的配置文件中没有视图解析器,处理器执行后,会将请求转发到用户方法返回值一致的映射路径。
在进行页面跳转之前,可以选择是否携带数据。
不携带数据
返回值为String类型,不携带数据。
处理器
@RequestMapping("/showPageByString")
    public String showPageByString(){
        System.out.println("show page by String running");
        return "register";
}浏览器访问http://localhost:9999/showPageByString,然后就会跳转到WEB-INF文件夹下的register.jsp页面
访问URL后,执行控制器方法,方法执行完成后成功跳转到了WEB-INF文件夹下的register.jsp页面。
如果此时注释掉Spring-mvc.xml中的视图解析器,在浏览器访问该URL,执行完成控制器方法,返回一个普通的字符串,SpringMVC会默认继续以转发的方式响应给客户端。
除了这种默认的转发方式,还可以返回指定前缀的字符串,用于设定处理器执行后对请求进行转发还是重定向。
设定转发和重定向的字符串格式如下
forward转发资源路径
redirect重定向资源路径
测试一下
@RequestMapping("/showPageByForward")
    public String showPageByForward() {
        System.out.println("show page by forward running");
        return "forward:order.jsp";
    }

    @RequestMapping("/showPageByReqirect")
    public String showPageByRedirect() {
        System.out.println("show page by redirect running");
        return "redirect:order.jsp";
}访问http://localhost:9999/shwoPageByForward后,执行完showPageByForward()方法,然后就会以转发的方式去访问Http://localhost:9999/order.jsp,重定向同理。
注意:方法返回的字符串一旦添加了forward:或redirect:前缀,视图解析器就不会再为方法的返回值拼接前缀和后缀了
携带数据
在转发时,可以通过SpringMVC支持的默认数据类型的对象完成数据的携带
先来看通过HttpServletRequest来携带数据
@RequestMapping("/showPageByRequest")
    public String showPageByRequest(HttpServletRequest request){
        System.out.println("show page by request running");
        request.setAttribute("username","zhangsan");
        return "register";
    }
携带数据到register.jsp页面,该页面利用EL表达式取出数据

还可以存储数据到Model
@RequestMapping("/showPageByModel")
    public String showPageByModel(Model model) {
        System.out.println("show page by model running");
        User user = new User();
        user.setUserName("zhangsan");
        user.setPassword("123123");
        model.addAttribute("user", user);
        return "register";
    }
返回值是ModelAndView类型的页面跳转
ModelAndView对象包含视图相关内容和模型数据这两部分。
其中:
- 视图相关的内容可以设置逻辑视图名称,也可以设置具体的View实例
- 模型数据则会在视图渲染过程中被合并到最终的视图输出

处理器
@RequestMapping("/showPageByModelAndView")
    public ModelAndView showPageByModel(){
        // 创建ModelAndView实例
        ModelAndView mav = new ModelAndView();
        // 在ModelAndView实例中添加名称为username的数据
        mav.addObject("username","zhangsan");
        User user = new User();
        user.setPassword("1122323");
        // 继续添加数据
        mav.addObject("user",user);
        // 设置ModelAndView的名称
        mav.setViewName("register");
        return mav;
    }
register.jsp成功拿到数据
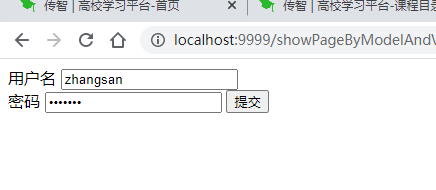
数据回写
默认情况下,SpringMVC的响应会经过视图解析器完成页面跳转
有时,我们希望服务器在响应时不要进行页面的跳转,而是只需要回写相关的数据即可
这时候可以使用响应时将数据写入输出流中,而不需要经过视图解析器
根据数据格式,回写到输出流的数据分为普通字符串和JSON数据。
普通字符串的回写
可以使用SpringMVC默认支持的数据类型完成数据的输出,HttpServletResponse,演示普通字符串的回写。
@RequestMapping("/showDataByResponse")
    public void showDataByResponse(HttpServletResponse response){
        try {
            response.getWriter().print("66666");
        } catch (IOException e) {
            e.printStackTrace();
        }
    }
JSON数据的回写
对象数据转换成JSON数据后回写
项目中已经导入了Jackson依赖,可以先调用Jackson的JSON转换的相关方法,将对象或集合转换成JSON数据,然后通过HttpServletResponse将JSON数据写入输出流中完成回写。
@RequestMapping("/showDataByJSON")
    public void showDataByJSON(HttpServletResponse response){
        ObjectMapper om = new ObjectMapper();
        User user = new User();
        user.setUserName("liumingkai");
        user.setPassword("21132");
        try {
            String userJson = om.writeValueAsString(user);
            response.getWriter().print(userJson);
        } catch (Exception e) {
            e.printStackTrace();
        }
    }
如果每次都需要手动转换JSON数据,那么操作非常繁琐。
SpringMVC提供了@ResponseBody注解,该注解的作用是将处理器返回的对象通过适当的转化器转换为指定格式之后,写入HttpServletResponse对象的body取。
@ResponseBody通常用于返回JSON数据
@ResponseBody可以标注在类和方法上,当标注在类上时,该类中所有的处理方法均应用@ResponseBody注解
如果想要当前类中所有的方法均应用@ResponseBody注解,可以使用@RestController注解
@RestController是@Controller和@ResponseBody这两个注解的结合
若要使用@ResponseBody注解,项目至少需要:
- 项目中有转换JSON相关的依赖
- 配置可以转换JSON数据的消息类型转换器
我们演示的项目中,pom.xml中引入了Jackson的依赖,可以用于转换JSON
SpringMVC的配置文件中配置了
<mvc:annotation-driven/>元素默认注册了Java数据转JSON数据的消息转换器
集合数据转换成JSON数据后回写
处理器
@ResponseBody
    @RequestMapping("/getJsonUser")
    public User getUser() {
        User user = new User();
        user.setUserName("zhangsan");
        user.setPassword(("12131231"));
        return user;
    }

    @RequestMapping("/addProducs")
    @ResponseBody
    public List<Product> addProducts() {
        List<Product> list = new ArrayList<>();
        Product p1 = new Product();
        p1.setProductId("0001");
        p1.setProductName("康师傅--冰红茶");
        list.add(p1);
        Product p2 = new Product();
        p2.setProductId("00002");
        p2.setProductName("白面馒头");
        list.add(p2);
        return list;
    }
测试页面
<%--
  Created by IntelliJ IDEA.
  User: 刘明凯的专属computer
  Date: 2023年4月7日
  Time: 20:06
  To change this template use File | Settings | File Templates.
--%>
<%@ page contentType="text/html;charset=UTF-8" language="java" %>
<html>
<head>
    <title>Title</title>
    <script src="../js/jquery-3.6.0.min.js"></script>
</head>
<body>
<table id="products" border="1" width="60%" align="center">
    <tr>
        <th align="center">欢迎您!</th>
        <th id="username"></th>
    </tr>
    <tr align="center">
        <td colspan="2" align="center">
            <input type="button" value="添加多个商品" onclick="addProducts()"/>
        </td>
    </tr>
    <tr align="center">
        <td>商品id</td>
        <td>商品名称</td>
    </tr>
</table>
<script type="text/javascript">
    // 显示当前用户
    window.onload = function () {
        var url = "/getJsonUser"
        $.get(url, function (response) {
            // 将处理器中的用户信息显示在表格中
            console.log("获取用户信息为" )
            console.log(response)
            $("#username").text(response.userName)
        })
    }


    // 添加商品
    function addProducts() {
        var url = "/addProducs"
        $.get(url, function (products) {
            console.log("商品列表" )
            console.log(products)
            // 将处理器返回的商品列表信息填充到表格中
            for (var i = 0; i < products.length; i++) {
                $("#products").append("<tr><td>" + products[i].productId + "</td><td>" + products[i].productName + "</td></tr>")
            }
        })
    }
</script>
</body>
</html>
SpringMVC高级
异常处理
Spring如何做到统一异常处理。
不论是持久层、业务层、表现层的异常,统一处理。
SpringMVC提供了3种方式来实现统一异常处理:
- 使用SpringMVC提供的简单异常处理器SimpleMappingExceptionResolver
- 通过实现异常处理器接口HandlerExceptionResolver
- 使用@ExceptionHandler实现统一异常处理
简单异常处理器
如果希望对SpringMVC中所有的异常进行统一处理,可以使用SpringMVC提供的异常处理器HandlerExceptionResolver实现。
HandlerExceptionResolver是一个接口,为了方便统一异常处理,Spring内部提供了HandlerExceptionResolver的实现类SimpleMappingExceptionResolver。
SimpleMappingExceptionResolver可以实现将不同的异常映射到不同的页面,当发生异常时,SimpleMappingExceptionResolver根据发生异常的类型跳转到指定的页面处理异常信息
SimpleMappingExceptionResolver也可以为所有的异常指定一个默认的异常处理页面,当应用程序抛出的异常没有对应的映射页面时,就会使用默认的页面处理异常信息
我们来模拟一下异常
@RequestMapping("/showNullPointer")
    public void showNullPointer(){
        ArrayList<String> list = null;
        list.get(2);
    }

    @RequestMapping("/showIOException")
    public void showIOException() throws IOException {
        FileInputStream in = new FileInputStream("liuminkgai.xml");
    }

    @RequestMapping("/showArithmetic")
    public void showArithmetic(){
        int i = 1 / 0;
    }
配置文件
<?xml version="1.0" encoding="UTF-8"?>
<beans xmlns="http://www.springframework.org/schema/beans"
       xmlns:context="http://www.springframework.org/schema/context"
       xmlns:xsi="http://www.w3.org/2001/XMLSchema-instance"
       xmlns:contxt="http://www.springframework.org/schema/context"
       xmlns:mvc="http://www.springframework.org/schema/mvc"
       xsi:schemaLocation="
       http://www.springframework.org/schema/beans
       http://www.springframework.org/schema/beans/spring-beans.xsd
       http://www.springframework.org/schema/context
       http://www.springframework.org/schema/context/spring-context.xsd
       http://www.springframework.org/schema/mvc
       http://www.springframework.org/schema/mvc/spring-mvc.xsd
">
    <!--    配置SpringMVC要扫描的包-->
    <context:component-scan base-package="com.liumingkai.controller"/>

    <!--    配置注解驱动 -->
    <mvc:annotation-driven/>
    <!--  配置访问静态资源的访问映射,此配置中的文件将不被DispatcherServlet拦截-->
    <mvc:resources mapping="/js/**" location="/js/"/>

    <!--    注入 SimpleMappingExceptionResolver -->
    <bean class="org.springframework.web.servlet.handler.SimpleMappingExceptionResolver">
        <!--        定义需要特殊处理的异常
                    用类名或完全路径作为key,对应的异常页面作为值
        -->
        <property name="exceptionMappings">
            <props>
                <prop key="java.lang.NullPointerException">nullPointer.jsp</prop>
                <prop key="IOException">IOException.jsp</prop>
            </props>
        </property>
<!--        为所有的异常定义默认的异常处理页面,value为默认异常处理页面-->
        <property name="defaultErrorView" value="defaultExp.jsp"></property>
<!--        value定义在异常处理页面中获取异常信息的变量名,默认名为exception-->
        <property name="exceptionAttribute" value="exp"></property>
    </bean>

</beans>
异常处理页面
IOException.jsp
<%@ page contentType="text/html;charset=UTF-8" language="java" %>
<html>
<head>
    <title>IO异常</title>
</head>
<body>
<h1>哎呀呀呀~!~~你遇到了IO异常</h1>----${exp}
</body>
</html>
defaultExcp.jsp
<%--
  Created by IntelliJ IDEA.
  User: 刘明凯的专属computer
  Date: 2023年4月8日
  Time: 13:41
  To change this template use File | Settings | File Templates.
--%>
<%@ page contentType="text/html;charset=UTF-8" language="java" %>
<html>
<head>
    <title>默认异常处理页面</title>
</head>
<body>
<h1>真不幸!你遇到了异常!</h1>----${exp}
</body>
</html>
nullPointer.jsp
<%--
  Created by IntelliJ IDEA.
  User: 刘明凯的专属computer
  Date: 2023年4月8日
  Time: 13:42
  To change this template use File | Settings | File Templates.
--%>
<%@ page contentType="text/html;charset=UTF-8" language="java" %>
<html>
<head>
    <title>nullPointerException</title>
</head>
<body>
<h1>哎呀,你遇到了空指针异常,自认倒霉吧!</h1>
___${exp}
</body>
</html>
去访问url来触发这些异常


通过配置SimpleMappingExceptionResolver来处理不同类型的异常,根据异常的类型的不同,转发到不同的处理页面,还可以指定默认的异常处理页面,用来处理未指定异常类型的异常
简单异常处理器只能实现异常的映射,不能对异常做出处理,不能做业务上的处理
自定义异常处理器
通过自定义异常处理器来实现统一异常处理。
通过实现HandlerExceptionResolver接口,重写处理方法resolveException()来定义异常处理器当Handler执行并抛出异常时,自定义异常处理器会拦截到异常并执行重写的resolveException(),此方法的返回值是ModelAndView类型的对象,可以在ModelAndView对象中存储异常信息,并且跳转到异常页面
首先我们自定义一个异常类
package com.liumingkai.exception;

/**
 * @author 刘明凯
 * @version 0.0.1
 * @date 2023年4月8日 14:11
 */

public class MyException extends Exception {
    // 异常信息
    private String message;

    public MyException(String message) {
        super(message);
        this.message = message;
    }

    @Override
    public String getMessage() {
        return message;
    }

    public void setMessage(String message) {
        this.message = message;
    }
}
定义一个控制器方法来触发自定义异常
@RequestMapping("/addData")
    public void addData() throws MyException{
        throw new MyException("新增数据异常");
    }
自定义异常处理器
package com.liumingkai.controller;

import com.liumingkai.exception.MyException;
import org.springframework.stereotype.Component;
import org.springframework.web.servlet.HandlerExceptionResolver;
import org.springframework.web.servlet.ModelAndView;

import javax.servlet.http.HttpServletRequest;
import javax.servlet.http.HttpServletResponse;
import java.io.PrintWriter;
import java.io.StringWriter;
import java.io.Writer;

/**
 * 自定义异常处理器
 * @author 刘明凯
 * @version 0.0.1
 * @date 2023年4月8日 14:16
 */
@Component
public class MyExceptionHandler implements HandlerExceptionResolver {

    /**
     * 异常处理方法
     * @param httpServletRequest  当前请求的HttpServletRequest对象
     * @param httpServletResponse 本次的响应对象
     * @param handler 正在执行的handler,也就是正在执行的Controller
     * @param exp handler执行时抛出的异常
     * @return 返回一个ModelAndView对象,可以在此对象身上存储信息
     */
    @Override
    public ModelAndView resolveException(HttpServletRequest httpServletRequest, HttpServletResponse httpServletResponse, Object handler, Exception exp) {
        System.out.println("自定义异常处理器执行.....");
        // 定义异常信息
        String msg ;
        // 如果是自定义异常,将异常信息直接返回
        if(exp instanceof MyException){
            msg = exp.getMessage();
        }else{
            // 如果是系统异常,从堆栈中获取异常信息
            Writer out = new StringWriter();
            PrintWriter s = new PrintWriter(out);
            exp.printStackTrace(s);
            // 系统真实的异常信息,可以邮件和短信方式发送给开发人员
            String sysMsg = out.toString();
            // TODO 通知开发人员
            // 向客户端隐藏真实的异常信息,仅发送友好提示
            msg = "网络异常!请稍后再试!";
        }
        // 返回错误页面, 给用户友好页面显示错误信息
        ModelAndView mav = new ModelAndView();
        mav.addObject("msg",msg);
        mav.setViewName("error.jsp");
        return mav;

    }
}
配置文件中不需要做出改动
<?xml version="1.0" encoding="UTF-8"?>
<beans xmlns="http://www.springframework.org/schema/beans"
       xmlns:context="http://www.springframework.org/schema/context"
       xmlns:xsi="http://www.w3.org/2001/XMLSchema-instance"
       xmlns:contxt="http://www.springframework.org/schema/context"
       xmlns:mvc="http://www.springframework.org/schema/mvc"
       xsi:schemaLocation="
       http://www.springframework.org/schema/beans
       http://www.springframework.org/schema/beans/spring-beans.xsd
       http://www.springframework.org/schema/context
       http://www.springframework.org/schema/context/spring-context.xsd
       http://www.springframework.org/schema/mvc
       http://www.springframework.org/schema/mvc/spring-mvc.xsd
">
    <!--    配置SpringMVC要扫描的包-->
    <context:component-scan base-package="com.liumingkai.controller"/>

    <!--    配置注解驱动 -->
    <mvc:annotation-driven/>
    <!--  配置访问静态资源的访问映射,此配置中的文件将不被DispatcherServlet拦截-->
    <mvc:resources mapping="/js/**" location="/js/"/>

</beans>
访问url,测试
普通异常直接显示

重大异常

异常处理注解
从Spring3.2开始,提供了一个新的注解@ControllerAdvice注解
底层利用AOP来实现,
使用@ControllerAdvice标注的类,就是一个异常处理器切面。
配合@ExceptionHandler,可以捕获指定类型的异常,从而实现不同类型的异常统一处理
来看
package com.liumingkai.controller;

import com.liumingkai.exception.MyException;
import com.sun.org.apache.xpath.internal.operations.Mod;
import org.springframework.web.bind.annotation.ControllerAdvice;
import org.springframework.web.bind.annotation.ExceptionHandler;
import org.springframework.web.servlet.ModelAndView;

/**
 * @author 刘明凯
 * @version 0.0.1
 * @date 2023年4月8日 14:50
 */
@ControllerAdvice
public class ExceptionAdvice {

    // 处理自定义类型的异常
    @ExceptionHandler(MyException.class)
    public ModelAndView doException(MyException exp) {
        ModelAndView mav = new ModelAndView();
        mav.addObject("msg", exp.getMessage());
        mav.setViewName("error.jsp");
        return mav;
    }

    // 处理Exception类型的异常
    @ExceptionHandler(Exception.class)
    public ModelAndView doOtherException(Exception exp) {
        ModelAndView mav = new ModelAndView();
        mav.addObject("msg", "小事小事,莫慌!客官先喝壶茶休息一下吧~~~");
        mav.setViewName("error.jsp");
        return mav;
    }
}
访问url来触发异常,
普通的异常

自定义的异常
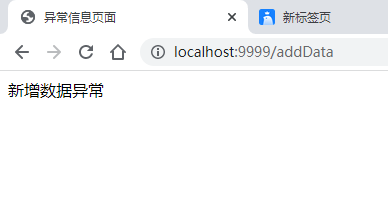
拦截器
拦截器使用非常普遍:购物网站,通过拦截器拦截未登录的用户,禁止未登录的用户下单,限制权限等。
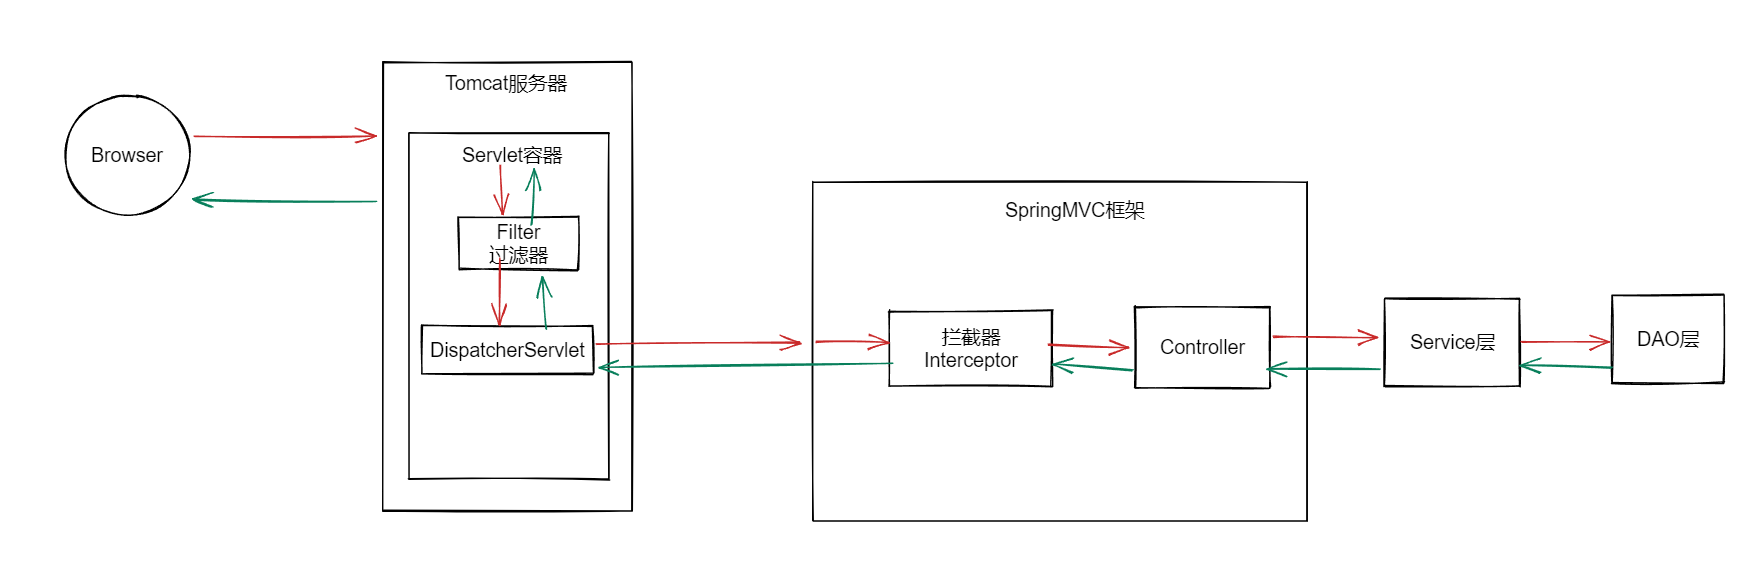
拦截器概述
拦截器Interceptor,是一种动态拦截Controller方法调用的对象,他可以在指定的方法调用前或调用后执行预先设定的的代码。
拦截器类似于JavaWEb中的Filter,但是他们的技术归属和拦截内容是不同的,Filter采用Servelt技术,拦截器采用SpringMVC技术。
Filter对所有的请求拦截,拦截器只针对SpringMVC的请求进行拦截
在SpringMVC中定义一个拦截器非常简单,常用的两种定义方式
- 第一种:通过实现HandlerInterceptor接口定义拦截器
- 第二种:通过继承HandlerInterceptor接口的实现类HandlerInterceptorAdapter定义拦截器。
上述两种方式的区别在于直接实现HandlerInterceptor接口需要直接重写HandlerInterceptor中的所有方法,而继承HandlerInterceptorAdapter类的方式允许重写想要回调的方法。(类似于Servlet和HttpServlet)
通过直接实现HandlerInterceptor接口实现拦截器的定义
HandlerInterceptor中的方法都是default的
package com.liumingkai.interceptor;

import org.springframework.web.servlet.HandlerInterceptor;
import org.springframework.web.servlet.ModelAndView;

import javax.servlet.http.HttpServletRequest;
import javax.servlet.http.HttpServletResponse;

/**
 * 自定义拦截器
 *
 * @author 刘明凯
 * @version 0.0.1
 * @date 2023年4月8日 16:18
 */

public class CustomInterceptor implements HandlerInterceptor {
    @Override
    public boolean preHandle(HttpServletRequest request, HttpServletResponse response, Object handler) throws Exception {
        return false;
    }

    @Override
    public void postHandle(HttpServletRequest request, HttpServletResponse response, Object handler, ModelAndView modelAndView) throws Exception {

    }

    @Override
    public void afterCompletion(HttpServletRequest request, HttpServletResponse response, Object handler, Exception ex) throws Exception {

    }
}
需要重写接口中的三个方法:
preHandle()
preHandle()方法用于对程序进行安全控制、权限校验等,它会在控制器方法调用前执行。
preHandle()方法的参数是HttpServletRequest、HttpServletResponse、Handler。
Handler是被调用的处理器对象。
preHandle()方法的返回值是boolean类型,表示是否中断后续的操作。
当返回值是true,表示继续向下执行;返回false,整个请求就结束了,后续的操作都会中断。
postHandle()
postHandle()方法用于对请求域中的模型和视图做进一步的修改,它会在控制器方法调用之后且视图解析之前执行
前3个参数与preHandle()是相同的,如果处理器执行完成有返回结果,可以通过第4个参数ModelAndView读取和调整返回结果对应的数据与视图信息。
afterCompletion()
此方法可以完成一些资源清理、日志信息记录等工作,它会在整个请求完成后执行,即视图模型渲染完成之后执行。
前3个参数相同的,如果处理器执行过程中出现异常,会将异常信息封装到异常对象中,可以在此方法中对异常情况进行单独处理。
拦截器的配置
要想使用自定义拦截器,需要在配置文件中进行配置。
<!--    配置拦截器-->
    <mvc:interceptors>
<!--        拦截所有的请求-->
        <bean class="com.liumingkai.interceptor.CustomInterceptor"/>

        <mvc:interceptor>
            <!--        拦截器的作用路径-->
            <mvc:mapping path="/**"/>
            <!--            配置不需要拦截器作用的路径-->
            <mvc:exclude-mapping path=""/>
            <!--            对匹配路径的请求才进行拦截-->
            <bean class="com.liumingkai.interceptor.MyInterceptor"/>
        </mvc:interceptor>
    </mvc:interceptors>
上述代码,通过两种方式配置了拦截器,
<mvc:interceptors>下的<bean>标签可以对所有的请求进行拦截。<mvc:interceptor>元素声明的拦截器会对指定路径下的请求进行拦截。通过
<mvc:mapping>元素来配置拦截器的作用路径,/**表示拦截所有的请求路径如果有不需要拦截的请求,可以通过
<mvc:exclude-mapping>元素进行配置
<mvc:interceptor>中的子元素必须按照以上顺序进行编写,否则报错,
<mvc:mapping></mvc:mapping>
<mvc:exclude-mapping></mvc:exclude-mapping>
<bean></bean>
拦截器的执行流程
拦截器的执行顺序,
单个的拦截器
如果项目中只配置了一个拦截器,则单个拦截器的执行流程:

多个拦截器的执行顺序
当有了多个拦截器时,执行流程是这样的,这是在所有的preHandle都返回true的前提下。

当preHandle_3处返回false时,执行流程 是这样的。
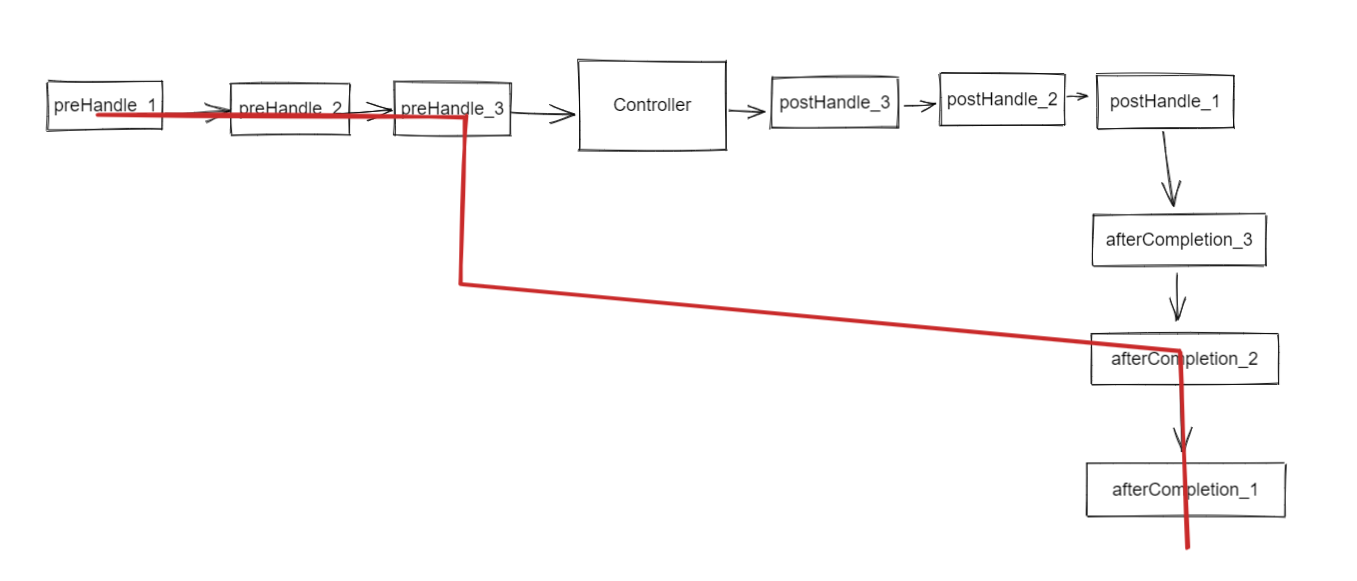
当preHandle_2处返回false时,执行流程是这样的。

当在preHandle_1处返回false时,执行流程是这样的

文件上传和下载
文件上传
大多数文件都是以表单的形式提交给后台服务器,因此要想实现文件上传功能,需要一个特定的表单。
表单满足的三个条件:(JavaWeb阶段学过了)
- form表单的提交方式设置为post
- form表单的enctype属性设置为 multipart/form-data
- 有一个type="file"的input元素
<form method="post" enctype="multipart/form-data" action="">
    <input type="file" name="fileName" multiple="multiple">
</form>
H5新增属性,如果文件上传输入框使用了multiple属性,则在上传文件时,可以同时选择多个文件进行上传
当form表单的enctye属性是multipart/form-data时,浏览器会采用二进制的方式来处理表单数据,服务器端会对请求中上传的文件进行解析处理
SpringMVC为文件上传提供了直接的支持,这种支持是通过MultipartResolver(多部件解析器)对象实现的。
MultipartResolver是一个接口,可以使用其实现类CommonsMultipartResolver来完成对文件上传工作。
在SpringMVC中使用MultipartResolver接口非常简单,只需要在配置文件中定义相关Bean即可。
<bean id="multipartResolver" class="org.springframework.web.multipart.commons.CommonsMultipartResolver">
        <!--        设置请求编码格式,必须要与JSP中的pageEncoding属性保持一致, 默认为ISO-8859-1-->
        <property name="defaultEncoding" value="UTF-8"/>
        <!--        设置允许上传文件的最大值是2M,单位是字节-->
        <property name="maxUploadSize" value="2097152"/>
</bean>CommonsMultiResolver,通过<property>元素对文件解析器的属性进行配置
- maxUploadSize 允许上传文件的最大大小
- maxInMemorySize 缓存中的最大值
- defaultEncoding 默认编码格式
- resolveLazily推迟文件解析,以便在Controller中捕获文件大小异常
MultipartResolver在初始化时,程序会在BeanFactory中查找名称为multipartResolver的MultipartResolver实现类,如果没有找到对应名称的实现类,将不提供多部件解析处理。
所以配置CommonsMultipartResolver时必须指定该Bean的id为multipartResolver
CommonsMultipartResolver并未自主实现文件上传和文件下载的对应功能,而是在内部调用了Apache Commons FileUpload组件,所以在SpringMVC中要想实现文件上传功能,必须导入commons-fileupload和commons-io依赖
xml<dependency> <groupId>commons-fileupload</groupId> <artifactId>commons-fileupload</artifactId> <version>1.4</version> </dependency>只需要引入commons-fileupload依赖,commons-io就会连带导入
在Controller中编写上传文件的方法
@Controller
public class FileController {
@RequestMapping("/fileUpload")
public String fileUpload(MultipartFile file){
if(!file.isEmpty()){
// TODO 保存上传的文件,filepath为保存的目标目录
file.transferTo(new File(filePath));
return "uploadSuccess";
}
return "uploadFailure";
}
}当访问该URL时,SpringMVC会自动处理该请求,并使用MultipartFile类型的形参对象封装请求参数中上传到程序中的文件。
MultipartFile类型的形参对象要与type = "file"的input的name属性一致
MultipartFile接口中提供了获取上传的文件的信息的方法

文件下载
文件下载就是从服务器端传输文件到客户端。
进行文件下载时,为了不以客户端默认的方式处理返回的文件,可以在服务端对所有下载的文件进行相关配置。
配置的内容包括返回文件的形式、文件的打开方式、文件的下载方式、响应的状态码
其中:
- 文件的打开方式可以通过响应头Content-Disposition的值来设定
Spring提供了一个ResponseEntity类,在ResponseEntity对象中可以设置HTTP响应的相关信息(状态码、头部信息、响应体内容)
因此,可以在ResponseEntity对象中设置所下载文件的相关信息,返回该ResponseEntity对象来对文件下载进行响应。
@RequestMapping("/download")
public ResponseEntity<byte[]> fileDownload(HttpServletRequest request, String fileName) throws IOException {
// 指定要下载的文件所在路径
String path = request.getServletContext().getRealPath("/upload/");
// 创建该文件对象
File file = new File(path + fileName);
// 设置消息头
HttpHeaders httpHeaders = new HttpHeaders();
// 通知浏览器以下载的方式打开文件
httpHeaders.setContentDispositionFormData("attachment", fileName);
// 定义以流的形式下载返回文件数据
httpHeaders.setContentType(MediaType.APPLICATION_OCTET_STREAM);
// 使用SpringMVC 的ResponseEntity对象封装返回下载数据
return new ResponseEntity<byte[]>(FileUtils.readFileToByteArray(file), httpHeaders, HttpStatus.OK);
}演示案例
- 引入依赖
<!-- Jackson转换的数据绑定依赖-->
<dependency>
<groupId>com.fasterxml.jackson.core</groupId>
<artifactId>jackson-databind</artifactId>
<version>2.13.5</version>
</dependency>
<!-- 文件上传-->
<dependency>
            <groupId>commons-fileupload</groupId>
            <artifactId>commons-fileupload</artifactId>
            <version>1.4</version>
</dependency>- 在配置文件中设置多部件解析器
<bean id="multipartResolver" class="org.springframework.web.multipart.commons.CommonsMultipartResolver">
        <!--        设置请求编码格式,必须要与JSP中的pageEncoding属性保持一致, 默认为ISO-8859-1-->
        <property name="defaultEncoding" value="UTF-8"/>
        <!--        设置允许上传文件的最大值是2M,单位是字节-->
        <property name="maxUploadSize" value="2097152"/>
    </bean>
在web目录下,新建files文件夹,用来存放上传成功的文件和上传成功的记录文件
其中,上传成功的记录文件中只记录上传成功的文件名称。
为了方便在后续页面上展示文件列表,上传成功的记录文件以JSON的格式
为了方便对file.json文件进行存取,在pojo包下创建一个与file.json内容对应的Resource类。
public class Resource {

    private String name;

    public Resource(String name) {
        this.name = name;
    }

    public String getName() {
        return name;
    }

    public void setName(String name) {
        this.name = name;
    }
}- 为了方便对file.json文件内容进行存取,新建一个工具类,放在utils目录下
package com.liumingkai.util;

import org.apache.commons.io.IOUtils;

import java.io.FileInputStream;
import java.io.FileOutputStream;

/**
 * @author 刘明凯
 * @version 0.0.1
 * @date 2023年4月8日 20:48
 */

public class JSONFileUtils {

    // 读文件
    public static String readFile(String filePath) throws Exception {
        FileInputStream fis = new FileInputStream(filePath);
        return IOUtils.toString(fis);
    }

    // 写文件
    public static void writeFile(String data, String filePath) throws Exception {
        FileOutputStream fos = new FileOutputStream(filePath);
        IOUtils.write(data,fos);
    }

}- 新建FileController控制器
- 文件上传的功能
@RequestMapping("/fileUpload")
    public String fileUpload(MultipartFile[] files, HttpServletRequest request) throws Exception {
        // 设置上传的文件所存放的路径
        String filePath = request.getServletContext().getRealPath("/") + "files/";
        ObjectMapper objMap = new ObjectMapper();
        if (files != null && files.length > 0) {
            // 循环获取上传的文件
            for (MultipartFile file : files) {
                // 获取上传文件的名称
                String filename = file.getOriginalFilename();
                List<Resource> list = new ArrayList<>();
                // 读取file.json文件中的文件名称
                String json = JSONFileUtils.readFile(filePath + "/files.json");
                if (json.length() != 0) {
                    // 将file.json的内容转换为集合
                    list = objMap.readValue(json, new TypeReference<List<Resource>>() {
                    });
                    for (Resource resource : list) {
                        // 如果上传的文件在file.json文件中有同名文件,将当前上传的文件重命名,以避免重名
                        if (filename.equals(resource.getName())) {
                            String[] split = filename.split("\\.");
                            filename = split[0] + "(1)." + " + split[1]";

                        }
                    }
                }
                // 文件保存的全路径名
                String realPath = filePath + filename;
                // 保存上传的文件
                file.transferTo(new File(realPath));
                System.out.println("文件真实的路径是" + realPath);
                list.add(new Resource(filename));
                json = objMap.writeValueAsString(list);
                // 重写file.json 文件中
                JSONFileUtils.writeFile(json, filePath + "/files.json");
            }
            request.setAttribute("msg", "上传成功");
            return "forward:fileUpload.jsp";
        }
        request.setAttribute("msg", "上传失败");
        return "forward:fileUpload.jsp";
}- 获取文件列表的功能
@RequestMapping(value = "/getFilesName",produces = "text/html;charset=utf-8")
    @ResponseBody
    public String getFilesName(HttpServletRequest request, HttpServletResponse response) throws Exception {
        String path = request.getServletContext().getRealPath("/") + "files/files.json";
        String json = JSONFileUtils.readFile(path);
        return json;
}- 文件上传页面
<%--
  Created by IntelliJ IDEA.
  User: 刘明凯的专属computer
  Date: 2023年4月8日
  Time: 22:20
  To change this template use File | Settings | File Templates.
--%>
<%@ page contentType="text/html;charset=UTF-8" language="java" %>
<html>
<head>
    <title>文件上传</title>
    <script src="./js/jquery-3.6.0.min.js"></script>
</head>
<body>
<table border="1">
    <tr>
        <td width="200" align="center">文件上传${msg}</td>
        <td width="300" align="center">下载列表</td>
    </tr>
    <tr>
        <td height="100">
            <form action="/fileUpload" method="post" enctype="multipart/form-data">
                <input type="file" name="files" multiple="multiple">
                <input type="reset" value="清空">
                <input type="submit" value="提交">
            </form>
        </td>
        <td id="files"></td>
    </tr>
</table>
<script>
    $(document).ready(function () {
        var url = "/getFilesName";
        $.get(url, function (files) {
            console.log(files)
            var files = eval('(' + files + ')');
            for (var i = 0; i < files.length; i++) {
                console.log(files[i])
                $('#files').append("<li><a href=" + "download?fileName=" + files[i].name + ">" + files[i].name + "</a></li>")
            }
        });
    })
</script>
</body>
</html>- 测试文件上传功能


编写文件下载功能
在实现文件下载功能时,还需要注意文件名称的乱码问题。
在使用Content-Disposition设置参数时,如果Content-Disposition中设置的文件名称出现中文字符,需要针对不同的浏览器设置不同的编码方式。
目前Content-Disposition支持的编码方式有UrlEncode编码、Base64编码、RFC2231编码和ISO编码
10.1 获取文件名称的功能,防止下载的文件名称乱码
public String getFileName(HttpServletRequest request, String fileName) throws Exception{
        BASE64Encoder encoder = new BASE64Encoder();
        String agent = request.getHeader("User-Agent");
        if (agent.contains("Firefox")) {
            // 火狐浏览器
            fileName = "=?UTF-8?B?" + new String(encoder.encode(fileName.getBytes(StandardCharsets.UTF_8))) + "?=";
        } else {
            // IE 及其他浏览器
            fileName = URLEncoder.encode(fileName, "UTF-8");
        }
        return fileName;
}- 下载文件的核心代码
@RequestMapping("/download")
    public ResponseEntity<byte[]> fileDownload(HttpServletRequest request, String fileName) throws Exception {
        // 指定要下载的文件所在路径
        String path = request.getServletContext().getRealPath("/files/");
        // 创建该文件对象
        File file = new File(path +File.separator + fileName);
        // 设置消息头
        HttpHeaders httpHeaders = new HttpHeaders();
        fileName = this.getFileName(request,fileName);
        // 通知浏览器以下载的方式打开文件
        httpHeaders.setContentDispositionFormData("attachment", fileName);
        // 定义以流的形式下载返回文件数据
        httpHeaders.setContentType(MediaType.APPLICATION_OCTET_STREAM);
        // 使用SpringMVC 的ResponseEntity对象封装返回下载数据
        return new ResponseEntity<byte[]>(FileUtils.readFileToByteArray(file), httpHeaders, HttpStatus.OK);
    }
测试
SSM框架整合
常用方式整合SSM框架
整合思路
将Spring、SpringMVC、MyBatis整合到一起工作。
SpringMVC负责管理表现层的Handler,SpringMVC容器是Spring的子容器,一次SpringMVC可以调用Spring容器中的Service对象。
Spring负责事务管理,Spring可以管理持久层的Mapper对象和业务层的Service对象。
由于Mapper对象和Service对象都在Spring容器中,所以可以在业务逻辑层通过Service对象调用持久层的Mapper对象
MyBatis负责与数据库进行交互
由于SpringMVC和Spring 与MyBaits没有直接交集,所需只需将Spring分别与MyBatis和SpringMVC整合,就可以实现SSM框架的整合
Spring整合MyBaits
思考:在MyBatis中最核心的一个对象是什么?
当然是SqlSessionFactory,他可以创建SqlSession对象,一个应用程序中只有一个SqlSessionFactory对象
Spring和MyBatis是两个没有交集的技术,所以需要一个依赖包,类似于两者之间的桥接器。
这个依赖是MyBatis提供的,因为MyBatis要和Spring整合。
前置环境
实体类
public class User {
    private String uid;
    private String uname;
    private Integer uage;
    // ...getter....setter
}
mapper接口
package com.liumingkai.dao;

import com.liumingkai.pojo.User;
import org.apache.ibatis.annotations.Param;

public interface UserMapper {

    User getUserByUid(@Param("uid") String uid);

}
映射文件
<?xml version="1.0" encoding="UTF-8" ?>
<!DOCTYPE mapper
        PUBLIC "-//mybatis.org//DTD Mapper 3.0//EN"
        "https://mybatis.org/dtd/mybatis-3-mapper.dtd">
<mapper namespace="com.liumingkai.dao.UserMapper">
<!--  User getUserByUid(@Param("uid") String uid);-->
    <select id="getUserByUid" resultType="com.liumingkai.pojo.User">
        select * from users where uid = ${uid};
    </select>
</mapper>- 导入依赖
<!--mysql的驱动依赖-->
<dependency>
    <groupId>com.mysql</groupId>
    <artifactId>mysql-connector-j</artifactId>
    <version>8.0.32</version>
</dependency>

<!--        mybatis的依赖-->
<dependency>
    <groupId>org.mybatis</groupId>
    <artifactId>mybatis-spring</artifactId>
    <version>3.0.1</version>
</dependency>
<dependency>
    <groupId>org.mybatis</groupId>
    <artifactId>mybatis</artifactId>
    <version>3.5.11</version>
</dependency>

<!--        数据源-->
<dependency>
    <groupId>com.alibaba</groupId>
    <artifactId>druid</artifactId>
    <version>1.2.15</version>
</dependency>


<!--        Spring操作数据库的依赖-->
<dependency>
    <groupId>org.springframework</groupId>
    <artifactId>spring-jdbc</artifactId>
    <version>5.2.10.RELEASE</version>
</dependency>
为了可以在Spring的容器中提供SqlSession的Bean,MyBatis实现了Spring中的BeanFactory接口,实现类是SqlSessionFactoryBean,我们需要在Spring的配置文件中配置这个Bean
该Bean需要一个DataSource的属性,所以还需要配置一个DataSource
jdbc.properties
jdbc.url=jdbc:mysql://localhost:3306/mybatis
jdbc.driver=com.mysql.cj.jdbc.Driver
jdbc.username=root
jdbc.password=root
配置文件
<?xml version="1.0" encoding="UTF-8"?>
<beans xmlns="http://www.springframework.org/schema/beans"
       xmlns:xsi="http://www.w3.org/2001/XMLSchema-instance"
       xmlns:context="http://www.springframework.org/schema/context"
       xsi:schemaLocation="http://www.springframework.org/schema/beans
       http://www.springframework.org/schema/beans/spring-beans.xsd
       http://www.springframework.org/schema/context
       http://www.springframework.org/schema/context/spring-context.xsd
">
<!--配置要扫描的包-->
    <context:component-scan base-package="com.liumingkai.service"/>
<!--    引入jdbc配置文件-->
    <context:property-placeholder location="classpath:jdbc.properties"/>

<!--    数据源-->
    <bean id="dataSource" class="com.alibaba.druid.pool.DruidDataSource">
        <property name="driverClassName" value="${jdbc.driver}"/>
        <property name="url" value="${jdbc.url}"/>
        <property name="username" value="${jdbc.username}"/>
        <property name="password" value="${jdbc.password}"/>
    </bean>

<!--    创建SqlSessionFactory对象-->
    <bean id="sqlSessionFactory" class="org.mybatis.spring.SqlSessionFactoryBean">
<!--        注入数据源-->
        <property name="dataSource" ref="dataSource"/>
    </bean>

<!--    配置扫描的DAO包,创建动态代理对象,会自动存储到Spring的IOC容器中-->
    <bean class="org.mybatis.spring.mapper.MapperScannerConfigurer">
<!--        指定要扫描的包-->
        <property name="basePackage" value="com.liumingkai.dao"/>
    </bean>

</beans>- 如果要使用MyBatis的Mapper代理机制,还需要设置MyBatis的扫描位置,MyBatis为此特意提供了一个类,专门用来扫描包
在Spring的配置文件中注册该Bean
<!--    配置扫描的DAO包,创建动态代理对象,会自动存储到Spring的IOC容器中-->
    <bean class="org.mybatis.spring.mapper.MapperScannerConfigurer">
<!--        指定要扫描的包-->
        <property name="basePackage" value="com.liumingkai.dao"/>
    </bean>
至此,Spring整合MyBatis已经完成。
接下来完成测试阶段,测试我们的整合有没有生效。
Spring整合Junit
Spring如何整合Junit。
导入Junit的依赖、导入Spring-test模块依赖
<dependency>
    <groupId>junit</groupId>
    <artifactId>junit</artifactId>
    <version>4.11</version>
    <scope>test</scope>
</dependency>

<dependency>
    <groupId>org.springframework</groupId>
    <artifactId>spring-test</artifactId>
    <version>5.3.25</version>
</dependency>
代码
@RunWith(SpringJUnit4ClassRunner.class)
@ContextConfiguration(locations = {"classpath:applicationContext.xml"})
public class TestUserMapper {

    @Autowired
    private UserService userService;

    @Test
    public void getUserById(){
        userService.getUserByUid("1");

    }

}- 通过@RunWith指定运行器
- 通过@ContextConfiguration指定要加载的Spring容器
- 如果需要测试哪一个类,直接使用Spring自动注入即可
Spring 整合SpringMVC
Spring和SpringMVC的整合比较简单,因为是同一家技术,所以可以直接互相使用。
只需要在项目启动时加载Spring和SpringMVC的配置文件即可。
Spring和SpringMVC的配置文件单独写,或者写到一个配置文件中,都是可以的。
为了发挥单一职责原则,以及避免同一个配置文件过于臃肿,Spring和SpringMVC 的配置文件还是分开写比较好。
刚才已经写完了Spring的配置文件
现在来看SpringMVC的配置文件
在web.xml中加载Spring和SPringMVC的配置文件,
在web.xml中配置Spring的监听器来加载Spring容器和Spring的配置文件
在web.xml中添加以下内容
<!--    Spring的配置文件加载-->
    <context-param>
        <param-name>contextConfigLocation</param-name>
        <param-value>classpath:application*.xml</param-value>
    </context-param>

    <!--容器加载的监听器-->
    <listener>
        <listener-class>org.springframework.web.context.ContextLoaderListener</listener-class>
    </listener>
完整的web.xml
<?xml version="1.0" encoding="UTF-8"?>
<web-app xmlns="http://xmlns.jcp.org/xml/ns/javaee"
         xmlns:xsi="http://www.w3.org/2001/XMLSchema-instance"
         xsi:schemaLocation="http://xmlns.jcp.org/xml/ns/javaee http://xmlns.jcp.org/xml/ns/javaee/web-app_4_0.xsd"
         version="4.0"
         metadata-complete="false"
>

    <display-name>Archetype Created Web Application</display-name>

<!--    Spring和Spring 的配置文件加载-->
    <context-param>
        <param-name>contextConfigLocation</param-name>
        <param-value>classpath:*.xml</param-value>
    </context-param>

    <!--容器加载的监听器-->
    <listener>
        <listener-class>org.springframework.web.context.ContextLoaderListener</listener-class>
    </listener>
    <!--    配置Spring MVC的前端控制器-->
    <servlet>
        <servlet-name>DispatcherSevlet</servlet-name>
        <servlet-class>org.springframework.web.servlet.DispatcherServlet</servlet-class>
        <!--    配置初始化参数,用于读取SpringMVC的配置文件-->
        <init-param>
            <param-name>contextConfigLocation</param-name>
            <param-value>classpath:spring-mvc.xml</param-value>
        </init-param>
        <!--    应用加载时创建-->
        <load-on-startup>1</load-on-startup>
    </servlet>

    <servlet-mapping>
        <servlet-name>DispatcherSevlet</servlet-name>
        <url-pattern>/</url-pattern>
    </servlet-mapping>


</web-app>
springmvc的配置文件,只需要完成的两件事情:
- 配置包扫描,扫描指定包下的Controller
- 配置注解驱动,让项目启动时启用注解驱动,并且自动注册HandlerMapping和HandlerAdapter
<?xml version="1.0" encoding="UTF-8"?>
<beans xmlns="http://www.springframework.org/schema/beans"
       xmlns:context="http://www.springframework.org/schema/context"
       xmlns:xsi="http://www.w3.org/2001/XMLSchema-instance"
       xmlns:mvc="http://www.springframework.org/schema/mvc"
       xsi:schemaLocation="
       http://www.springframework.org/schema/beans
       http://www.springframework.org/schema/beans/spring-beans.xsd
       http://www.springframework.org/schema/context
       http://www.springframework.org/schema/context/spring-context.xsd
       http://www.springframework.org/schema/mvc
       http://www.springframework.org/schema/mvc/spring-mvc.xsd
">
    <!--    配置SpringMVC要扫描的包-->
    <context:component-scan base-package="com.liumingkai.controller"/>

    <!--    配置注解驱动 -->
    <mvc:annotation-driven/>
    <!--  配置访问静态资源的访问映射,此配置中的文件将不被DispatcherServlet拦截-->
    <mvc:resources mapping="/js/**" location="/js/"/>

</beans>
测试一下
package com.liumingkai.controller;

import com.liumingkai.service.UserService;
import org.springframework.beans.factory.annotation.Autowired;
import org.springframework.stereotype.Controller;
import org.springframework.web.bind.annotation.RequestMapping;
import org.springframework.web.bind.annotation.ResponseBody;

/**
 * @author 刘明凯
 * @version 0.0.1
 * @date 2023年4月9日 14:28
 */
@Controller
public class UserController {
    @Autowired
    UserService userService;

    @RequestMapping("/getUserById")
    @ResponseBody
    public String getUserById(String uid){
        userService.getUserByUid(uid);
        return "访问成功";
    }
}
访问url,看后台
至此,SSM整合完成
纯注解方式整合SSM框架
就是使用注解类来替代配置文件。
新建一个configuration的包,专门用来存放注解配置类
共有4个配置文件需要我们利用注解类来替换他们
- Spring配置文件
- 扫描Service层
- Spring-mybatis配置文件
- 扫描DAO层
- 注册SqlSessionFactoryBean对象
- 注册DataSource对象
- 加载jdbc.properties
- 注册MapperScannerConfigurer对象,指定包扫描位置
- Spring-mvc配置文件
- 扫描cotroller层
- 配置注解驱动
- 配置静态资源不拦截
实现
首先来创建一个jdbc配置类,来读取并实例化DataSource
package com.liumingkai.configuration;

import com.alibaba.druid.pool.DruidDataSource;
import org.springframework.beans.factory.annotation.Value;
import org.springframework.context.annotation.Bean;
import org.springframework.context.annotation.PropertySource;

import javax.sql.DataSource;

/**
 * @author 刘明凯
 * @version 0.0.1
 * @date 2023年4月9日 14:38
 */
// 等同于 <context:property-placeholder>标签
@PropertySource("classpath:jdbc.properties")
public class JdbcConfig {

    //    等同于
//    <property name="xxx" value="${jdbc.url}">元素
    @Value("${jdbc.driverName")
    private String driver;

    @Value("${jdbc.url")
    private String url;

    @Value("${jdbc.username")
    private String username;
    @Value("${jdbc.password}")
    private String password;

    //    等同于
//    <bean id="dataSource" class="com.xxx">
    @Bean("dataSource")
    public DataSource getDataSource() {
        DruidDataSource ds = new DruidDataSource();
//        依赖注入
        ds.setDriverClassName(driver);
        ds.setUrl(url);
        ds.setUsername(username);
        ds.setPassword(password);
        return ds;
    }
}
新建一个MybatsConfig类,用来提供SqlSessionFactoryBean和MapperScannerConfigurer类
package com.liumingkai.configuration;

import org.mybatis.spring.SqlSessionFactoryBean;
import org.mybatis.spring.mapper.MapperScannerConfigurer;
import org.springframework.beans.factory.annotation.Autowired;
import org.springframework.context.annotation.Bean;

import javax.sql.DataSource;

/**
 * @author 刘明凯
 * @version 0.0.1
 * @date 2023年4月9日 14:37
 */
public class MyBatisConfig {


    @Bean
    public SqlSessionFactoryBean getSqlSessionFactoryBean(DataSource dataSource) {
        SqlSessionFactoryBean ssfb = new SqlSessionFactoryBean();
        ssfb.setDataSource(dataSource);
        return ssfb;
    }

    @Bean
    public MapperScannerConfigurer getMapperScannerConfigurer() {
        MapperScannerConfigurer msc = new MapperScannerConfigurer();
        msc.setBasePackage("com.liumingkai.dao");
        return msc;
    }
}
创建SpringConfig类,用来作为所有Bean的源头
package com.liumingkai.configuration;

import org.springframework.context.annotation.ComponentScan;
import org.springframework.context.annotation.Configuration;
import org.springframework.context.annotation.Import;

/**
 * @author 刘明凯
 * @version 0.0.1
 * @date 2023年4月9日 14:33
 */
//将MybaitsConfig 和 JdbcConfig交给SpringConfig
@Configuration
@ComponentScan("com.liumingkai.service")
@Import({MyBatisConfig.class,JdbcConfig.class})
public class SpringConfig {

}
SpringMVC 的配置类
package com.liumingkai.configuration;

import org.springframework.context.annotation.ComponentScan;
import org.springframework.context.annotation.Configuration;
import org.springframework.web.servlet.config.annotation.EnableWebMvc;

/**
 * @author 刘明凯
 * @version 0.0.1
 * @date 2023年4月9日 14:56
 */

@Configuration
@ComponentScan("com.liumingkai.controller")
// 等同于 <mvc:annotation-driven />但不完全相同
@EnableWebMvc
public class SpringMvcConfig {
}
接下来就是如何整合web.xml这个配置文件了,也可以使用配置类来替代web.xml
Spring提供了一个类AbstractAnnotationConfigDispatcherServletInitializar,任意继承此类的类,都会在项目启动时自动配置DispatcherServlet、初始化Spring容器和SpringMVC容器
继承此类需要实现的方法:
getRootConfigClasses()
将Spring配置类的信息加载的Spring容器中
getServletConfigClasses()
将SpringMVC配置类的信息加载到SpringMVC容器中
getServletMappings()
可以指定DispatcherServlet的映射路径
AbstractAnnotationConfigDispatcherServletInitializer类中还有很多普通方法,可以实现对web项目的配置,如果有需要可以配置,例如配置编码格式
package com.liumingkai.configuration;

import org.springframework.web.servlet.support.AbstractAnnotationConfigDispatcherServletInitializer;


/**
 * @author 刘明凯
 * @version 0.0.1
 * @date 2023年4月9日 15:01
 */

public class ServletContainerConfig extends AbstractAnnotationConfigDispatcherServletInitializer {


    @Override
    protected Class<?>[] getRootConfigClasses() {
        return new Class[]{SpringConfig.class};
    }

    @Override
    protected Class<?>[] getServletConfigClasses() {
        return new Class[]{SpringMvcConfig.class};
    }

    @Override
    protected String[] getServletMappings() {
        return new String[]{"/"};
    }
}
启动项目,测试

至此,纯注解的方式实现Web开发已经完成.